Getting Started
Provides initial procedures for getting started with the device.
Components
|
|
|
|
| BioEntry P2 | Wall Bracket | Drilling Template | Connection Cables |
|
|
|
|
| Diode | 120 Ω Resistor | PVC Anchors x2 | Fixing Screws x2 |


|
|
|
| Bracket Fixing Screw (Star Shaped) | Quick Guide | Open Source Software Guide |


- Components may vary according to the installation environment.
- When assembling the product with the bracket, you can use the included bracket fixing screw (Star Shaped) instead of the product fixing screw for enhanced security.
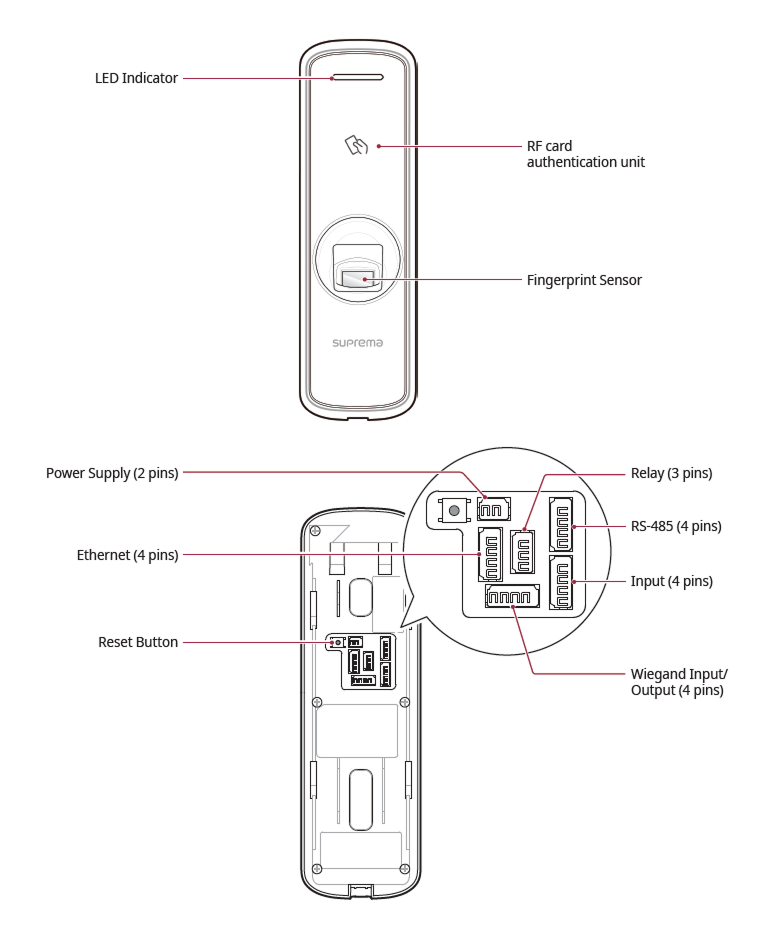
Name and function of each part
-
LED Indicator: Indicates the operational status of the device with the color of the LED.
-
Green: Authentication success.
-
Red: Authentication failure.
-
Blue/Cyan blinking: Normal operation.
-
Blue/Green blinking:
-
When setting DHCP to use, unable to retrieve IP address.
-
When in Slave mode, the connection to the master device is disconnected.
-
When Initializing Network Settings.
-
-
Green blinking: Waiting for input.
-
-
RF Card Recognition Part: This is the part that recognizes RF cards for access.
-
Fingerprint Recognition Unit: The part that recognizes the fingerprint for access.
-
Power Supply (2-pin): Connects the power supply cable.
-
Relay (3-pin): Connect the Relay cable.
-
Ethernet (4-pin): Connect the Ethernet cable.
-
RS-485 (4-pin): Connect the RS-485 cable.
-
Input (4-pin): Connect the input cable.
-
Wiegand Input/Output (4-pin): Connect the Wiegand Input/Output cable.
-
Reset Button
-
Initializes network settings. For more information on initializing network settings, refer to Initialize Network Settings.
-
Deletes all information and certificates stored on the device and initializes the settings. For more information on factory initialization, refer to Factory default.
-
Cables and connectors
Power

| Pin | Name | Color |
|---|---|---|
| 1 | PWR +VDC | Red (White stripe) |
| 2 | PWR GND | Black (White stripe) |
Relay

| Pin | Name | Color |
|---|---|---|
| 1 | RLY NO | White |
| 2 | RLY COM | Blue |
| 3 | RLY NC | Orange |
RS-485

| Pin | Name | Color |
|---|---|---|
| 1 | 485 TRXP | Blue |
| 2 | 485 TRXN | Yellow |
| 3 | 485 GND | Black |
| 4 | SH GND | Gray |
Input

| Pin | Name | Color |
|---|---|---|
| 1 | INPUT0 | Red |
| 2 | INPUT1 | Yellow |
| 3 | INPUT GND | Black |
| 4 | SH GND | Gray |
Wiegand Input and Output

| Pin | Name | Color |
|---|---|---|
| 1 | WG D0 | Green |
| 2 | WG D1 | White |
| 3 | WG GND | Black |
| 4 | SH GND | Gray |
Ethernet

| Pin | Name | Color |
|---|---|---|
| 1 | ENET RXN | Yellow |
| 2 | ENET RXP | Green |
| 3 | ENET TXN | Red |
| 4 | ENET TXP | Black |
Correct fingerprint input method
In order to improve the fingerprint authentication rate, enroll the fingerprint correctly. This product can authenticate fingerprints even if the user's fingerprint input angle and position change. If you enroll the fingerprint with attention to the following matters, the authentication rate can be improved.
Selecting a finger for fingerprint input

-
In preparation for the case that the fingerprint of a specific finger cannot be used, for example if the user is lifting a load with one hand or a finger gets hurt, up to 10 fingerprints for each user can be enrolled.
-
In the case of a user whose fingerprint cannot be recognized well, the authentication rate can be improved by enrolling the same finger twice repeatedly.
-
If a finger has a cut or the fingerprint is blurry, select another finger for the fingerprint.
-
It is recommended to use the index finger or the middle finger when scanning the fingerprint. The authentication rate can be reduced if it is difficult to place another finger at the center of fingerprint sensor accurately.
Fingerprint enroll method
- Place the finger you want to enroll on the fingerprint recognition unit and gently press it so that the fingerprint is authenticated well.

- After the "beep" sound, scan the fingerprint of the enrolled finger again. (scan the fingerprint of a finger to be enrolled twice)
Cautions for fingerprint enrollment
When a fingerprint is recognized, it is compared with the initially enrolled fingerprint, so the initial fingerprint enroll is the most important. Pay attention to the following matters when enrolling the fingerprint.

-
Place the finger deep enough to contact with the sensor completely.
-
Place the center of the fingerprint in the center of the sensor.
-
If a finger has a cut or the fingerprint is blurry, select another finger for the fingerprint.
-
Scan the fingerprint correctly without moving according to the instruction on the screen.
-
If you make the finger upright so that the contact area with the sensor is decreased or the angle of finger is warped, fingerprint authentication may not be performed.
If fingerprint authentication does not work well
This product can authenticate fingerprints regardless of seasonal changes or changes in the condition of the fingers. However, the authentication rate may vary according to the external environment or fingerprint input method. If the fingerprint authentication cannot be done smoothly, it is recommended to take the following measures.
-
If the finger is smeared with water or sweat, dry off the finger and then scan the finger.
-
If the finger is too dry, blow your breath on the fingertips and then scan the finger.
-
If the finger has a cut, enroll the fingerprint of another finger.
-
Since the initially enrolled fingerprint is often not input correctly, please re-enroll the fingerprint according to the Cautions for fingerprint enrollment.