Getting Started
Provides initial procedures for getting started with the device.
Components
|
|
|
|
| BioEntry W3 | Wall Bracket | Quick Guide | Open Source Software Guide |


|
|
|
|
|
| Fixing Screws x2 | Bracket Fixing Screw (Star Shaped) | Shrink Tube | Diode | 120 Ω Resistor x2 |

- Components may vary according to the installation environment.
- When assembling the product with the bracket, you can use the included bracket fixing screw (Star Shaped) instead of the product fixing screw for enhanced security.
Name and function of each part

-
Visual Camera: Capture an actual face image.
-
Infrared Camera: Capture the infrared face image.
-
Display: Indicates user authentication result.
-
RF card and mobile access card authentication unit: Part to scan a RFID card or mobile access card for entrance.
-
LED Indicator: Indicates the operational status of the device with the color of the LED.
-
Green: Authentication success.
-
Red: Authentication failure.
-
Blue/Cyan blinking: Normal operation.
-
Blue/Green blinking:
-
When setting DHCP to use, unable to retrieve IP address.
-
When in Slave mode, the connection to the master device is disconnected.
-
-
Red/Purple blinking: Device is locked.
-
Green blinking: Waiting for input.
-
-
Cable
Power / Ethernet / RS-485 / Wiegand Input/Output / Input / Relay
-
Speaker: Delivers sound.
-
Reset Button
-
Initializes network settings. For more information on initializing network settings, refer to Initialize Network Settings.
-
Deletes all information and certificates stored on the device and initializes the settings. For more information on factory initialization, refer to Factory default.
-
-
USB (Type-C) Memory Slot: Connects the USB memory.
Cable
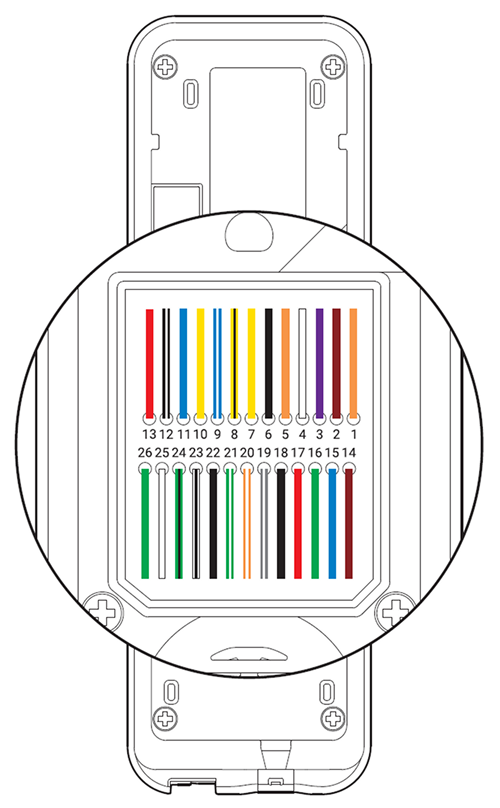
There are various conductors of size AWG 26, which should be protected with standard sheathing or equivalent material when wiring. Also, ensure the lead does not contact conductors larger than 18 AWG (0.82 mm2).
1) In the standard firmware, only RS485_0 (pins 8 and 9) is supported. RS485_1 (pins 10 and 11) can only be used with custom firmware. If you need to use both RS485_0 and RS485_1, please contact the Suprema Global Technical Support Team.
Correct face enrollment and authentication method
Cautions for enrolling a faces
- Keep the distance between the device and your face at 60-100 cm when enrolling your face.
-
Do not change your face expression.
-
Do not wear masks, hats, or eye patches.
-
Do not enroll a face wearing a mask. It may increase the False Acceptance Rate (FAR) if both faces with and without a mask are enrolled.
-
Do not raise head up or lower head.
-
Do not wear thick makeup.
-
Do not close your eyes.
-
Make sure that both of your shoulders correctly appear on the screen.
-
Stand still and enroll your face by staring at the screen.
-
Be careful not to display two faces on the screen. Enroll one person at a time.
-
If you do not follow the instructions on the screen, the face enrollment may take longer or may fail.
Cautions for authenticating a face
-
Ensure that the face appears in the center of the device’s screen. When the guideline is displayed, follow the instructions shown on the screen to authenticate the face.
-
If a part of the face is covered with a hat, a mask, an eye patch, or sunglasses authentication may fail. Do not cover the face; allow the device to recognize both the eyebrows and the face.
-
Authenticate at a location 60~100 cm away from the device.
-
Make sure that both of your shoulders correctly appear on the screen. Authentication may fail if your shoulders are not at the same height. Stand still, and then authenticate your face.