Authentication
Describes the supported authentication methods and authentication procedures.
Authentication mode
Set the authentication mode. You can combine Fingerprint, PIN, Card, and ID for authentication mode, and you can also set schedules for each authentication mode.
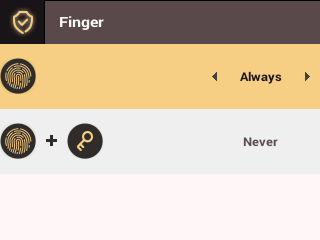
Fingerprint authentication mode
You can set schedules for each authentication method that uses fingerprints.
-
Press
 and authenticate with the administrator credential.
 -
Select AUTHENTICATION → Auth Mode → Finger and then press OK.
-
Select the desired item and press / to set the schedule.
-
 : Mode that uses only fingerprints.
 -
+
 : Mode that authenticates using fingerprints followed by entering PIN.
-
-
Press OK to save the settings.
-
Schedule can be set in BioStar X. If no schedule is set, only Always can be selected.
-
For more information about the Schedule settings, please refer to the BioStar X Administrator Guide.
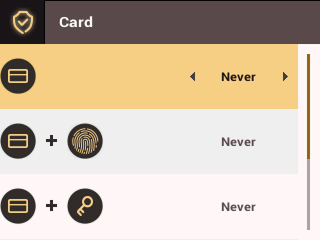
Card Authentication Mode
You can set schedules for each authentication method that uses cards.
-
Press
and authenticate with the administrator credential. -
Select AUTHENTICATION → Auth Mode → Card and then press OK.
-
Select the desired item and press / to set the schedule.
-
 : Mode that uses only cards.
 -
+ : Mode that authenticates using cards followed by fingerprints.
-
+ : Mode that authenticates using cards followed by entering PIN.
-
+ / : Mode that authenticates using cards followed by either fingerprints or entering PIN.
-
+ + : Mode that uses both fingerprint authentication and PIN entry after using a card.
-
-
Press OK to save the settings.
-
Schedule can be set in BioStar X. If no schedule is set, only Always can be selected.
-
For more information about the Schedule settings, please refer to the BioStar X Administrator Guide.
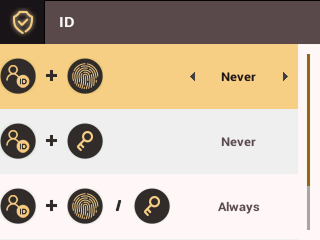
ID Authentication Mode
You can set schedules for each authentication method that uses IDs.
-
Press
and authenticate with the administrator credential. -
Select AUTHENTICATION → Auth Mode → ID and then press OK.
-
Select the desired item and press / to set the schedule.
-
 + : Mode that authenticates using ID followed by fingerprints.
 -
+ : Mode that authenticates using ID followed by entering PIN.
-
+ / : Mode that authenticates using ID followed by either fingerprints or entering PIN.
-
+ + : Mode that uses both ID authentication and PIN entry after using a fingerprint.
-
-
Press OK to save the settings.
-
Schedule can be configured in BioStar X. If no schedule is set, only Always can be selected.
-
For more information about the Schedule settings, please refer to the BioStar X Administrator Guide.
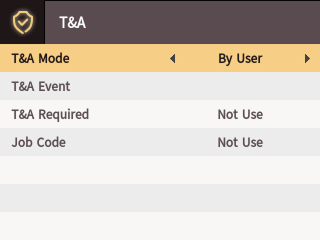
Attendance Mode
You can set how to register T&A mode.
-
Press
and authenticate with the administrator credential. -
Select AUTHENTICATION → T&A, then click OK.
-
Select the desired item and press / to change the settings.
-
T&A Mode: Set how to use attendance mode.
-
T&A Event: You can check attendance events.
-
T&A Required: Set to require a user to select a T&A event when authenticating.
-
Job Code: Set whether to use the job code.
-
-
Press OK to save the settings.
Server matching
You can set up server matching. When server matching is used, authentication is performed on BioStar X without authentication on the device. It can be used when the device has too much user information or when the device is installed outside.
-
Press
and authenticate with the administrator credential. -
Select AUTHENTICATION → Server Matching and then press OK.

-
Press / to change the settings.
-
Press OK to save the settings.
-
You can only use Server Matching with Fingerprint, Card, and ID.
-
If using Server Matching, you must enable server matching on both the device and BioStar X. For more information on BioStar X server matching settings, please refer to the BioStar X Administrator Guide.
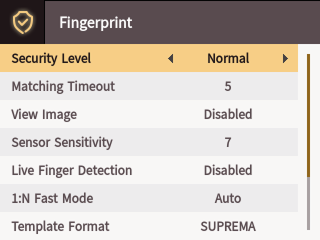
Fingerprint Settings
You can change the settings for fingerprint authentication.
-
Press
and authenticate with the administrator credential. -
Select AUTHENTICATION → Fingerprint and then press OK.
-
Select the desired item and press / to change the settings.
-
Security Level: You can set the security level for 1:N authentication.
-
Matching Timeout: Set the wait time for fingerprint matching. If authentication is not completed within the specified time, it will fail.
-
View Image: The original image of the scanned fingerprint can be viewed.
-
Sensor Sensitivity: Set the sensitivity of the fingerprint recognition sensor. Set the sensitivity higher to obtain precise fingerprint information.
-
Live Finger Detection: Set the fake fingerprint detection level. Higher levels for fake fingerprint detection may also increase rejection rates for actual people’s fingerprints.
-
1:N Fast Mode: Set the speed of fingerprint authentication. When you select Auto, authentication speed is set according to the total number of fingerprint templates enrolled in the device.
-
Template Format: Set the fingerprint template format. SUPREMA is set as default. Changing the template format will make all previously saved fingerprints unusable, so take care when changing.
InfoDelete all user fingerprint information and then change the template format. If user fingerprint information is enrolled, you cannot change the template format.
-
Sensor Mode: Set to Auto On to turn on the fingerprint sensor when it detects the user’s finger. When set to Always On, the sensor remains on even when not scanning fingerprints.
-
Advanced Enrollment: Assess the quality of scanned fingerprints to save high-quality fingerprint information. Enable to notify the user when fingerprint quality is low, helping them scan fingerprints correctly.
-
Duplicate Check: Check for duplicate fingerprints when enrolling.
-
-
Press OK to save the settings.