User
Describes how to register, edit, delete, and manage users.
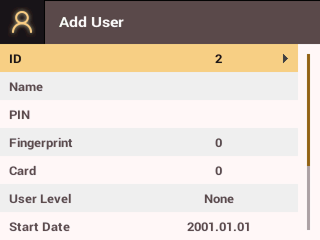
Registering user information
You can register user information that includes biometric authentication data.
-
Press
 and authenticate with the administrator credential.
 -
Select USER → Add User and then press OK.
-
Select the desired item and press the button. After configuring the item, press OK to register user information.
-
ID: Enter a number between 1 and 4294967295 to register a user ID. If User ID Type is set to Alphanumeric, you can use a combination of alphanumeric characters and symbols
_-as the ID, with a maximum of 32 characters. -
Name: You can enter the user name using the numeric buttons. Press the / buttons to select letters or numbers, and press F1/F2 to see more characters.
-
PIN: You can enter the PIN you want to use. Enter the PIN and press OK. To confirm, enter the PIN again and press OK. To prevent leaks, input a PIN of 4 to 16 digits.
InfoWhen using Master Admin feature, enter at least an 8-digit number.
-
Fingerprint: You can enroll a fingerprint for user authentication. After scanning the fingerprint of the finger to be enrolled, scan the same finger's fingerprint once more.
-
Card: You can enroll a card for user authentication. Scan the card to assign to the user.
-
User Level: You can select permissions to assign to the user.
InfoAvailable menus vary according to the set user level.
-
None: This is a general user level, and the menu is not available.
-
Administrator: You can use all menus.
-
Configuration: You can use the menus AUTHENTICATION, DISPLAY & SOUND, DEVICE, NETWORK, EVENT LOG.
-
User Mgmt: You can use the menus USER, EVENT LOG.
-
-
Start Date: You can set the date to start using the user account. Press the numeric buttons to enter the date. Use the button to delete the entered date, and the button to insert a separator.
-
Expiration Date: You can set the date to stop using the user account. Press the numeric buttons to enter the date. Use the button to delete the entered date, and the button to insert a separator.
-
Security Level: You can set the security level for 1:1 authentication.
-
Duress: Select to enroll a duress fingerprint. If you are coerced by someone or need to open the door forcefully, authenticating with this fingerprint can send an alarm signal to BioStar X.
-
Private Auth Mode: You can change the authentication method for each user. Select the desired item and change the setting with the / buttons.
-
Modifying User Information
The user administrator or super administrator can modify registered user information. You can add the user's fingerprint or card and modify the PIN and permissions.
-
Press
and authenticate with the administrator credential. -
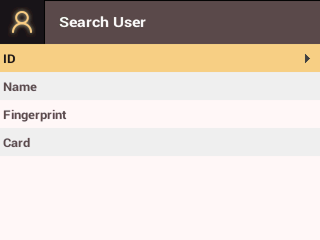
Select USER → Search User and then press OK.
-
Select the search method to use and press the button. You can search for users with ID, Name, Fingerprint, Card.
- If you press OK without selecting a search method, the entire user list will appear.
-
Select the user you wish to modify and press F2. Refer to Registering user information to modify the information.
- To delete a user, press F3 and then OK.
Access Group can be registered in BioStar X. For detailed information on registering an Access Group, please refer to the BioStar X Administrator Guide.
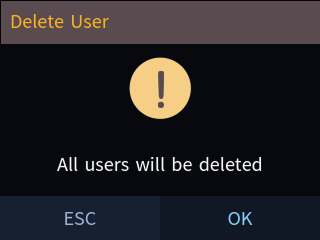
Delete All Users
You can delete all registered users at once.
-
Press
and authenticate with the administrator credential. -
Select USER → Delete User and then press OK.
-
Press OK to delete all users. Press ESC to return to the previous screen.
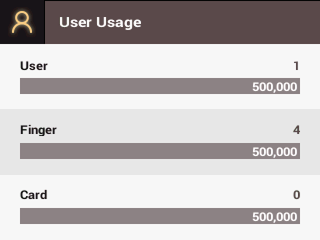
View User Usage
You can view the number of enrolled users, fingerprints, and cards at a glance.
-
Press
and authenticate with the administrator credential. -
Select USER → User Usage and then press OK. User usage information appears.