User
Describes how to register, edit, delete, and manage users.
Registering user information
You can register user information that includes biometric authentication data.
-
Press
 and authenticate with the Admin level credential.
 -
Select USER →
 and set the desired items. User usage information appears.
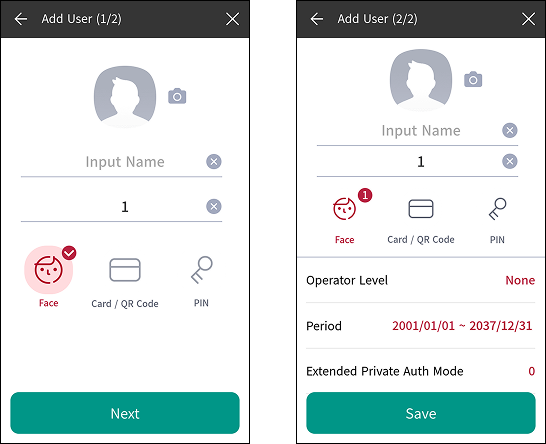
-
 : Register a user photo.
 -
Name: Enter the user name.
-
ID: Enter a number between 1 and 4294967295 to register a user ID. If User ID Type is set to Alphanumeric, you can use a combination of alphanumeric characters and symbols
_-as the ID, with a maximum of 32 characters. -
Face: You can enroll a face for user authentication. Press Face → Next and follow the instructions on the screen to enroll your face. To add more faces, press
. Please refer to Enrolling user faces to learn more about face enrollment. -
Card / QR Code: You can enroll a card for user authentication. Press Card / QR Code → Next, then scan the card to assign it to the user at the RF card authentication unit. To enroll more cards, press Card / QR Code →
. -
PIN: You can enter the PIN you want to use. Press PIN → Next and enter the PIN you want to use. For confirmation, enter the PIN once more and then press OK. Enter a 4- to 16-digit PIN to prevent it from being exposed.
InfoWhen using Master Admin feature, enter at least an 8-digit number.
-
Operator Level: You can select permissions to assign to the user.
InfoAvailable menus vary according to the set user level.
-
None: This is a general user level, and the menu is not available.
-
Administrator: You can use all menus.
-
Configuration: You can use the menus AUTHENTICATION, DISPLAY & SOUND, DEVICE, NETWORK, EVENT LOG.
-
User Management: You can use the menus USER, EVENT LOG.
-
-
Period: You can set the duration for using the user account.
-
Extended Private Auth Mode: You can set the extended personal authentication mode. This mode allows you to combine user authentication methods, including both faces. Otherwise, you can use the device’s basic authentication mode.
-
-
Press Save to complete the registration of user information.
Enrolling user faces
-
Press
and authenticate with the Admin level credential. -
Select USER →
. -
Press Face → Next.
-
Adjust a distance between the face and screen and look straight at the camera of the device.
-
After the shooting is complete, press OK → Save. To retake your face picture, press Re-Shot.
Info-
The visual face data of this product are not compatible with face templates of FaceStation 2 or FaceLite.
-
Face information for this product can also be batch enrolled by uploading a photo in BioStar X or importing a CSV file, not just on the device. You can also enroll visual face with your smartphone via a link sent from BioStar 2. For detailed information on each enrollment method, please refer to the BioStar X Administrator Guide.
-
To use a Visual Face feature correctly, take a picture by following instructions below.
- Keep the distance between the device and your face at 60-100 cm when enrolling your face.
-
Do not change your face expression.
-
Do not wear masks, hats, or eye patches.
-
Do not enroll a face wearing a mask. It may increase the False Acceptance Rate (FAR) if both faces with and without a mask are enrolled.
-
Do not raise head up or lower head.
-
Do not wear thick makeup.
-
Do not close your eyes.
-
Make sure that both of your shoulders correctly appear on the screen.
-
Stand still and enroll your face by staring at the screen.
-
Be careful not to display two faces on the screen. Enroll one person at a time.
-
If you do not follow the instructions on the screen, the face enrollment may take longer or may fail.
-
Modifying User Information
User Management or Administrator can modify the registered user information. A card or face can be added, and PIN and level can be modified.
-
Press
and authenticate with the Admin level credential. -
Click USER →
 .
. -
Select your search terms. You can search for users using All, User ID, Name, Face, Card.
-
Select the user to modify.
-
Modify the information by referring to Registering user information and press OK.
- To delete a user, select
 and then press OK.
- To delete a user, select
Access Group can be registered in BioStar X. For detailed information on registering an Access Group, please refer to the BioStar X Administrator Guide.
Delete All Users
You can delete all registered users at once.
-
Press
and authenticate with the Admin level credential. -
Select USER →
. -
Select Delete All to check, then press OK.
-
To delete all users, press OK.
View User Usage
You can see the number of registered users, faces, and cards at a glance.
-
Press
and authenticate with the Admin level credential. -
Press USER →
 . User usage information appears.