Authentication
Describes the supported authentication methods and authentication procedures.
Authentication mode
Set the authentication mode. You can combine Face, PIN, Card, and ID for authentication mode, and you can also set schedules for each authentication mode.
Registering auth mode
-
Click
 and authenticate with administrator privileges.
 -
Press AUTHENTICATION → Auth Mode.
-
Select
 .
. -
Press
 to see the credentials that can be added on the screen. Select the credentials to add. You can delete the added credentials by pressing
  when credentials are added.
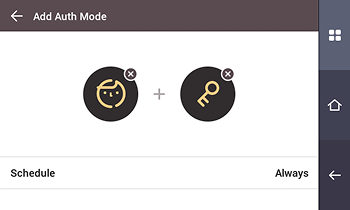
-
After setting the desired authentication mode, set Schedule.
Category Description Face -  : This mode uses only facial authentication.
- +  : This mode authenticates with face and then enters the PIN.
Card -  : This mode uses only card authentication.
- + : This mode authenticates with card and then with face.
- + : This mode authenticates with card and then enters the PIN.
- + / : This mode authenticates with card and then with face or enters the PIN.
- + + : This mode uses both face authentication and PIN entry after authenticating with the card.ID -  + : This mode enters the ID and then authenticates with face.
- + : This mode enters the ID and then enters the PIN.
- + / : This mode enters the ID and then either authenticates with face or enters the PIN.
- + + : This mode uses both face authentication and PIN entry after entering the ID.Info-
Schedule can be configured in BioStar X. If no schedule is set, only Always can be selected.
-
For more information about the Schedule settings, please refer to the BioStar X Administrator Guide.
-
-
To save the settings, press OK.
Modifying auth mode
-
Click
and authenticate with administrator privileges. -
Press AUTHENTICATION → Auth Mode.
-
Select the authentication mode to modify.
-
Modify the authentication mode by referring to Registering auth mode and press OK.
Delete auth mode
-
Click
and authenticate with administrator privileges. -
Press AUTHENTICATION → Auth Mode.
-
Press
 and select the authentication mode to delete. You can select multiple options.
 -
To delete the selected item, press OK.
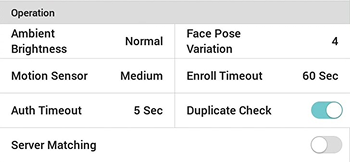
Operation
-
Click
and authenticate with administrator privileges. -
After pressing AUTHENTICATION, change the desired item in Operation.
-
Ambient Brightness: Adjusts the intensity of the IR LED by detecting ambient brightness. Change settings according to the installation environment.
-
Motion Sensor: Set the sensitivity to detect motion around the device. When Motion Sensor is set to Off, touch the screen to authenticate your face.
-
Auth Timeout: If authentication is not completed within the set time, authentication fails.
-
Server Matching: When server matching is set, the device does not perform user authentication; BioStar X performs user authentication. It can be used when the device has too much user information or when the device is installed outside.
Info-
Server Matching can only use cards and IDs.
-
If you use Server Matching, you must enable server matching on both the device and BioStar X. For more information on BioStar X server matching settings, please refer to the BioStar X Administrator Guide.
-
-
Face Pose Variation: Set the sensitivity for face position, angle, and distance when registering a face. Set high for precise face templates.
-
Enroll Timeout: If the face is not enrolled within the set time, the face registration will be canceled.
-
Duplicate Check: You can check for duplicate faces during face registration.
-
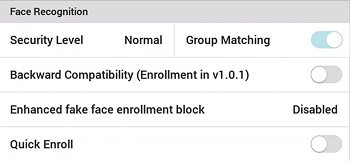
Facial recognition
You can change the configuration for facial authentication.
-
Click
and authenticate with administrator privileges. -
After pressing AUTHENTICATION, change the desired item in Face Recognition.
-
Security Level: You can set the security level for 1:N authentication.
-
Group Matching: You can check whether group matching is used. Using group matching allows you to group multiple users' faces to increase authentication speed.
-
Backward Compatibility (Enrollment in v1.0.1): Enable this option if the firmware of the device that registers face templates is v1.0.1 or earlier.
-
Enhanced fake face enrollment block: This can prevent user registration using spoofed faces such as photos. You can set the intensity from Level 1 to Level 3, and as the level increases, the inspection intensity strengthens.
-
Quick Enroll: You can set whether to use fast face registration. When fast face registration is enabled, the face registration process is set to one step, and when disabled, it is set to three steps.
Info-
Group Matching can be set in BioStar X.
-
If Enhanced fake face enrollment block is set to a high level, the registration of real faces may be rejected. If the registration fails, try again or lower the inspection intensity.
-
To register high-quality face templates, disable Quick Enroll.
-
-
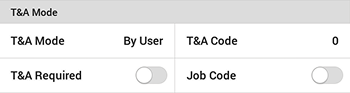
Attendance Mode
You can set how to register T&A mode.
-
Click
and authenticate with administrator privileges. -
Click AUTHENTICATION, then change the desired item in T&A Mode.
-
T&A Mode: Set how to use attendance mode.
-
T&A Code: Register T&A events.
-
T&A Required: Set to require a user to select a T&A event when authenticating. Available when T&A Mode is set to By User.
-
Fixed T&A Key: Set to use only a T&A event selected by the administrator. Available when T&A Mode is set to Fixed.
-
Job Code: Set whether to use the job code.
-