Settings
Provides instructions on how to set system and device configurations.
Display & Sound
You can change the display and sound settings of the device.
-
Click
 and authenticate with administrator privileges.
 -
Click DISPLAY & SOUND.
-
Change the desired item.
-
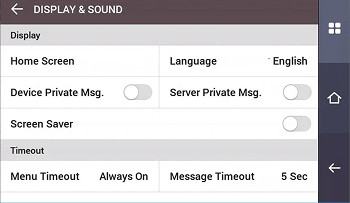
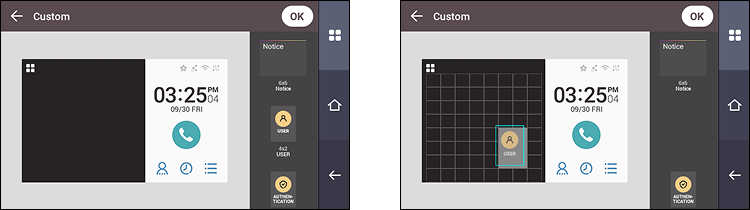
Home Screen: You can choose items to display in the background of the home screen. Selecting the custom style allows you to modify the home screen directly. Long press the desired object and drag it to edit the home screen.
-
Language: You can select the language that will be displayed on the screen.
-
Device Private Msg.: Set whether to use a Private Message, which will be displayed on the screen when the user authenticates. The Device Private Msg. can be set using the BioStar Device SDK. If not set, does not display a message when authentication is successful even if Device Private Msg. is enabled on the device.
-
Server Private Msg.: Set whether to use a Private Message, which will be displayed on the screen when the user authenticates. Server Private Msg. can be set using the BioStar X API. If not set, does not display a message when authentication is successful even if Server Private Msg. is enabled on the device.
-
Screen Saver: Set whether the screen saver is enabled or not. It reduces unnecessary energy consumption by lowering the brightness of the screen when the device is not in use.
-
Menu Timeout: Set the time (sec) for the menu screen to disappear automatically. If there is no button input during a set time, the screen will return to the home screen.
-
Message Timeout: Set the time (sec) for a setting complete message or notification message to disappear automatically.
-
Backlight Timeout: Set the time (sec) to turn off the lighting of the screen.
-
Voice Instruction: You can use voice guidance instead of notification tones.
-
Volume: Set the volume.
-
For more information on the BioStar Device SDK, refer to the BioStar Device SDK page on the Suprema Knowledge Base.
Network
You can change the communication settings of devices such as Ethernet, server, and serial communication.
Ethernet
-
Click
and authenticate with administrator privileges. -
Select NETWORK → Ethernet.
-
Change the desired item.
-
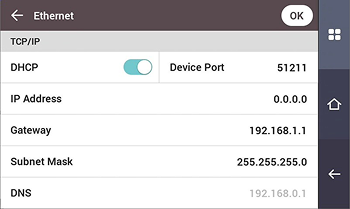
DHCP: Set whether to use DHCP. If DHCP setting is disabled, the user can modify IP Address, Gateway, and Subnet Mask.
-
Device Port: Set the device's port.
-
IP Address: You can check the device's IP address. To modify, disable DHCP setting.
-
Gateway: You can check the device's gateway. To modify, disable DHCP setting.
-
Subnet Mask: You can check the device's subnet mask. To modify, disable DHCP setting.
-
DNS: Set the DNS server address.
-
-
To save the settings, press OK.
Ethernet cannot be used with Wireless.
Wireless
-
Click
and authenticate with administrator privileges. -
Select NETWORK → Wireless.
-
The list of networks available to connect will be displayed.

-
Select the network you wish to connect to and enter the password. When you press OK, the connection to the wireless network will be made.
-
Press
 for the wireless network you want to use, and turn off DHCP to modify IP Address, Gateway, and Subnet Mask.
-
Wireless is only available for the FS2-AWB model.
-
Wireless cannot be used with Ethernet.
-
To connect to Wireless, a wireless router is required. For content regarding the installation and configuration of wireless router, refer to the user’s manual of the wireless router.
Server
-
Click
and authenticate with administrator privileges. -
Select NETWORK → Server.
-
Change the desired item.
-
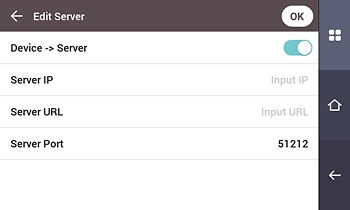
Device → Server: You can send a connection signal from the device to a server with the input information directly. When Device → Server is enabled, the user can input Server IP, Server URL, and Server Port.
-
Server IP: Enter the IP address of the PC on which BioStar X is installed.
-
Server URL: You can enter Server URL instead of Server IP.
-
Server Port: Enter the port of the PC on which BioStar X is installed.
-
-
To save the settings, press OK.
Serial communication settings
-
Click
and authenticate with administrator privileges. -
Press NETWORK and change the desired item in Serial Setting.

-
RS-485: Select the RS-485 mode.
-
Baud Rate: Select the desired baud rate.
-
Device
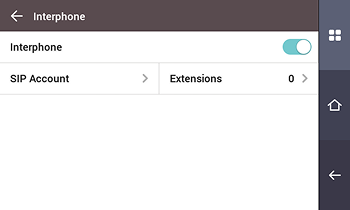
Intercom
You can configure the account and extensions of the SIP intercom.
-
Click
and authenticate with administrator privileges. -
Click DEVICE → Interphone.
-
Interphone: You can set whether to enable the intercom. Enabling intercom settings allows you to configure SIP Account and Extensions.
-
SIP Account: Enter each item so that the device can be registered on the SIP server.
-
Extensions: Add, delete, or edit extension numbers.
-
Relay
You can set the input ports of Open Time and Exit Button on the device.
-
Click
and authenticate with administrator privileges. -
Click DEVICE → Relay.
-
Relay: You can set whether relay is enabled or not. Enabling relay settings will allow you to configure Open Time and Exit Button.
-
Open Time: Set the duration for the door to remain open when standard user authentication has been carried out.
-
Exit Button: Select the input port connected to the exit button.
-
Switch: Select the type of switch (N/O or N/C) for the Exit Button's input port.
-
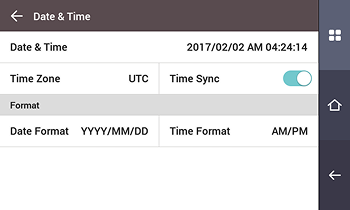
Date & Time
You can set date and time. Set the date and time accurately in order to collect accurate log data.
-
Click
and authenticate with administrator privileges. -
Click DEVICE → Date & Time.
-
Change the desired item.
-
Date & Time: Check the current date and time. To modify it manually, disable Time Sync.
-
Time Zone: Set the time reference of the current location.
-
Time Sync: Synchronize the server and the time. If you wish to synchronize the server and the time, enable Time Sync.
-
Date Format: You can set the date format. You can select YYYY/MM/DD, MM/DD/YYYY, and DD/MM/YYYY.
-
Time Format: You can set the time format. You can select AM/PM and 24-Hour.
-
Daylight saving time
You can use the device by applying daylight saving time. Set the start and end time correctly.
-
Click
and authenticate with administrator privileges. -
Click DEVICE → Daylight Saving Time, then press
 to add daylight savings time.
 -
Change the desired item.
-
Name: You can view the name of the daylight savings time.
-
Start Month / Start Week / Start Day / Start Time: Set details of when daylight-saving time begins.
-
End Month / End Week / End Day / End Time: Set details of when daylight-saving time ends.
-
-
To save the settings, press OK.
Device Information
You can view the model name, device ID, serial number, device and firmware version, kernel, and MAC address.
-
Click
and authenticate with administrator privileges. -
Select DEVICE → Device Info. You can view the information for Model Name, Device ID, Serial No., HW, FW, Kernel, MAC, and WiFi MAC.
The WiFi MAC item is only available on the FS2-AWB model.
Memory information
View the status of memory usage.
-
Click
and authenticate with administrator privileges. -
Select DEVICE → Memory Info. You can view the memory usage status of the device.
USB memory
Connect USB Memory and import user information to the device or export log and user information from the device. You can also upgrade the firmware.
-
Click
and authenticate with administrator privileges. -
Select DEVICE → USB Memory.
-
Select the desired item and change the setting.
-
Import: Import user information from the connected USB memory.
-
Export: Select information you wish to export to the connected USB memory.
-
FW Upgrade: Upgrade the firmware if the firmware files are saved in the connected USB memory.
-
Do not disconnect the power supply while upgrading the firmware of the device. The device may malfunction.
Secure Tamper
You can set whether to use security tamper. When the tamper is turned on, you can set to delete the entire user, the entire log, and the security key.
-
Click
and authenticate with administrator privileges. -
Select DEVICE.
-
Activate Secure Tamper to delete data of all registered users, all logs, and secure keys when a temper event occurs.
Restart device
The user can restart the device.
-
Click
and authenticate with administrator privileges. -
Select DEVICE → Restart Device.
-
Press OK to restart the device. Press Cancel to return to the previous screen.
Restore default
Device settings, network settings, and operator levels will be reset.
-
Click
and authenticate with administrator privileges. -
Select DEVICE → Restore Default.
-
All settings: Initializes all settings stored on the device. To initialize all device settings, press OK → OK. Press Cancel to return to the previous screen.
-
Keep Network Settings: Initializes all settings except for network settings. To initialize all settings except network settings, press OK → OK. Press Cancel to return to the previous screen.
-
Factory Default: Deletes all information saved in the device and the root certificate, restoring settings to default.
-
Delete the Root Certificate: Deletes the root certificate saved in the device.
-
-
If you proceed with Restore Default, the device will restart.
-
When you reset, the operator level will be reset as well. After resetting, make sure to set the operator level again.
-
Language setting will not change after resetting.
-
The Factory Default menu can be used when the root certificate is saved in the device.
-
The Delete the Root Certificate menu can be used only when the root certificate is saved in the device and an administrator has been designated.
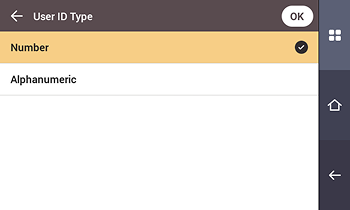
User ID type
Select the type of user ID to register to the device.
-
Click
and authenticate with administrator privileges. -
Select DEVICE → User ID Type.
-
Number: You can enter a user ID with numbers only.
-
Alphanumeric: You can enter a user ID using alphanumeric characters and certain symbols
_-.
-
-
After changing to the desired item, press OK.
Thermal camera
The device can measure the temperature of users passing through the entrance by linking with the thermal camera and restrict access for users exceeding the reference temperature.
-
Click
and authenticate with administrator privileges. -
Select DEVICE → Thermal Camera.
-
Change the desired item.

-
Thermal Camera: You can set whether to use the thermal camera. When set to Enabled (Hard), users exceeding the reference temperature will be denied authentication, and the exceeding temperature event will be logged. When set to Enabled (Soft), users exceeding the reference temperature can authenticate, but the exceeding temperature event will be logged.
-
Check Temperature Mode: You can set the temperature check mode according to purpose.
-
Temperature Check After Authentication: Measures user's temperature after authentication is performed.
-
Temperature Check Before Authentication: Measures user's temperature and then performs authentication. In this mode, users exceeding the reference temperature cannot authenticate.
-
Check Temperature Only: The device can only be used for measuring temperature. In this mode, all users below the reference temperature can enter, regardless of authentication.
-
-
Celsius/Fahrenheit: You can set the temperature display unit.
-
Low Threshold Temperature: You can set the minimum reference temperature to restrict access. Users with a surface temperature lower than the minimum reference temperature will be denied authentication.
The minimum reference temperature can be set in the range of 1 °C to 45 °C, and must be higher than the maximum reference temperature. -
High Threshold Temperature: You can set the maximum reference temperature to restrict access. Users with a surface temperature higher than the maximum reference temperature will be denied authentication.
The maximum reference temperature can be set in the range of 1 °C to 45 °C, and must be lower than the minimum reference temperature. -
Save Temperature Data: You can set whether to save the user's temperature log. Using this option, both the success of authentication and the user's temperature value will be saved in the log; if not used, only the success of authentication will be logged.
-
Show Thermal Infrared Image: You can set whether to display the thermal image on the device screen.
-
Camera Configuration: You can set detailed options for accurate measurements for the camera.
-
Distance(cm): Set the distance between the user and the thermal camera.
-
Emission Rate: Set the infrared emissivity.
-
ROI X(%), ROI Y(%), ROI Width(%), ROI Height(%): If additional lighting is installed nearby, the thermal camera can be set to measure the user's temperature instead of that lighting. Adjust the position and size of the ROI (Region of Interest) to manually set the area where the thermal camera will measure the temperature.
-
Skin Temperature Compensation: You can set the thermal camera to automatically calibrate the temperature based on the usage environment and ambient temperature.
-
Skin Temperature Correction: You can adjust the temperature readings to a fixed value based on the usage environment. For example, in environments where the temperature is always measured as 0.1 °C higher, set the temperature calibration value to -0.1.
-
-
-
For optimal performance, it is recommended to use the default values for the sub-options of the camera settings. The default values of each option are as follows:
-
Distance(cm): 100
-
Emission Rate: 0.98
-
ROI X(%): 47
-
ROI Y(%): 45
-
ROI Width(%): 15
-
ROI Height(%): 10
-
-
The thermal camera supports TCM10-FS2.