User
Describes how to register, edit, delete, and manage users.
Registering user information
You can register user information that includes biometric authentication data.
-
Click
 and authenticate with administrator privileges.
 -
Click User →
 . The face registration wizard will start.
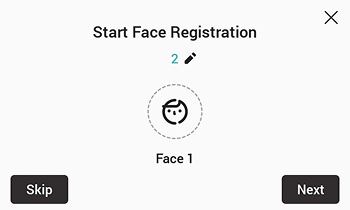
-
Click Next to continue the face registration wizard. To skip, press Skip and verify step 5.
-
If you pressed Next, follow the instructions on the screen to register your face. Face registration consists of a total of 3 steps.
-
Front face registration

-
Move face up and down

-
Move face left and right

Using the face registration wizard will only register the user's face. After face registration is completed, you can select the user to set additional information.
Please note the following when registering your face.
- Keep the distance between the device and your face at 40-80 cm when enrolling a face.
-
Do not change your face expression.
-
Do not wear masks, hats, or eye patches.
-
Do not enroll a face wearing a mask. It may increase the False Acceptance Rate (FAR) if both faces with and without a mask are enrolled.
-
Do not raise head up or lower head.
-
Do not wear thick makeup.
-
Do not close your eyes.
-
Make sure that both of your shoulders correctly appear on the screen.
-
Stand still and enroll your face by staring at the screen.
-
Be careful not to display two faces on the screen. Enroll one person at a time.
-
If you do not follow the instructions on the screen, the face enrollment may take longer or may fail.
-
-
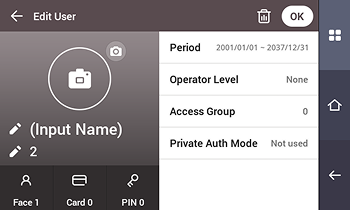
If you pressed Skip, select the desired item and set it.
-
 : You can register a user photo.
 -
Name: Enter the user name.
-
ID: Enter a number between 1 and 4294967295 to register a user ID. If User ID Type is set to Alphanumeric, you can use a combination of alphanumeric characters and symbols
_-as the ID, with a maximum of 32 characters. -
Face: You can enroll a face for user authentication. Press
and follow the instructions on the screen to register your face. To enroll more faces, click . -
Card: You can enroll a card for user authentication. Press
and scan the card to assign it to the user in the RF card authentication section. To enroll more cards, click . -
PIN: You can enter the PIN you want to use. Enter the PIN you want to use, then confirm by entering the PIN again, and press OK. To prevent leaks, input a PIN of 4 to 16 digits.
-
Operator Level: You can select permissions to assign to the user.
InfoAvailable menus vary according to the set user level.
-
None: This is a general user level, and the menu is not available.
-
Administrator: You can use all menus.
-
Configuration: You can use the menus AUTHENTICATION, DISPLAY & SOUND, DEVICE, NETWORK, EVENT LOG.
-
User Management: You can use the menus User, EVENT LOG.
-
-
Face Group: You can select a group for the user's face. Face groups can only be used if Group Matching is enabled and can only be registered in BioStar X.
-
Access Group: You can check the user's access group. Access groups can only be registered in BioStar X.
-
Private Auth Mode: You can set a personal authentication mode. Using personal authentication mode allows you to combine authentication methods including face authentication for each user. Otherwise, you can use the device’s basic authentication mode.
-
-
Press OK to complete user information registration.
Modifying User Information
User Management or Administrator can modify the registered user information. A card or face can be added, and PIN and level can be modified.
-
Click
and authenticate with administrator privileges. -
Click User →
 .
. -
Select your search terms. You can search for users using All, User ID, Name, Face, Card.
-
Select the user to modify.
-
Modify the information by referring to Registering user information and press OK.
- To delete a user, select
 and then press OK.
- To delete a user, select
Access Group can be registered in BioStar X. For detailed information on registering an Access Group, please refer to the BioStar X Administrator Guide.
Delete All Users
You can delete all registered users at once.
-
Click
and authenticate with administrator privileges. -
Select User →
. -
Select Delete All to check, then press OK.
-
To delete all users, press OK.
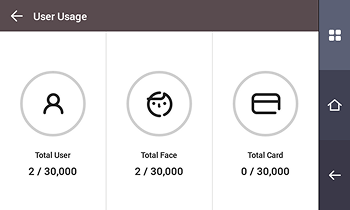
View User Usage
You can see the number of registered users, faces, and cards at a glance.
-
Click
and authenticate with administrator privileges. -
Click User →
 . User usage information appears.