Authentication
Describes the supported authentication methods and authentication procedures.
Authentication mode
Set the authentication mode. You can use face, fingerprint, PIN, card, and ID in combination as authentication modes, and you can also set the schedule for each authentication mode.
Fingerprint authentication is only available on the FSF2-ODB product.
Registering auth mode
-
Press
 and authenticate with the Admin level credential.
 -
Press AUTHENTICATION → Auth Mode →
 .
. -
Select
 and choose the authentication method you want to use. To set an additional authentication method, select it in the same way and combine it.
 -
Set Schedule.
Info-
You can combine selected authentication methods to authenticate all in order or choose to authenticate only some of the selected methods. For example, when combined as
 +
+  +
+  , you must authenticate the card, face, and PIN; when combined as + / , you must authenticate the card and then enter the face or PIN.
 -
Schedule can be configured in BioStar X. If there is no schedule set, only Not Use and Always can be selected.
-
For more information about the Schedule settings, please refer to the BioStar X Administrator Guide.
-
-
To save the settings, press OK.
Modifying auth mode
-
Press
and authenticate with the Admin level credential. -
Press AUTHENTICATION → Auth Mode.
-
Select the authentication mode to modify.
-
Modify the authentication mode by referring to Registering auth mode and press OK.
Delete auth mode
-
Press
and authenticate with the Admin level credential. -
Press AUTHENTICATION → Auth Mode.
-
Press
 and select the authentication mode to delete. You can select multiple options.
 -
To delete the selected item, press OK, then press OK. Press Cancel to return to the previous screen.
Server matching
You can set up server matching. Using server matching means that user authentication is performed on BioStar X, not on the device. Server matching can be useful when there is too much user information on the device or when the device is installed outside the entrance door.
-
Press
and authenticate with the Admin level credential. -
Press AUTHENTICATION then enable Server Matching.
-
FSF2-ODB: Server Matching (Fingerprint, Card, ID)
-
FSF2-DB, FSF2-AB: Server Matching (Card, ID)
-
-
Server Matching can only use fingerprint, card, and ID.
-
If you use Server Matching, you must enable server matching on both the device and BioStar X. For more information on BioStar X server matching settings, please refer to the BioStar X Administrator Guide.
Face
You can change the configuration for facial authentication.
-
Press
and authenticate with the Admin level credential. -
Select AUTHENTICATION → Face.
-
Change the desired item.
-
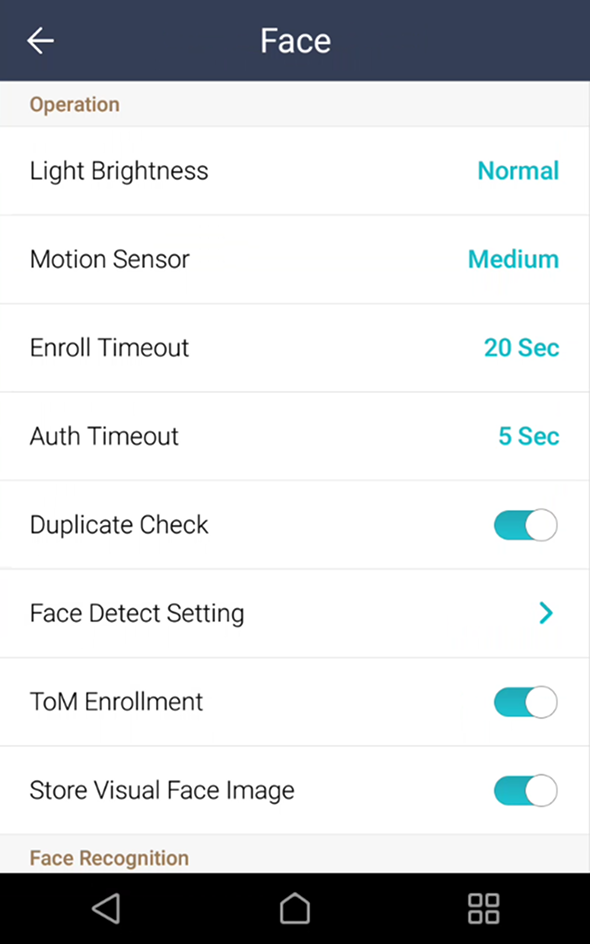
Light Brightness: You can manually adjust the brightness of the device light. Set the brightness with Normal or High or select Not Use to turn the light off.
-
Motion Sensor: Set the sensitivity to detect motion around the device. When Motion Sensor is set to OFF, touch the screen to authenticate your face.
-
Enroll Timeout: If the face is not enrolled within the set time, the face registration will be canceled.
-
Auth Timeout: If authentication is not completed within the set time, authentication fails.
-
Duplicate Check: You can check for duplicate faces during face registration.
-
Face Detect Setting: Set the position and size of the area where the device detects faces during face authentication.
InfoFor optimal performance, it is recommended to use default settings for the sub-options of Face Detect Setting. The default values of each option are as follows:
-
Maximum Head Pose Angle: 15
-
Detection Distance: Min 30 cm, Max 100 cm
-
Wide Search: Deactivated
-
-
ToM Enrollment: By activating ToM Enrollment, you can enroll the Template on Mobile issued by BioStar X. Template on Mobile allows biometric authentication without storing user data on the BioStar X server, Airfob Portal, or device by storing the user's biometric template on a mobile access card.
InfoFor more information about Template on Mobile, please refer to the BioStar X Administrator Guide.
-
Store Visual Face Image: You can set to store both the actual images and templates in Visual Face, or to store only the templates without saving the actual images. If disabled, all stored images of visual faces will be deleted, and newly enrolled visual faces will store templates excluding images.
InfoAfter disabling this setting, connect to BioStar 2 v2.9.7 or later or BioStar X.
-
Security Level: You can set the security level for 1:N authentication.
-
Operation Mode: You can set the operating mode of the device for face authentication.
-
Fusion Matching: Both visual and infrared matching work to increase the accuracy of face authentication.
-
Fast Matching: Users can perform rapid authentication while walking within the device's authentication range.
-
-
Fake Detection: You can prevent user authentication with spoofed faces such as photos. Activated when Operation Mode is set to Fusion Matching.
-
Advanced Settings: You can change advanced settings for face authentication, such as mask detection and thermal imaging camera functions.
-
Check Mode: You can set the confirmation mode according to the purpose.
-
Authentication Fail Sound: You can set the notification status for authentication failures due to no mask worn or exceeding the standard temperature.
-
Mask Detection: You can set whether to use mask detection.
-
Enabled (Hard): Users without masks will be denied authentication, and maskless events will be recorded in the logs.
-
Enabled (Soft): Users without masks can still authenticate, but a maskless event will be logged.
-
-
-
Thermal Camera: You can set whether to use the thermal camera.
-
Enabled (Hard): Users exceeding the standard temperature range will be denied authentication, and the event will be logged as exceeding the standard temperature.
-
Enabled (Soft): Users exceeding the standard temperature range can still authenticate, but the event will be logged as temperature exceeding the standard.
-
-
-
When using Mask Detection or Thermal Camera, you can set Check Mode according to the device's purpose.
-
Check After Authentication: After authentication, check whether the user is wearing a mask or measure temperature.
-
Check Before Authentication: After checking whether the user is wearing a mask or measuring temperature, perform authentication. When using this mode, users without masks or exceeding the standard temperature cannot perform authentication.
-
Check Only: The device can only be used for checking whether a mask is worn or for measuring temperature. When using this mode, users wearing masks or below the standard temperature can enter regardless of authentication.
-
-
When Thermal Camera is set to Enabled, advanced setting options for thermal imaging cameras are activated.
-
Celsius/Fahrenheit: You can set the temperature display unit.
-
Low Threshold Temperature: You can set the minimum reference temperature to restrict access. Users with surface temperatures lower than Low Threshold Temperature will be denied authentication. Low Threshold Temperature can be set in the range of 1℃~45℃ and cannot be set higher than High Threshold Temperature.
-
High Threshold Temperature: You can set the maximum reference temperature to restrict access. Users with surface temperatures higher than High Threshold Temperature will be denied authentication. High Threshold Temperature can be set in the range of 1℃~45℃ and cannot be set lower than Low Threshold Temperature.
-
Save Temperature Data: You can set whether to save the user's temperature log. Using this option, both the success of authentication and the user's temperature value will be saved in the log; if not used, only the success of authentication will be logged.
-
Show Thermal Infrared Image: Set whether to display infrared video on the device screen.
-
Dynamic ROI: Set the device to automatically detect the area of interest (ROI) for measuring the user's temperature. For example, if there are other lights installed nearby, this option allows the thermal imaging camera to detect and measure the user's temperature instead of that lighting.
-
Camera Configuration: Set detailed options for the camera for accurate measurement.
-
-
When Thermal Camera is set to Enabled, you can set detailed options for the thermal imaging camera for accurate measurement according to the installation environment.
-
Distance(cm): Set the distance between the user and the thermal camera.
-
Emissivity: Set the infrared emissivity.
-
ROI X(%), ROI Y(%), ROI Width(%), ROI Height(%): You can set the ROI (Region of Interest) manually when Dynamic ROI is set to Not Use. Adjust the ROI location and size to specify the area where the thermal camera will measure temperature. ROI X(%) indicates the left and right positions of the region of interest, and the larger this value, the further the region moves to the right of the screen. ROI Y(%) indicates the top and bottom positions of the region of interest, and the larger this value, the further the region moves up. ROI Width(%) and ROI Height(%) indicate the size of the region of interest; as both values increase, the area for measuring temperature widens. For example, if the values of ROI X(%), ROI Y(%), ROI Width(%), ROI Height(%) are changed from default values to 40, 15, 70, 40 respectively, the region of interest will change as shown below.

If the ROI is set to the default value

ROI X(%), ROI Y(%), ROI width(%), ROI height(%)
When the values are changed to 40, 15, 70, and 40, respectively-
Skin Temperature Compensation: You can set the thermal imaging camera to correct the temperature autonomously, considering the environmental usage of the device and the surrounding temperature.
-
Skin Temperature Correction: Depending on the product usage environment, you can adjust the temperature measures to be increased or decreased by a constant value. For example, if the temperature reading is always measured 0.1℃ higher, set the temperature correction value to -0.1.
-
FW: If the thermal imaging camera is properly connected, the firmware version of that camera will be displayed.
-
-
For optimal performance, it is recommended to use default settings for the sub-options of Camera Configuration. The default values of each option are as follows:
-
Distance(cm): 100
-
Emissivity: 0.98
-
ROI X(%): 30
-
ROI Y(%): 25
-
ROI Width(%): 50
-
ROI Height(%): 55
When using the ROI as the default setting, a yellow guide will be displayed in the ROI area of the screen during authentication as shown below. When the user's face is aligned within that area during authentication, accurate temperature measurements can be made. When manually changing the settings or using dynamic ROI, the yellow guide is not displayed.
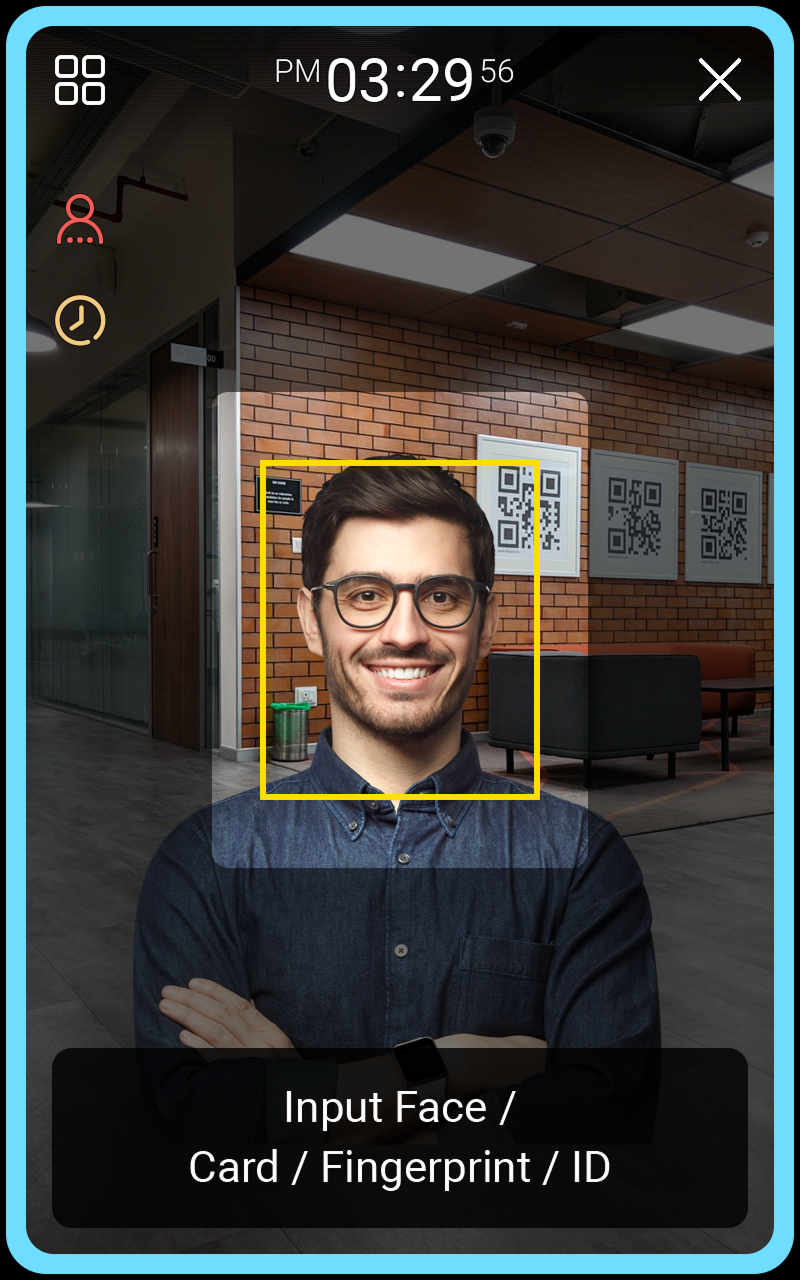
If the ROI is set to the default value
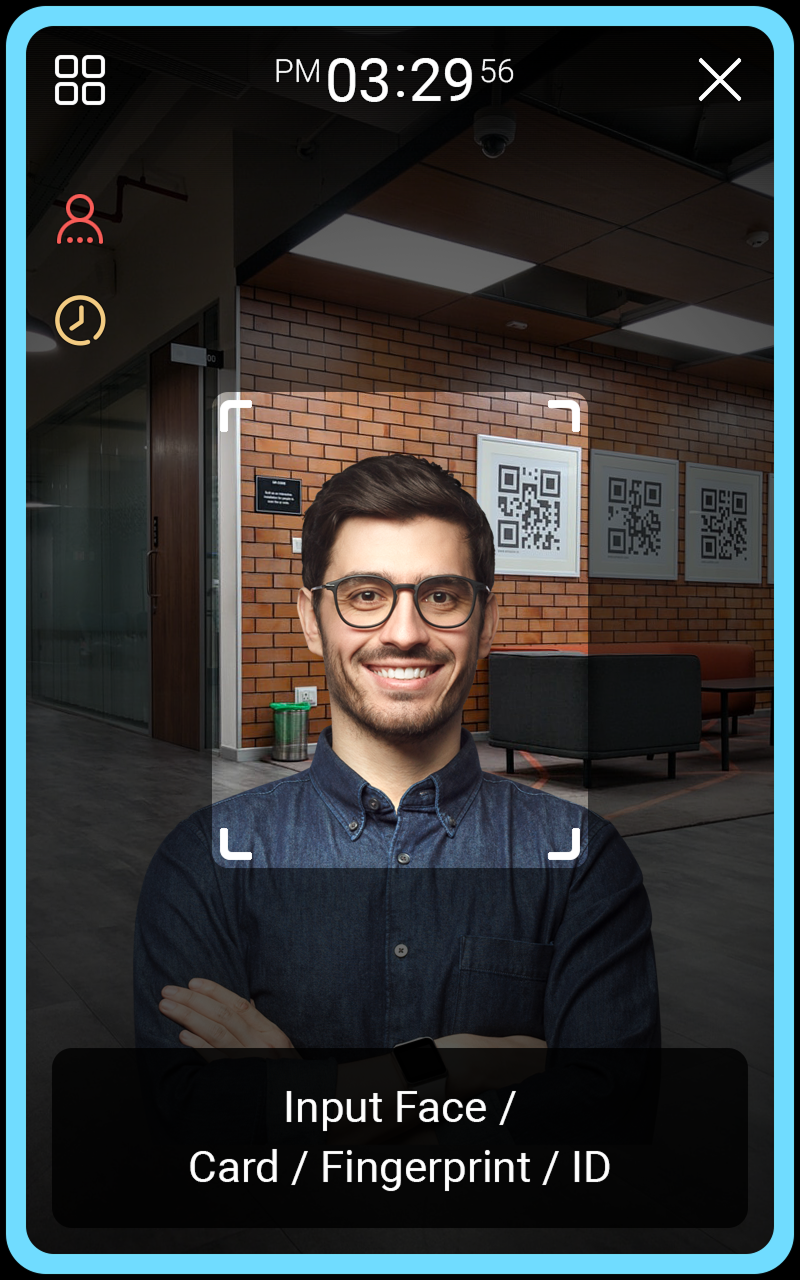
When changing ROI settings or using dynamic ROI
-
-
Mask authentication and thermal imaging camera functions are not available on slave devices.
-
The thermal imaging camera supports TCM10-FSF2.
Fingerprint FSF2-ODB
You can change the settings for fingerprint authentication.
-
Press
and authenticate with the Admin level credential. -
Select AUTHENTICATION → Fingerprint.
-
Change the desired item.
-
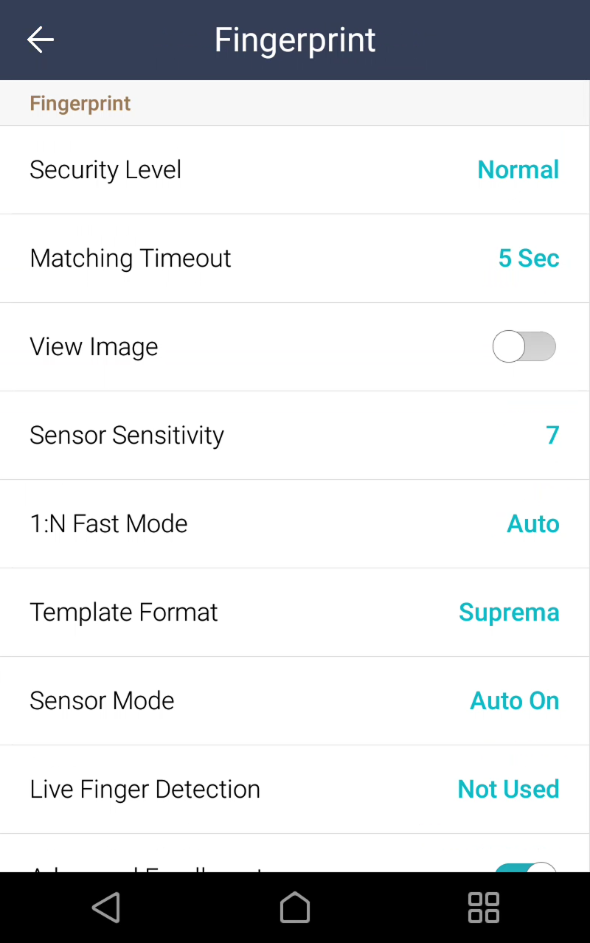
Security Level: You can set the security level for 1:N authentication.
-
Matching Timeout: Set the wait time for fingerprint matching. If authentication is not completed within the specified time, it will fail.
-
View Image: The original image of the scanned fingerprint can be viewed.
-
Sensor Sensitivity: Set the sensitivity of the fingerprint recognition sensor. Set the sensitivity higher to obtain precise fingerprint information.
-
1:N Fast Mode: Set the speed of fingerprint authentication. When you select Auto, authentication speed is set according to the total number of fingerprint templates enrolled in the device.
-
Template Format: Set the fingerprint template format. SUPREMA is set as default. Changing the template format will make all previously saved fingerprints unusable, so take care when changing.
-
Sensor Mode: Set to Auto On to turn on the fingerprint sensor when it detects the user’s finger. When set to Always On, the sensor remains on even when not scanning fingerprints.
-
Live Finger Detection: Set the fake fingerprint detection level. Higher levels for fake fingerprint detection may also increase rejection rates for actual people’s fingerprints.
-
Advanced Enrollment: Assess the quality of scanned fingerprints to save high-quality fingerprint information. Enable to notify the user when fingerprint quality is low, helping them scan fingerprints correctly.
-
Duplicate Check: Check for duplicate fingerprints when enrolling.
-
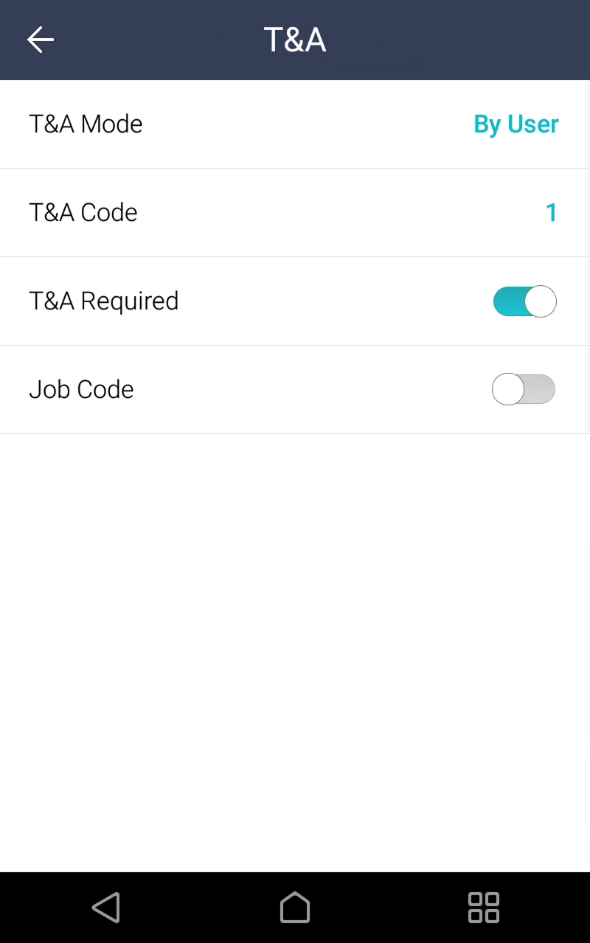
T&A (Time and Attendance)
You can set how to register T&A mode.
-
Press
and authenticate with the Admin level credential. -
Select AUTHENTICATION → T&A Mode.
-
Change the desired item.
-
T&A Mode: Set how to use attendance mode.
-
T&A Code: Register T&A events. To register attendance events, select T&A Code →
and then set the icon to display on the screen, T&A Event Name, and Schedule. -
T&A Required: Set to require a user to select a T&A event when authenticating. Available when T&A Mode is set to By User.
-
Fixed T&A Key: Set to use only a T&A event selected by the administrator. Available when T&A Mode is set to Fixed.
-
Job Code: Set whether to use the job code.
-
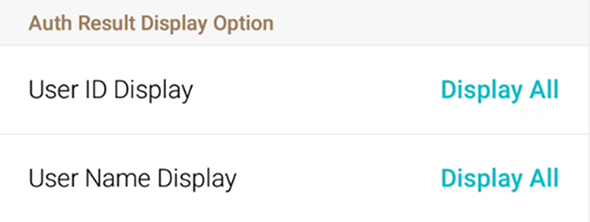
Auth result display option
You can set the auth result display option.
-
Press
and authenticate with the Admin level credential. -
Select AUTHENTICATION.
-
Set the desired items in Auth Result Display Option.
-
User ID Display: You can select how the user ID is displayed on the authentication result screen of the device.
-
Display All: Displays the entire user ID.
-
Mask All but First Letter: Displays only the first letter of the user ID.
-
Hide All: Do not display the user ID.
-
-
User Name Display: You can select how the user name is displayed on the authentication result screen of the device.
-
Display All: Displays the entire user name.
-
Mask All but First Letter: Displays only the first letter of the user name.
-
Hide All: Do not display the user name.
-
-