User
Describes how to register, edit, delete, and manage users.
Registering user information
You can register user information that includes biometric authentication data.
-
Press
 and authenticate with the Admin level credential.
 -
Select USER →
 and set the desired items. User usage information appears.
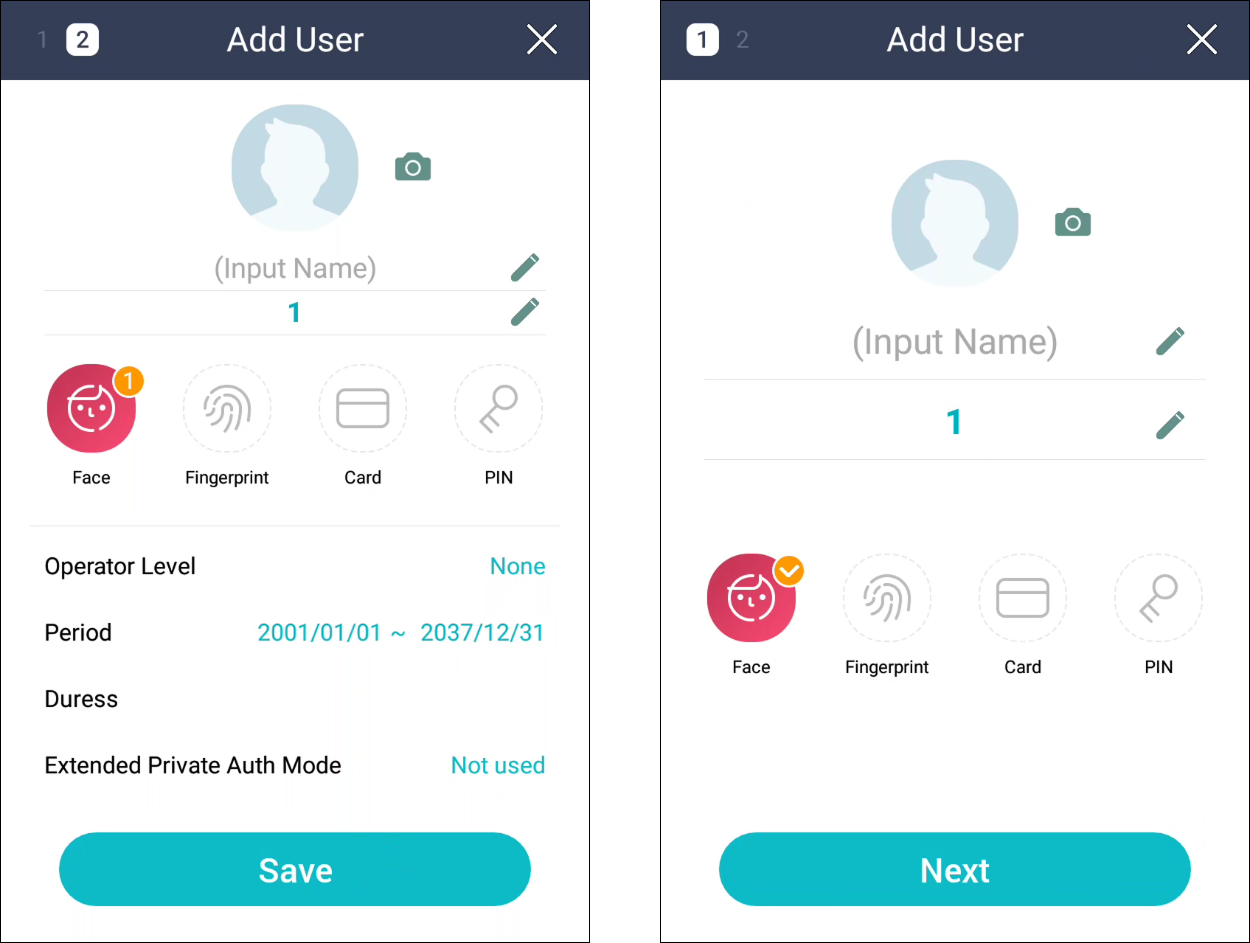
-
 : You can register a user photo.
 -
Name: Enter the user name.
-
ID: Enter a number between 1 and 4294967295 to register a user ID. If User ID Type is set to Alphanumeric, you can use a combination of alphanumeric characters and symbols
_-as the ID, with a maximum of 32 characters. -
Face: You can enroll a face for user authentication. Press Face → Next and follow the instructions on the screen to enroll your face. To enroll more faces, click
. Please refer to Enrolling user faces to learn more about face enrollment. -
Fingerprint: FSF2-ODB You can enroll a fingerprint for user authentication. Press Fingerprint → Next and follow the on-screen instructions to enroll a fingerprint. To enroll more fingerprints, press
. For more information on fingerprint registration, refer to User fingerprint enrollment. -
Card: You can enroll a card for user authentication. Press Card → Next and scan the card to assign to the user in the RF card authentication section. To enroll more cards, click
. -
PIN: You can enter the PIN you want to use. Press PIN → Next and enter the PIN you want to use. For confirmation, enter the PIN once more and then press OK. To prevent leaks, input a PIN of 4 to 16 digits.
-
Operator Level: You can select permissions to assign to the user.
InfoAvailable menus vary according to the set user level.
-
None: This is a general user level, and the menu is not available.
-
Administrator: You can use all menus.
-
Configuration: You can use the menus AUTHENTICATION, DISPLAY & SOUND, DEVICE, NETWORK, EVENT LOG.
-
User Management: You can use the menus USER, EVENT LOG.
-
-
Period: You can set the duration for using the user account.
-
Duress: FSF2-ODB Select to enroll a duress fingerprint. If you are coerced by someone or need to open the door forcefully, authenticating with this fingerprint can send an alarm signal to BioStar X.
-
Extended Private Auth Mode: You can set the extended personal authentication mode. Using the extended personal authentication mode, you can combine methods of authentication including face and fingerprint for each user. Otherwise, you can use the device’s basic authentication mode.
InfoFingerprint registration is only available on the FSF2-ODB product.
-
-
Press Save to complete the registration of user information.
Enrolling user faces
-
Press
and authenticate with the Admin level credential. -
Select USER →
. -
Press
 Face → Next.
 -
Adjust a distance between the face and screen and look straight at the camera of the device.
-
After the shooting is complete, press OK → Save. To retake your face picture, press Re-Shot.
-
The visual face data of this product are not compatible with face templates of FaceStation 2 or FaceLite.
-
Face information for this product can also be batch enrolled by uploading a photo in BioStar X or importing a CSV file, not just on the device. You can also enroll visual face with your smartphone via a link sent from BioStar 2. For detailed information on each enrollment method, please refer to the BioStar X Administrator Guide.
-
To use a Visual Face feature correctly, take a picture by following instructions below.
- Keep the distance between the device and your face at 60-100 cm when enrolling your face.
-
Do not change your face expression.
-
Do not wear masks, hats, or eye patches.
-
Do not enroll a face wearing a mask. It may increase the False Acceptance Rate (FAR) if both faces with and without a mask are enrolled.
-
Do not raise head up or lower head.
-
Do not wear thick makeup.
-
Do not close your eyes.
-
Make sure that both of your shoulders correctly appear on the screen.
-
Stand still and enroll your face by staring at the screen.
-
Be careful not to display two faces on the screen. Enroll one person at a time.
-
If you do not follow the instructions on the screen, the face enrollment may take longer or may fail.
User fingerprint enrollment FSF2-ODB
-
Press
and authenticate with the Admin level credential. -
Select USER →
. -
Press
 Fingerprint → Next.
 -
After scanning the fingerprint of the finger to be enrolled, scan the same finger's fingerprint again.
-
Fingerprint registration is only available on the FSF2-ODB product.
-
Place the finger deep enough to contact with the sensor completely.
-
Place the center of the fingerprint in the center of the sensor.
-
If a finger has a cut or the fingerprint is blurry, select another finger for the fingerprint.
-
Enter accurately according to the on-screen instructions when authenticating fingerprints.
-
If you make the finger upright so that the contact area with the sensor is decreased or the angle of finger is warped, fingerprint authentication may not be performed.
Modifying User Information
User Management or Administrator can modify the registered user information. Add the user's face, fingerprint, or card, and modify the PIN and level.
-
Press
and authenticate with the Admin level credential. -
Click USER →
 .
. -
Select your search terms. You can search for users using All, User ID, Name, Face, Fingerprint, Card.
-
Select the user to modify.
-
Modify the information by referring to Registering user information and press OK.
- To delete a user, select
 and then press OK.
- To delete a user, select
-
Fingerprint searching is only available on the FSF2-ODB product.
-
Access Group can be registered in BioStar X. For detailed information on registering an Access Group, please refer to the BioStar X Administrator Guide.
Delete All Users
You can delete all registered users at once.
-
Press
and authenticate with the Admin level credential. -
Select USER →
. -
Select Delete All to check, then press OK.
-
To delete all users, press OK.
View User Usage
View the number of enrolled users, faces, fingerprints, and cards at a glance.
-
Press
and authenticate with the Admin level credential. -
Press USER →
 . User usage information appears.
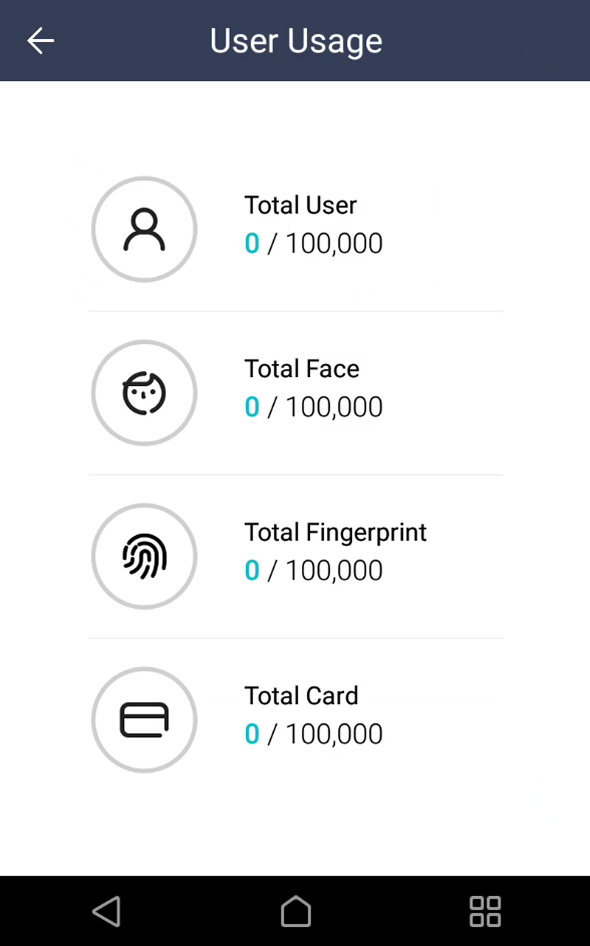 Info
InfoThe number of fingerprints can only be checked on the FSF2-ODB product.