Maintain the Camera
Manage the camera effectively by rebooting it or initializing settings. Covers three methods: reboot, config reset, and factory reset.
Use the camera maintenance feature in the following situations.
-
When an external person who is not an administrator tries to remove the camera cover, and you want to apply security measures so the camera stops operating normally.
-
After changing network settings, to apply the new settings.
-
When the camera responds slowly or its performance degrades.
-
When the system is not operating normally.
-
When you need to restore all camera settings to defaults.
-
Before handing the camera to another user, to remove all information.
-
When a system problem requires restoring factory defaults.
-
Do not power off the camera during reboot or initialization.
-
Factory reset permanently deletes all user data, event records, and logs. This action is irreversible; proceed with extreme caution.
-
Back up necessary data before initializing.
Tamper
Enable the camera's Tamper feature to delete the camera's certificates and keys when an external person who is not an administrator tries to remove the camera cover, preventing the camera from operating normally.
-
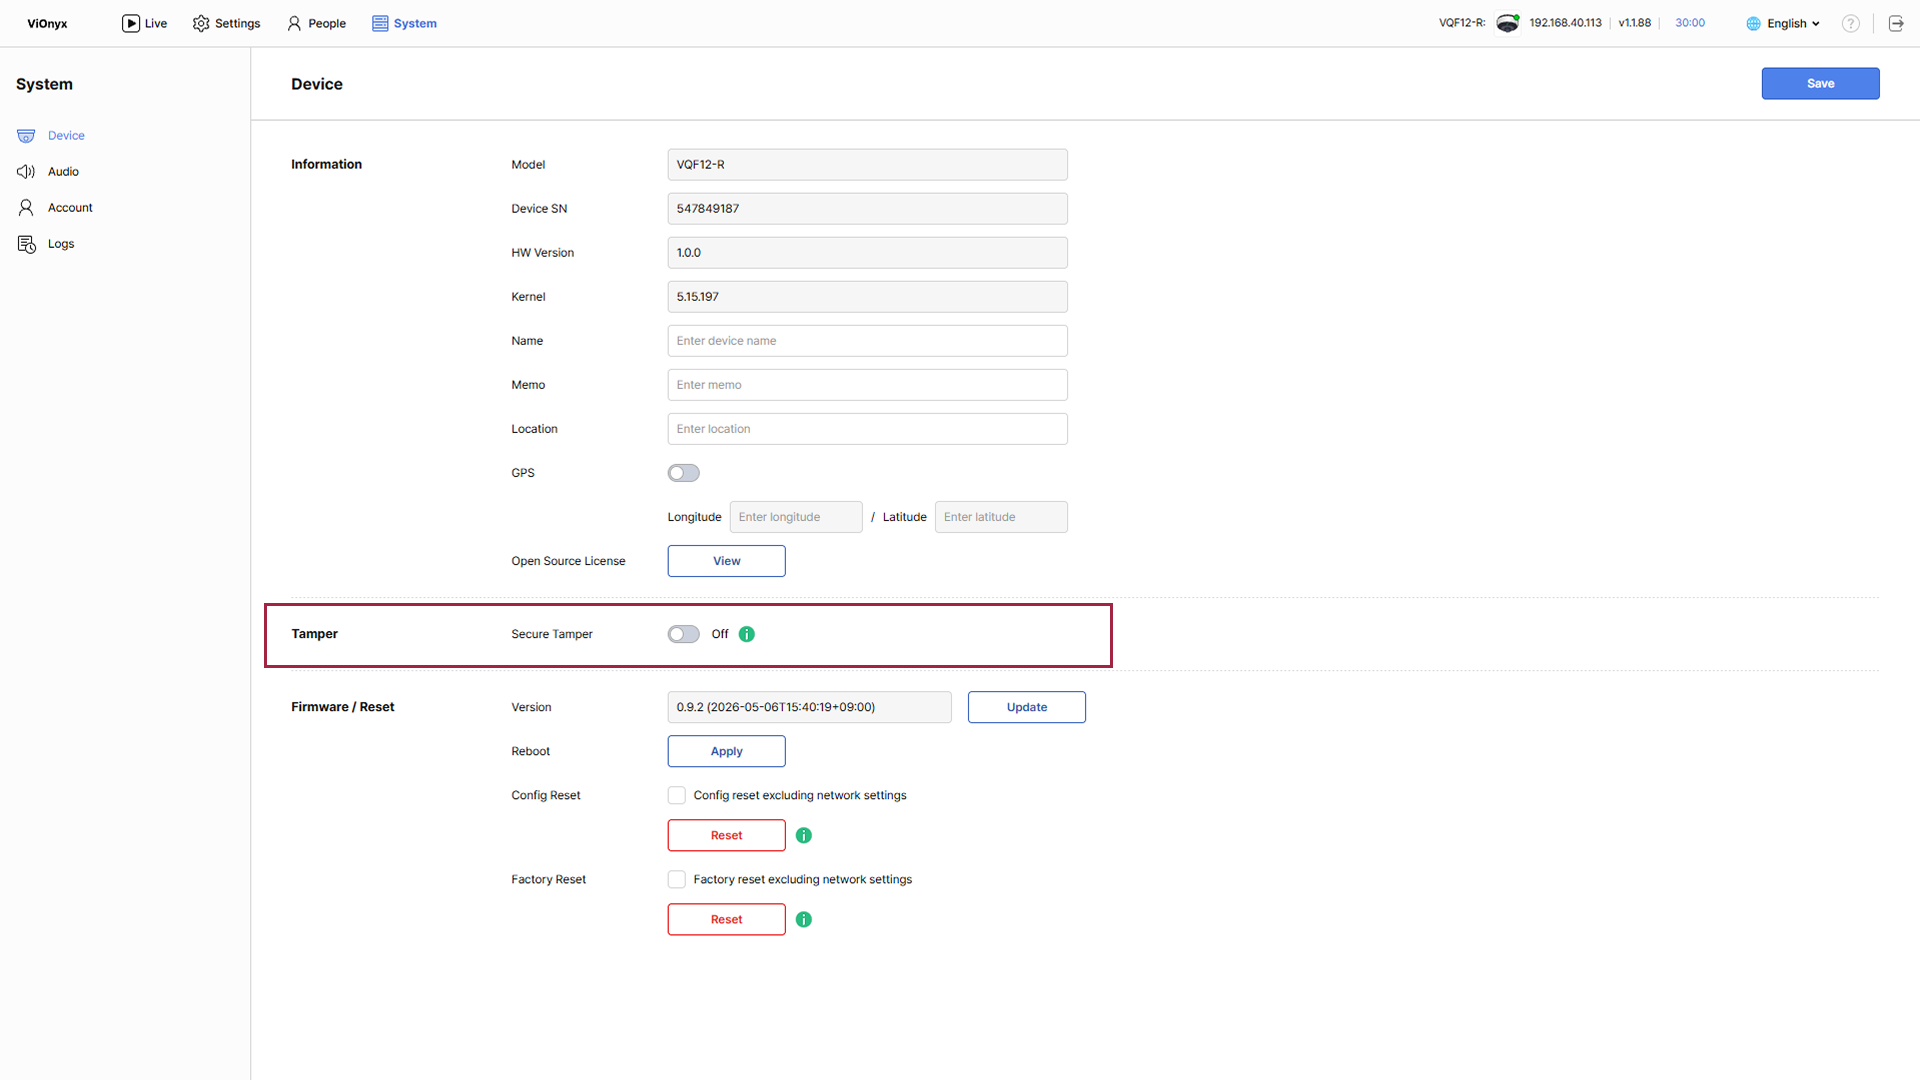
Click the System menu in the upper-left corner of the screen.
-
Click Device in the left sidebar.
-
Click the toggle in the Tamper section to enable the feature.
-
When the warning message appears, click OK.
This feature saves changes automatically without clicking Save.
When the Tamper feature is enabled and the administrator must remove the camera cover for maintenance, temporarily disable the Tamper feature before proceeding. Enable it again after the task is complete to keep security in place.
Reboot the camera
Restart the camera to apply setting changes or restore system performance. Reboot reinitializes the system while keeping current settings.
-
Click the System menu in the upper-left corner of the screen.
-
Click Device in the left sidebar.
-
In the Firmware / Reset section, under Reboot, click Apply.

-
When the reboot confirmation popup appears, click OK.
-
While rebooting, the camera is temporarily unavailable. Reboot takes at least 1-2 minutes.
-
Do not power off the camera during reboot. System damage may occur.
-
If the camera's IP address changes after reboot, connect using the new IP address.
-
When reboot starts, the web UI connection disconnects automatically. This is normal behavior.
Reset
Initialize the camera's settings or fully restore it to factory defaults. Two initialization methods are available; they delete different data, so choose carefully.
Initialization method comparison
| Method | Description | Data deleted | Data retained |
|---|---|---|---|
| Config Reset | Initialize settings only | Camera settings, network settings (optional), video profiles, rules, accounts | User information, face data, events/logs |
| Factory Reset | Delete all data and restore factory defaults | All settings, user information, events, logs, accounts | - |
Config Reset
Initialize only settings; retain user information and log data.
-
Click the System menu in the upper-left corner of the screen.
-
Click Device in the left sidebar.
-
In the Firmware / Reset section, under Config Reset, click Reset.
To exclude network settings from the initialization, click the checkbox for the Config reset excluding network settings option.
-
When the settings reset confirmation popup appears, click OK.
The settings reset proceeds, and the camera restarts automatically.
Factory Reset
Fully initialize the camera to restore it to factory defaults. This action cannot be undone.
Factory reset completely deletes all data. This action is irreversible; proceed with extreme caution.
-
Click the System menu in the upper-left corner of the screen.
-
Click Device in the left sidebar.
-
In the Firmware / Reset section, under Factory Reset, click Reset.
To exclude network settings from the initialization, click the checkbox for the Config reset excluding network settings option.
-
When the factory reset confirmation popup appears, click OK.
-
When the final confirmation popup appears, enter the administrator password.
-
Click OK.
-
After factory reset completes, the following items are restored to their defaults.
-
Admin ID: admin
-
Network settings: DHCP
-
All user data, events, and logs: deleted
-
-
After factory reset, set a new default password when accessing the web UI.