System Security
After hardening the server security on BioStar X server, the next step is securing the BioStar X application itself. Default admin accounts, weak passwords, and unencrypted device communication become paths to directly compromise the system while bypassing infrastructure-level security. This document explains how to establish a security baseline at the application layer through BioStar X authentication, role management, device encryption, and backup strategies.
Change default admin login ID and password
Change the default Administrator login ID (admin) and assign a strong, unique password immediately after installation.
Default credentials are one of the most common entry points for attackers. Since every BioStar X installation ships with a predefined Administrator account (UID: 1), leaving it unchanged makes the system predictable and highly vulnerable to brute-force or dictionary attacks.
-
Log in with the default admin account (Login ID:
admin). -
Navigate to User.
-
Double-click the Administrator account.
User Name: Administrator, UID: 1
-
In the edit user page, find the Permission section:
-
Login ID: Change from
adminto a unique, non-obvious user ID. Avoid names likeroot,system, or your company name. -
Password: Change to a secure password. By default, BioStar X enforces Medium strength passwords. Passwords must be 8–32 characters and include both letters (uppercase/lowercase) and numbers.
-
-
Click Save at the top right of the screen.
-
Log out, then log back in with the new credentials to confirm the change.
Best Practice
-
Do not use personal names or simple patterns (
admin1,company2025). -
Store the new credentials in a secure password manager or enterprise vault.
-
Create a secondary administrator account for emergency use.
-
Regularly review audit logs for Administrator login attempts.
Access separation
Enforce strict separation of roles inside BioStar X by assigning Administrator, Operator, and Auditor accounts with clearly defined privileges.
A single super-user account for all tasks introduces unnecessary risk. By separating roles, you:
-
Reduce the chance of accidental misconfiguration.
-
Limit insider threats (no single user has unchecked power).
-
Improve auditability and compliance (clear accountability per role).
This practice aligns with least privilege and separation of duties — two core principles in ISO 27001, NIST, and other frameworks.
Recommended approach after installation
-
Rename & Secure the Default Admin:
Treat it as a break-glass only emergency account. For more information, see #changeDefaultAdmin.
-
Create Named Role Accounts:
-
Admin Role: For system configuration and role management. Limit to 1–2 trusted people.
-
Operator Role: For daily operations. No access to system security settings or audit logs.
-
Auditor Role: Read-only access to logs, reports, and configurations. No ability to change settings.
-
-
Enable Multi-Factor Authentication (MFA):
Enforce MFA for all role accounts. For more information, see #setMfa.
-
Use Custom Account Levels (if required):
-
Navigate to Settings → Account, and then click Add Custom Level.
-
Configure granular access across User Groups, Device Groups, Doors Groups, etc.
-
Select the Edit/Read or Read permission for each menu item in Admin Menu Settings.
-
Step by step example: Creating a custom auditor role
-
Go to Settings → Account.
-
Click Add Custom Level.
-
Enter Name as
Auditor, add description. -
Under Admin Menu Settings, set:
-
User: Read
-
Monitoring: Read
-
Data: Read
-
Dashboard: Read
-
Setting: Do not select.
-
-
Click Apply, then assign this role to designated auditor accounts.
Best Practice
-
Assign unique accounts per individual — avoid shared logins.
-
Review account roles quarterly and remove unused accounts.
-
Keep the renamed built-in Administrator account for emergencies only.
Enforcing strong password policy
Configure BioStar X to enforce strong password policies for all user accounts.
Password policy options in BioStar X
-
Password Level
-
Low: You can enter up to 32 characters.
-
Medium: When setting a password, a combination of 8 to 32 alphabetic characters (uppercase or lowercase) and numbers is required.
-
Strong: When setting a password, a combination of 10 to 32 alphabetic characters (uppercase and lowercase, including at least one uppercase letter), numbers, and special characters is required.
-
-
Maximum Password Age: Can be set from 1 to 180 days.
-
Maximum Invalid Attempts: If you enter the password incorrectly more than the set number of times, you will not be able to log in for the time limit. The default is 100 attempts within 10 minutes, and it is recommended to reduce it to 5–10 attempts within 15 minutes.
-
Maximum Password Change Limit: To limit the number of password changes a user can make in a day.
Step by step: Strengthening password policy
-
Go to Settings → System → Security.
-
Under Login Password, configure:
-
Password Level: Strong
-
Maximum Password Age: Enable, set to 90 days
-
Maximum Invalid Attempts: Enable, set to 5 attempts per 15 minutes
-
Maximum Password Change Limit: Enable, set to 5 times maximum
-
-
Click Apply at the bottom right of the screen.
Communicate new policies to all users.
Session security
Path: Settings → System → Security → Session Security
Disable Simultaneous Connection Allow to ensure that each account can only be used for one active session at a time.
-
Active: Multiple concurrent logins with the same credentials are allowed.
-
Inactive: Only one login per account is permitted. A new login automatically logs out the previous session.
-
Account sharing goes undetected — impossible to know who performed which action.
-
Attackers who gain stolen credentials can log in unnoticed while the legitimate user is still active.
-
Audit logs lose their value because they cannot attribute actions to specific individuals.
Multi-factor authentication
Enable multi-factor authentication for all high-privilege accounts (Admin, Operator) in BioStar X by requiring an additional biometric fingerprint factor.
How it works in BioStar X
-
MFA is implemented using a fingerprint scanner (Suprema BioMini or BioMini Plus 2).
-
After users enter their Login ID and Password, the system prompts for a fingerprint scan.
-
If the Admin account has MFA enabled and the fingerprint component fails, you may get locked out.
-
MFA is not supported when logging in via Cloud interfaces.
-
MFA can't be enabled for accounts authenticated via Active Directory or non-supported services.
Step-by-step
-
Connect and install the fingerprint scanner on the BioStar X server or client machine.
-
In the BioStar X, go to User.
-
Open the user's profile and ensure fingerprint is enrolled.
-
Set Multi-Factor Auth for Login to Use in the Permission section.
-
Click Save at the top right of the screen to apply the changes.
Test by logging in: enter valid credentials, then scan your fingerprint to gain access.
Best Practices & Safety Measures:
-
Enroll backup fingerprints (alternate finger) to mitigate scanner failures.
-
The original built-in Administrator ("break-glass" account) should have fallback recovery in case biometric hardware fails.
-
Document MFA-enabled accounts and maintain a recovery mechanism.
Secure communication with device
Enable Secure communication with device to encrypt traffic between BioStar X and connected devices using digital certificates (TLS/SSL-style).
Option A: Server-generated certificates (default)
BioStar X generates a certificate and automatically provisions it to devices.
If disabled and re-enabled, a new certificate is generated, which may require manual device resets.
Option B: External certificates (recommended for enterprise use)
-
Upload your organization's certificate chain and private key.
-
Provides easier integration with enterprise PKI.
Step-by-step
-
Log in to BioStar X with an Administrator account.
-
Go to Settings → System → Security → Advanced Security Settings.
-
Set Secure communication with device to Use.
-
If using external CA certificates, set Use external certificates to Use.
- Upload the Root CA, Public certificate, and Private key.
-
Apply and verify that devices reconnect successfully over secure channels.
Best Practice
-
Always use strong keys (RSA 2048+ or ECC equivalent).
-
Use certificates with proper CN/SAN values that match how devices connect (hostname or IP).
-
Rotate certificates before expiry; keep a renewal calendar.
Note on log upload
If Log Upload is Manual, you risk delayed event visibility or gaps in audit trails. Keep Log Upload to Automatic whenever possible.
Device hashkey management
Enable Device Hashkey Management to manually control the encryption key used between BioStar X and devices. This activates tamper-resistance. Devices can automatically wipe critical data if physical tampering is detected.
While #secureComm protects data in transit, Device Hashkey Management goes further:
-
It ensures the data encryption key is controlled by the administrator, not generated automatically.
-
It activates tamper defense. If a device detects unauthorized opening or manipulation, it deletes stored users, logs, and its encryption key.
-
Manual key management cannot be applied if non-administrator users have login PW or PIN.
-
Remove such logins before enabling.
Step-by-step
-
Log in to BioStar X with an Administrator account.
-
Go to Settings → System → Security → Advanced Security Settings.
-
Set Device Hashkey Management to Use.
-
Read and acknowledge the warning pop-up.
-
Remove any non-admin PW/PIN logins from devices before applying.
-
Rotate the encryption key and administrator password when prompted.
-
Confirm devices can still sync users, logs, and events.
-
Document the key change (date, responsible admin, next scheduled rotation).
Best Practice
-
Rotate the device hashkey on a regular cycle (e.g., annually or semi-annually).
-
Document all rotations and store in a secure vault.
-
Test tamper events in a lab/staging device.
-
Pair with #secureComm for full defense-in-depth.
System backup
Use the built-in System Backup feature to regularly back up BioStar X's database, system settings, and key values.
-
If BioStar X and MSSQL are installed on different servers, System Backup/Restore is not available.
-
BioStar X Backup function (manual or scheduled) is unencrypted.
-
BioStar X Restore function does not support encrypted backup.
Manual backup settings
Path: Settings → System → System Backup
-
Backup File Path: Define the directory. The path must exist and have appropriate write permissions.
-
Number of Backup Files to Keep: Range 1–100. Recommendation: at least 7–10 rotating backups for daily schedules.
-
Backup Now: Trigger an immediate backup on demand. Useful before upgrades or major changes.
Automatic system backup
-
Frequency: Daily / Weekly / Monthly
-
Time: Specify the time. Follows BioStar X server time zone.
Best Practice
For production, daily backups at off-peak hours.
e.g., 02:00 local time
Configuring automatic backups
-
Go to Settings → System → System Backup.
-
Under Automatic System Backup, set:
-
Frequency: Daily
-
Time: 02:00 (or another off-peak time)
-
Number of Backup Files to Keep: 30
-
-
Click Apply to save the settings.
-
Verify backups are created by checking the target directory.
-
Periodically test restore procedures in a staging environment.
Ensure server is protected by UPS. Do not interrupt operations while "In Progress" status is displayed. Interruptions may cause database corruption.
Directory Integration
Directory Integration allows BioStar X to connect with enterprise identity systems such as Entra ID (Azure AD) or Microsoft Active Directory (AD).
-
Stronger security: Enterprise policies for password rules, MFA, and conditional access are automatically applied to BioStar X.
-
Centralized control: User lifecycle is handled in Entra ID/AD, reducing risk of stale accounts.
-
Audit and compliance: All user actions are tied back to corporate accounts.
Directory Integration requires the Advance license to be active.
Best Practice
-
Use dedicated Entra ID/AD service accounts with limited privileges.
-
Restrict synchronization to only relevant groups.
-
Always use LDAPS for Active Directory connections.
-
Periodically review synchronized accounts for stale entries.
Microsoft Entra ID — Step-by-step
-
Log in to BioStar X with an Administrator account.
-
Go to Settings → Directory Integration.
-
Under Directory Service, select Microsoft Entra ID.
-
Configure Directory Server:
-
Client ID: Enter the Client ID of the application registered in Entra ID.
-
Client Secret: Enter the Client secret added in Certificates & secrets of the application registered in Entra ID.
-
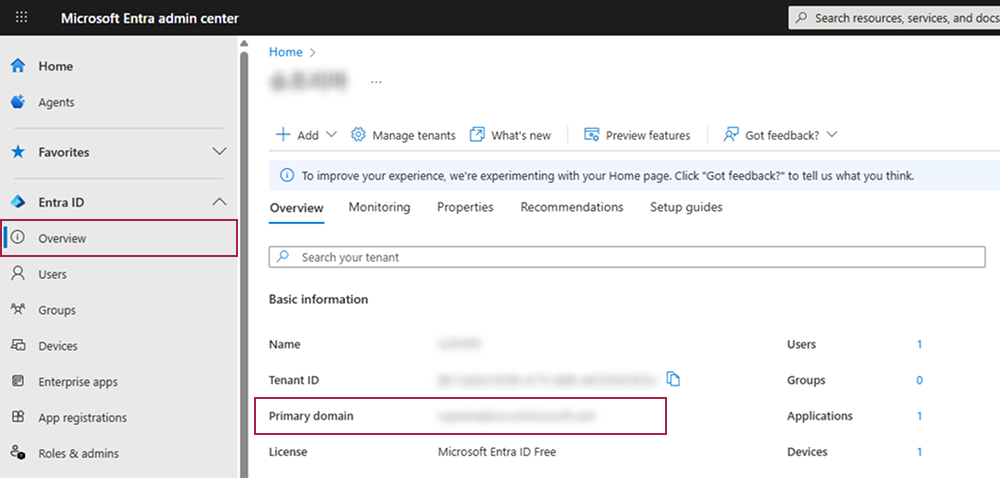
Primary Domain: Enter the primary domain name that you input when creating your organization in Entra ID.
-
-
Click Connect to retrieves user group information to BioStar X.
-
Enable BioStar X Login with Entra ID.
-
Copy Redirection URI and paste it into the SSO redirection settings in the Entra ID portal.
-
Select the desired sync mode under Sync Mode.
-
Click Apply to save the settings.
Confirm sync by checking user list.
-
For more information about registering an application in Entra ID, refer to the following link.
-
For more information about configuring Certificates & secrets in Entra ID, refer to the following link.
-
Tenant ID can be found in the Overview of the registered application in Entra ID.
-
You can check the information for Primary Domain in the Overview of Entra ID.
Microsoft Active Directory — Step-by-step
-
Log in to BioStar X with an Administrator account.
-
Go to Settings → Directory Integration.
-
Under Directory Service, select Microsoft Active Directory.
-
Configure Directory Server:
-
Server Address: IP or hostname of AD server.
-
User Name and Password: AD service account credentials.
-
Base Domain Name: Distinguished name of your AD domain.
-
-
To use an encrypted connection (LDAPS), enable Secure Transfer:
-
Install AD Certificate Services on the AD server.
-
Export the root certificate, convert to .jks, place in the BioStar X installation path.
-
Enter Keystore Password in BioStar X.
-
-
Click Connect to retrieves user group information to BioStar X.
-
Deselect groups not needed in User Group Filter.
-
Enable BioStar X Login with Active Directory.
-
Select the desired sync mode under Sync Mode.
-
Click Apply to save the settings.
Confirm sync by checking user list.
System log settings
Path: Settings → Server → Server
Configure BioStar X logging to retain sufficient data for audits and troubleshooting.
System log storage duration
-
Log Upload: Select the method for uploading event logs.
-
Automatic (default): Logs are automatically deleted after the retention period.
-
Manual: Logs must be purged manually.
-
-
System log storage duration: 1–120 days (default: 60 days).
Best Practice
For compliance-sensitive environments, set retention to 90–120 days and forward logs to a SIEM.
System log level settings
Per subsystem: Debug, Network, SQL, System, Web, WebSocket
| Level | Description |
|---|---|
| Trace | Captures everything (very verbose) |
| Debug | Detailed developer-level logs |
| Info | Operational events, successful connections (default for most) |
| Warning | Potential issues |
| Error | Failures only |
Running with Trace or Debug in production can generate excessive logs, impacting performance and filling disks rapidly. Reserve for short-term troubleshooting only.
BioStar X default log levels
-
Debug, SQL, WebSocket: Not Use
-
Network, System, Web: Info
Server port configuration
Configure BioStar X ports explicitly and prefer secure channels wherever possible. Use the default HTTPS port (443) for system access, and restrict device communication ports to trusted networks only.
Change the HTTPS port
-
Open BioStar X Service Manager:
http://127.0.0.1:28088/ -
In the side menu, select SERVICE SETTINGS.
-
Under Unified Gateway Service, locate the HTTPS Port field (default: 443).
-
Change the port to your desired value.
e.g., 8443
-
Click Apply and restart the service if required.
-
Update firewall rules and client connections accordingly.