Set Up Okta Integration
To sign in to BioStar Air with Okta, the ID administrator must create an OIDC application in Okta. Link it to the SSO settings in BioStar Air.
Connect Okta SSO
BioStar Air: Prepare redirect URI
-
Click Settings → Site in the left sidebar of BioStar Air.
-
Click the SSO & SCIM tab.
-
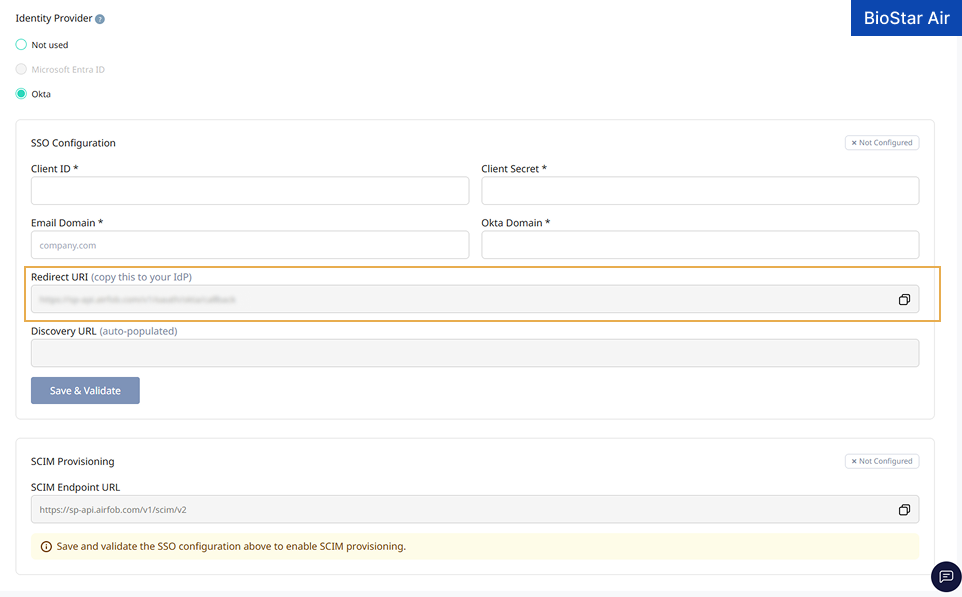
Select Okta under Identity Provider.
-
Copy the URI value shown in the Redirect URI field.
Okta: Create an app
-
Sign in to the Okta Admin Console.
-
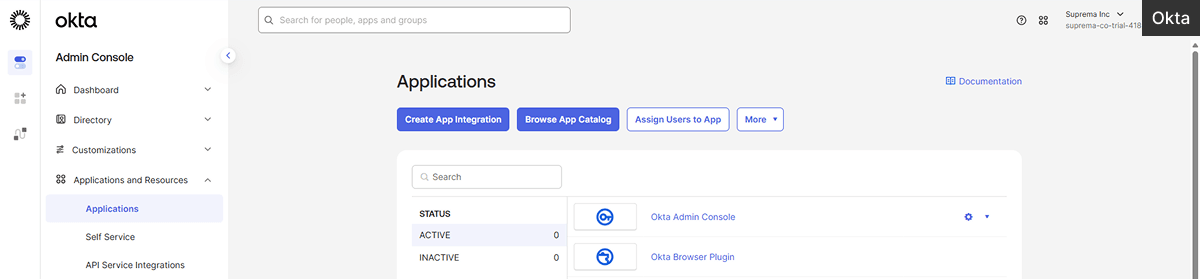
Go to Applications and Resources → Applications.
-
Click Create App Integration.
-
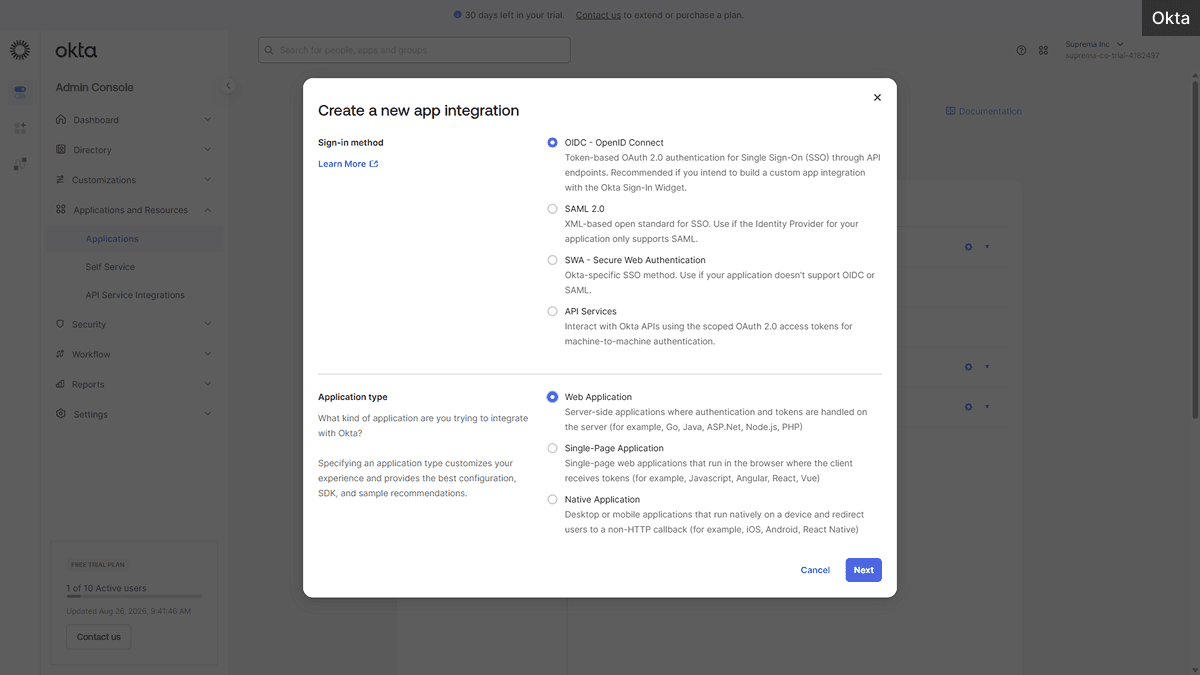
Under Sign-in method, select OIDC - OpenID Connect.
-
Under Application type, select Web Application so you can obtain a client secret.
-
Click Next.
-
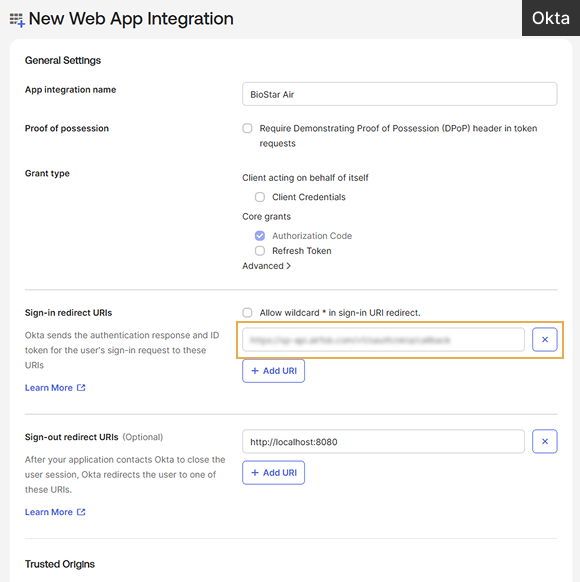
In App Integration name, enter 'BioStar Air'.
-
Paste the URI copied in the #bsairRedirect step into the input field under Sign-in redirect URIs.
-
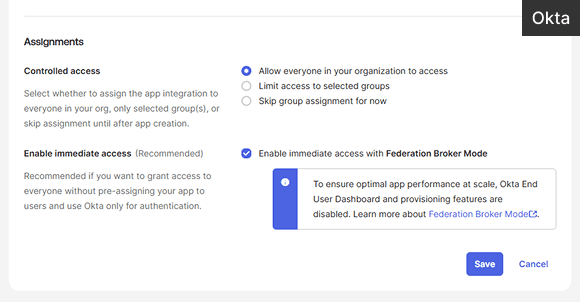
Go to Assignments, then select Allow everyone in your organization to access.
-
Click Save.
Okta: Copy app client information
-
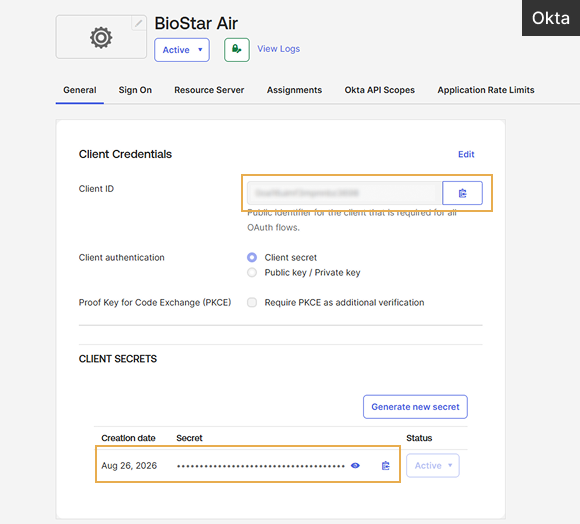
After creating the application, copy Client ID and Client Secret from the General tab.
-
Click the profile in the upper-right corner, then copy Okta Domain.
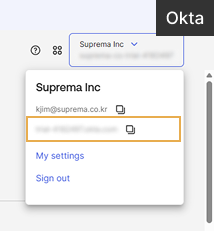
Enter the copied Client ID, Client Secret, and Okta Domain in the next step.
BioStar Air: Configure SSO
-
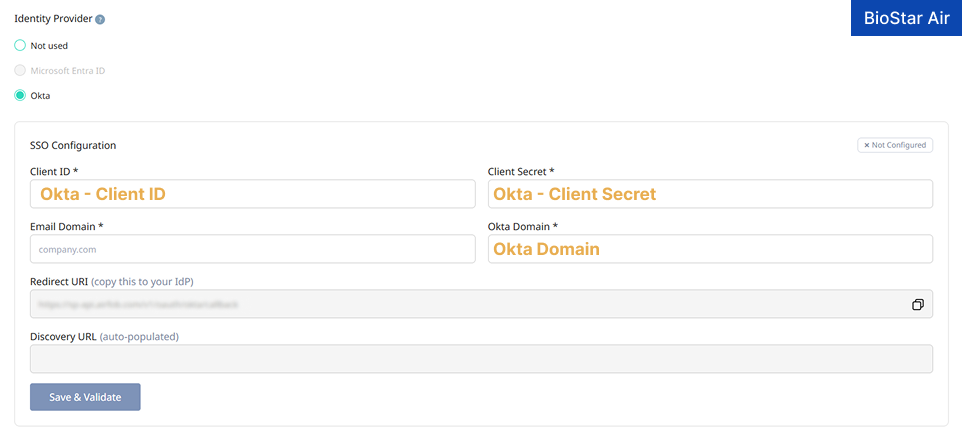
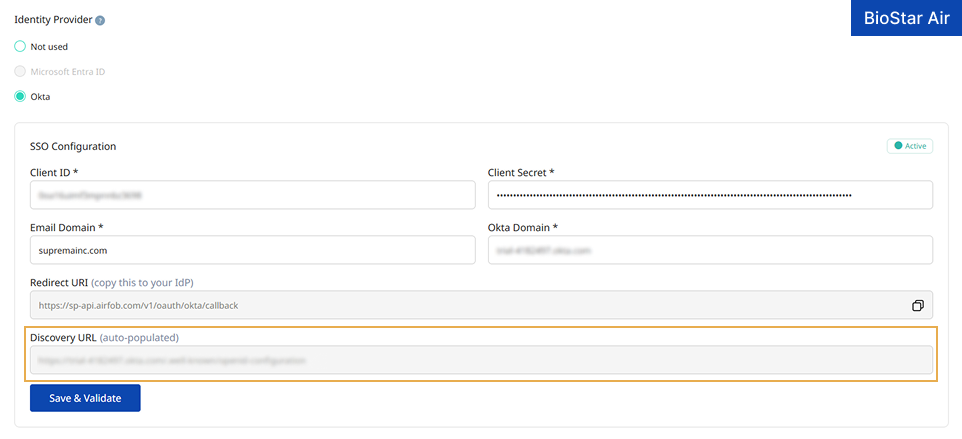
Return to the BioStar Air settings page, then enter the values copied in the #copyClientinfo step into each field.
-
Client ID: Client ID
-
Client Secret: Client Secret
-
Okta Domain: Okta Domain
-
-
In the Email Domain field, enter your organization's email domain.
-
Click Save & Validate.
After the system saves and verifies successfully, it automatically generates the value for Discovery URL.
Connect Okta SCIM provisioning
BioStar Air: Copy SCIM token
-
Click Settings → Site in the left sidebar of BioStar Air.
-
Click the SSO & SCIM tab.
-
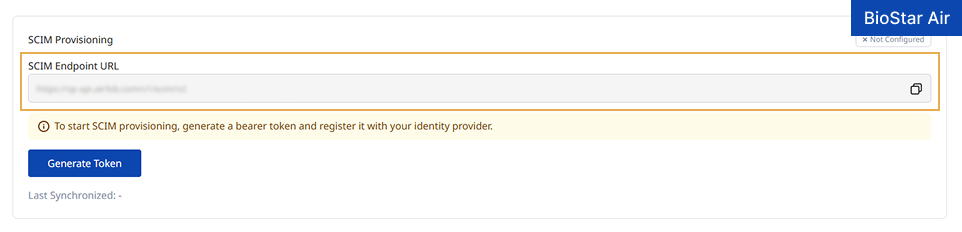
In the SCIM Provisioning section, copy the SCIM Endpoint URL value.
-
Click Generate Token.
-
In the Token Generation Complete dialog box, copy the token.
-
Copy the generated token immediately. Copy the token only when you generate it. After you close the dialog box, you cannot copy the token again.
-
If you lose the token, click Rotate Token to generate a new token. Enter the new token in the identity provider again.
-
In the next step, enter the SCIM endpoint URL and token copied in this step.
Okta: Create a SCIM provisioning app
-
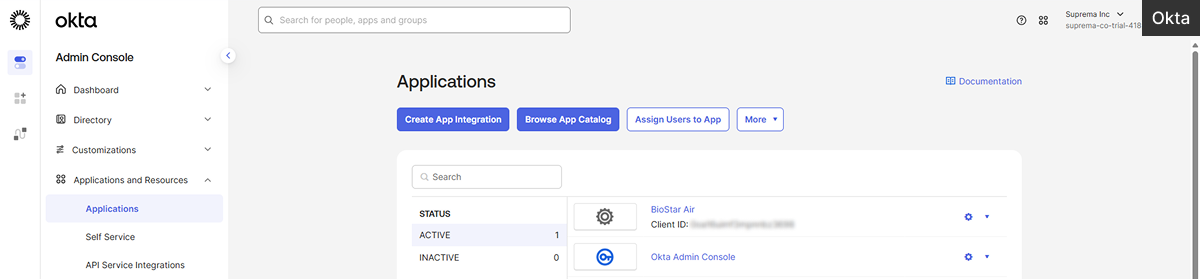
In the Okta Admin Console, go to Applications and Resources → Applications.
-
Click Browse App Catalog.
-
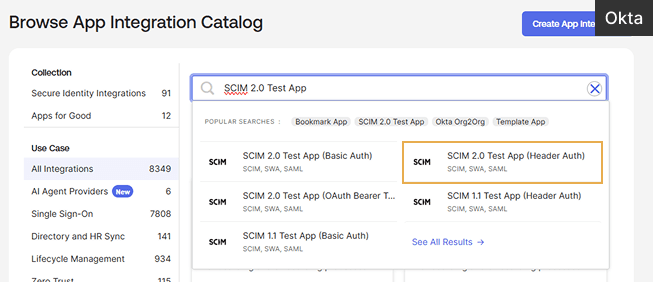
Search for 'SCIM 2.0 Test App'.
-
In the search results, select SCIM 2.0 Test App (Header Auth).
-
Click Add Integration.
-
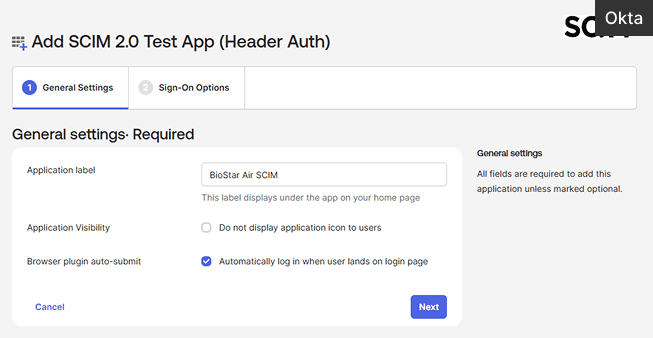
In the Application label field, enter 'BioStar Air SCIM'.
-
Click Next.
-
In Sign-on options, scroll down without changing settings, and click Done.
Okta: API integration settings
-
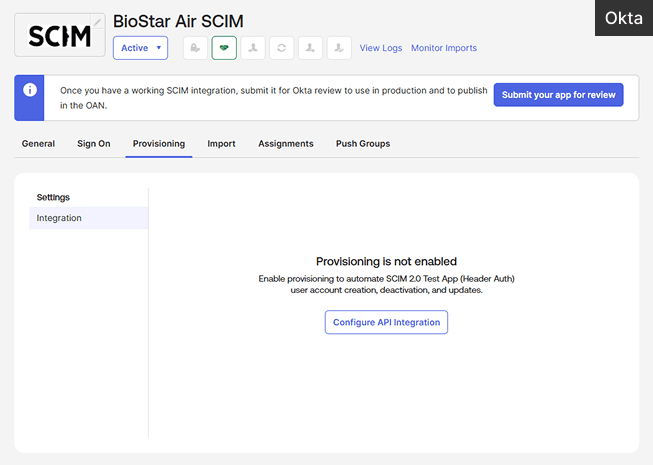
After creating the provisioning app, click the Provisioning tab.
-
Click Configure API Integration.
-
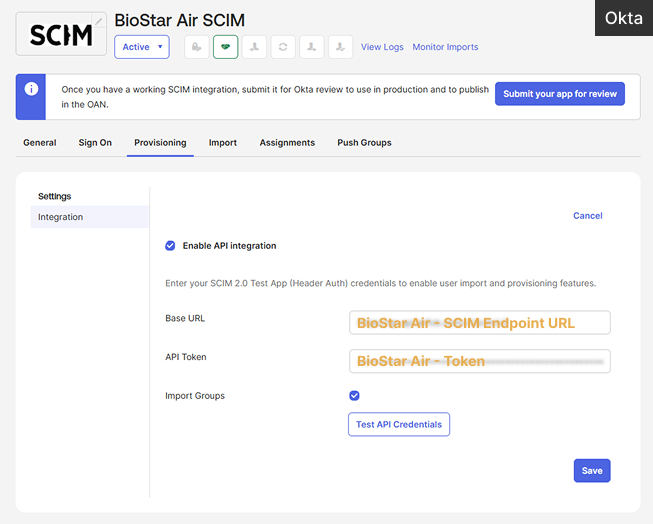
Click Enable API integration.
-
Enter the SCIM endpoint URL and SCIM bearer token from #copyToken into the Base URL and API Token fields.
-
To test synchronization, click Test API Credentials.
-
Click Save.
-
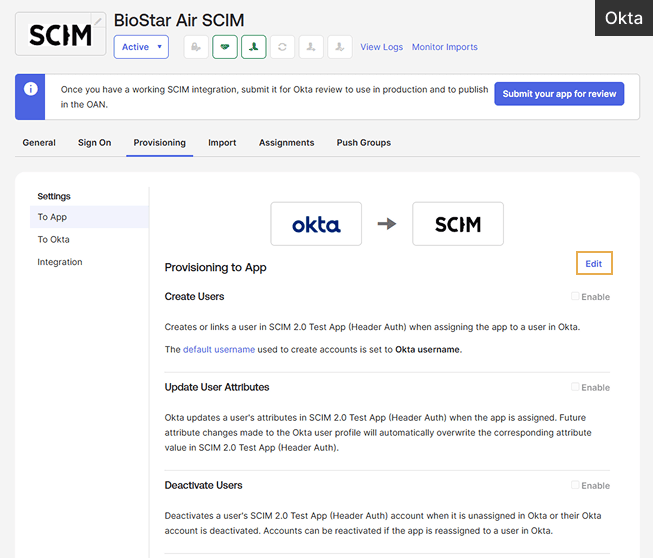
Click the Provision tab to set group push behavior.
-
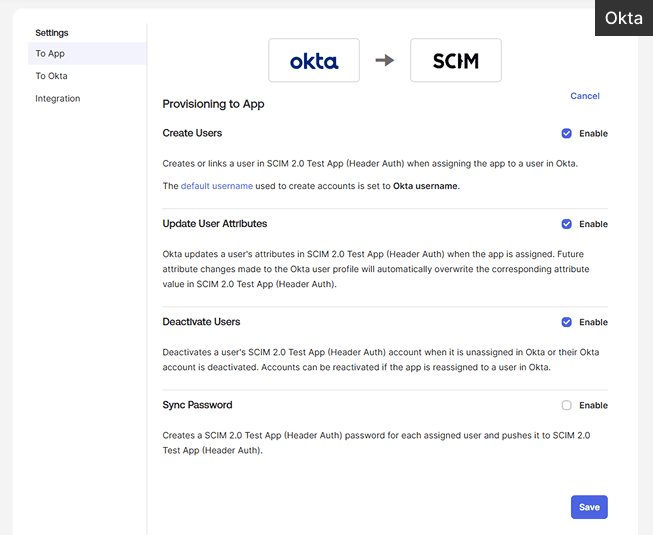
Click Edit, then enable the following attributes.
-
Create Users
-
Update User Attributes
-
Deactivate Users
-
-
Click Save to save the changes.
Push IdP groups to BioStar Air
To push IdP groups to BioStar Air, first prepare user groups and users in Okta. After preparing user groups and users, push them to BioStar Air via SCIM.
Okta: Assign user groups
-
Sign in to the Okta Admin Console.
-
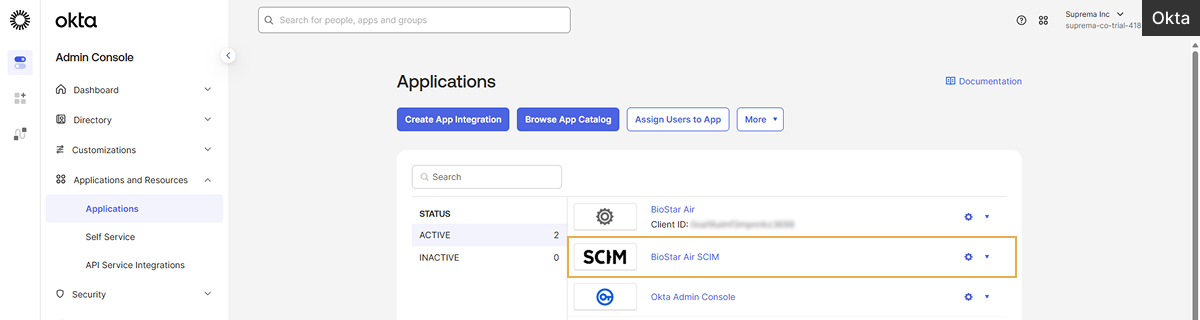
Go to Applications and Resources → Applications.
-
Select the SCIM application.
-
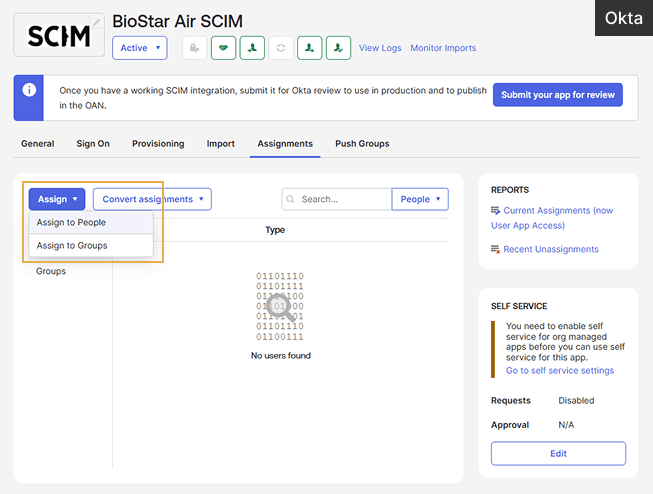
Click the Assignments tab.
-
Click Assign → Assign to Groups.
-
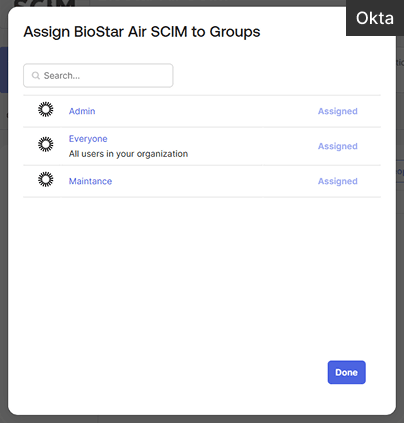
In the user group to assign to the SCIM application, click Assign.
-
After assigning the group, click Done.
Okta: Push user groups
-
Click the Push Groups tab.
-
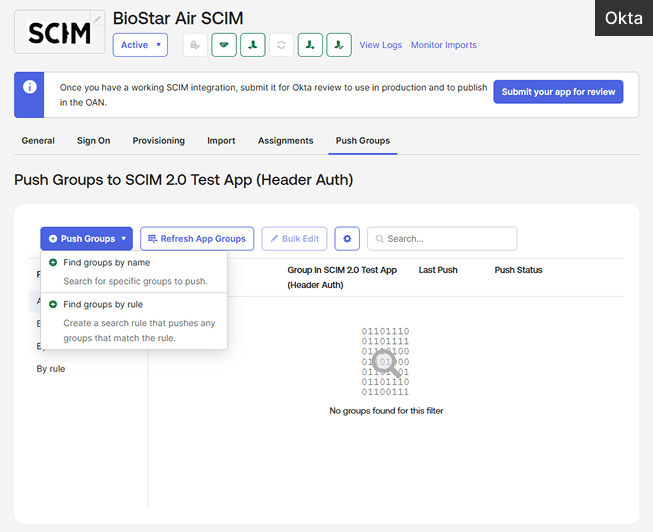
Click Push Groups → Find groups by name.
-
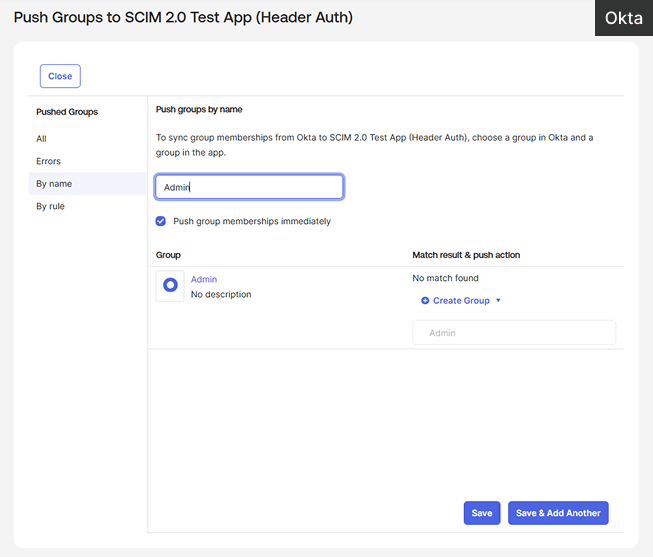
In the input field, enter the group name to push.
-
When a matching user group appears, select it.
-
After selecting a user group, click Save or Save & Another to add it.
-
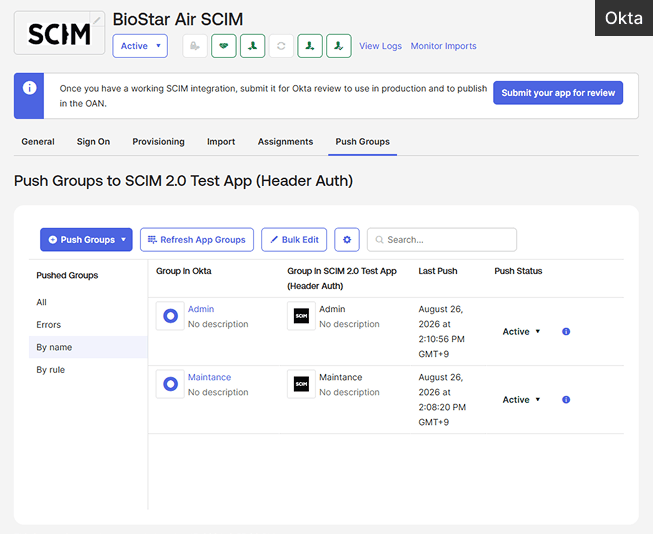
Check the pushed user groups on the Push Groups tab.
BioStar Air: Check the connection
-
Click Settings → Site in the left sidebar of BioStar Air.
-
Click the SSO & SCIM tab.
-
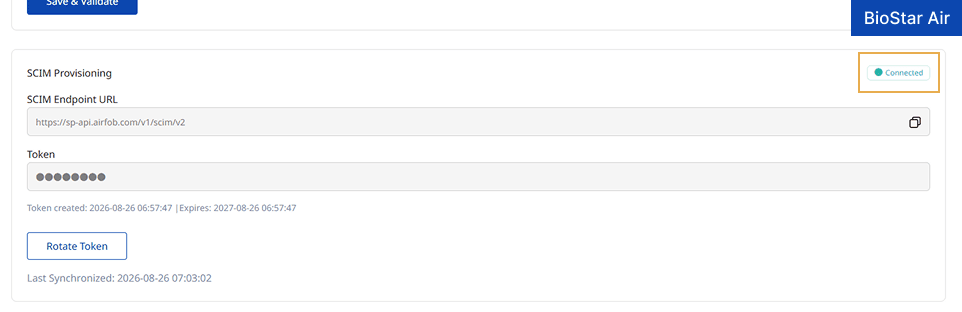
In the SCIM Provisioning section, check for the Connected indicator.
Group mapping
After connecting SSO and SCIM and pushing IdP groups, the site administrator must map them to BioStar Air groups.
Mapping rules
-
You can map multiple IdP groups to a single BioStar Air user group.
-
A BioStar Air user group must be empty before mapping.
-
BioStar Air groups with members cannot serve as mapping targets.
-
Only the site master administrator can manage IdP group mapping.
-
The system locks the role after mapping an IdP group to the master role.
Map administrator roles and user groups
-
Click Settings → Site in the left sidebar of BioStar Air.
-
Click the SSO & SCIM tab.
-
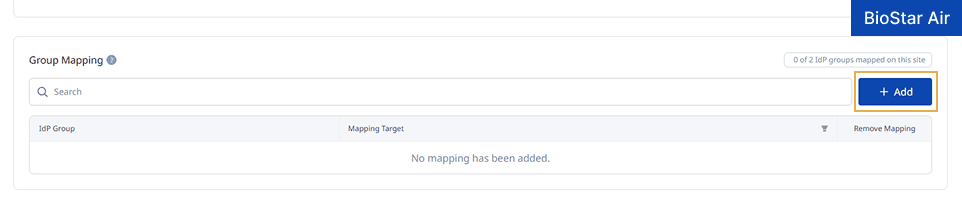
Go to the Group Mapping section and click Add.
-
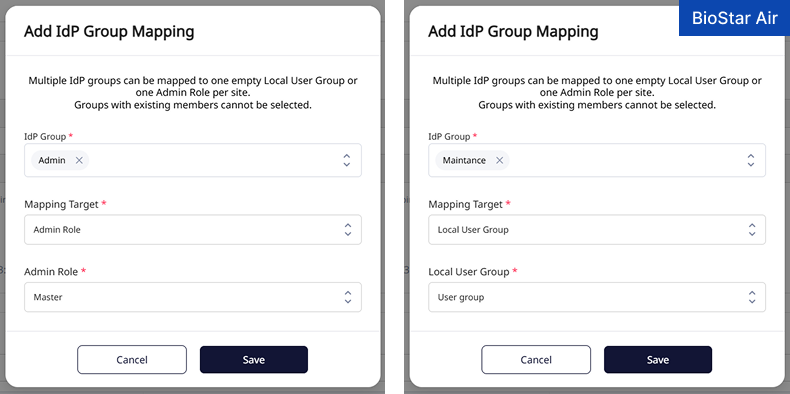
From IdP Group, select an IdP group.
-
In Mapping Target, select Admin Role or Local User Group based on the selected IdP group.
-
Depending on the mapping target, assign an administrator role or select a user group.
-
Click Save to save the mapping.
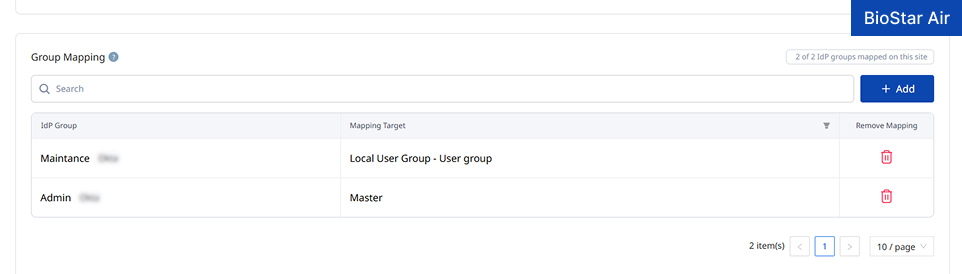
The Group Mapping section shows IdP groups and their mapped BioStar Air groups.
-
For more information on administrator roles, see Manage Administrator Accounts and Roles.
-
For more information on user groups, see Manage User Groups.
Manage synchronized admins, users, and groups
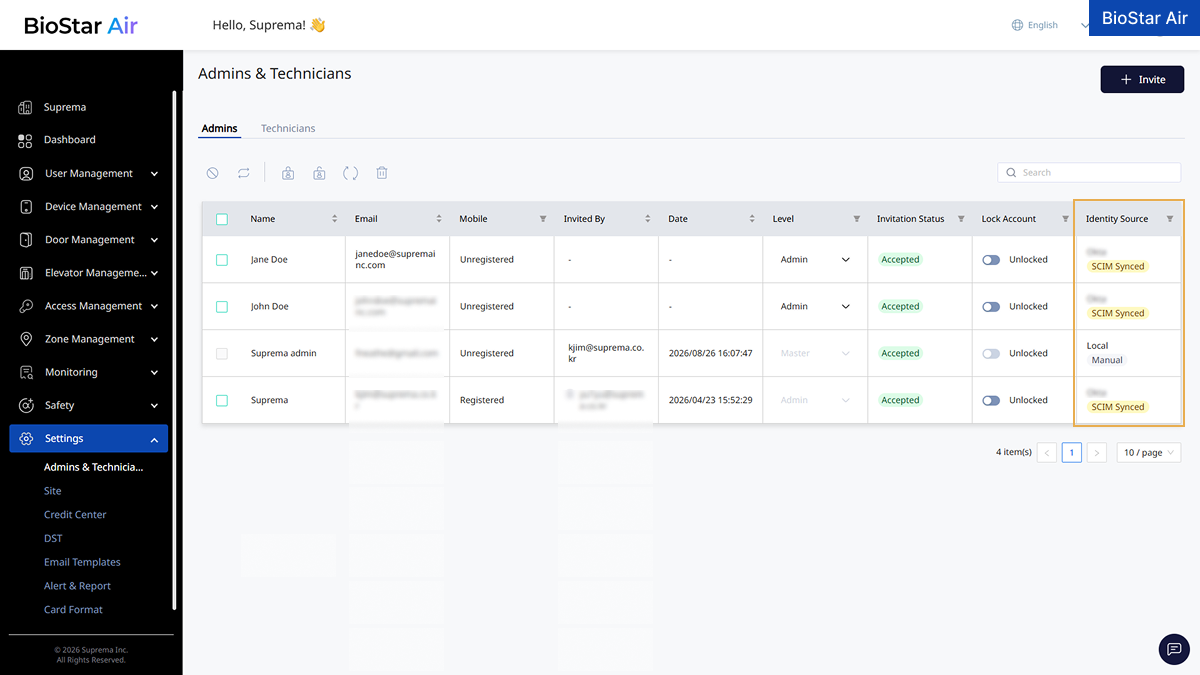
With provisioning enabled, BioStar Air shows whether each admin, user, and group is local or synchronized from the identity provider.
-
In Settings → Admins & Technicians, check the Identity Source column in the admin list.
-
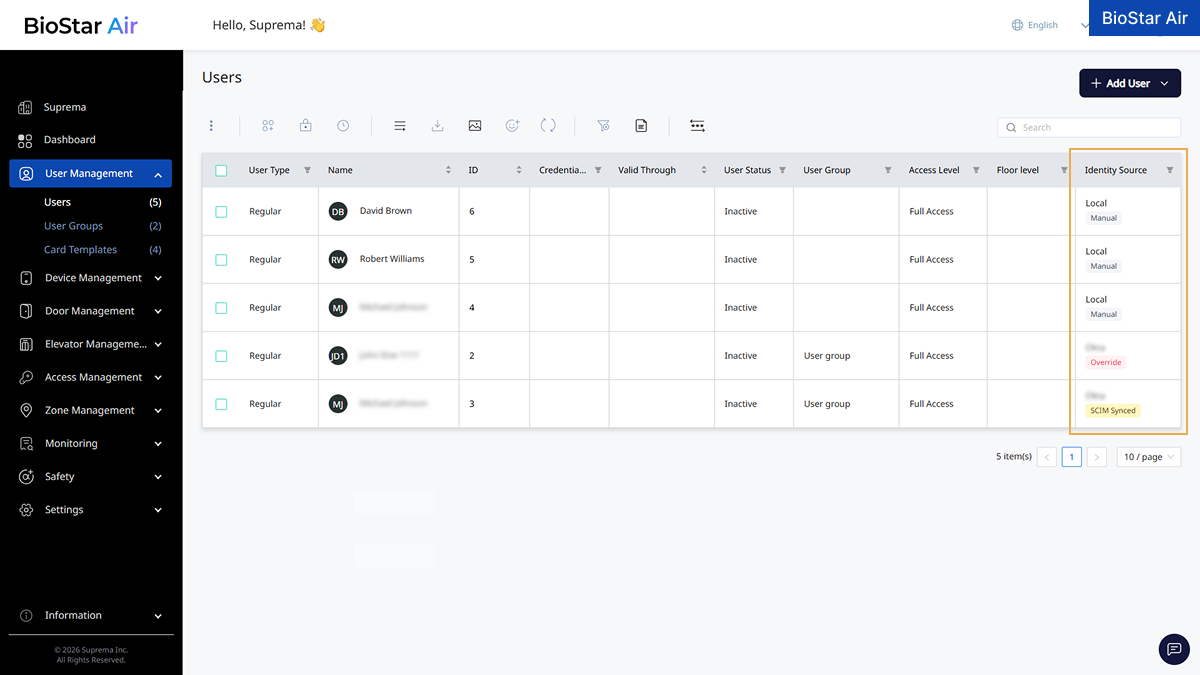
In User Management → Users, check the Identity Source column in the user list.
-
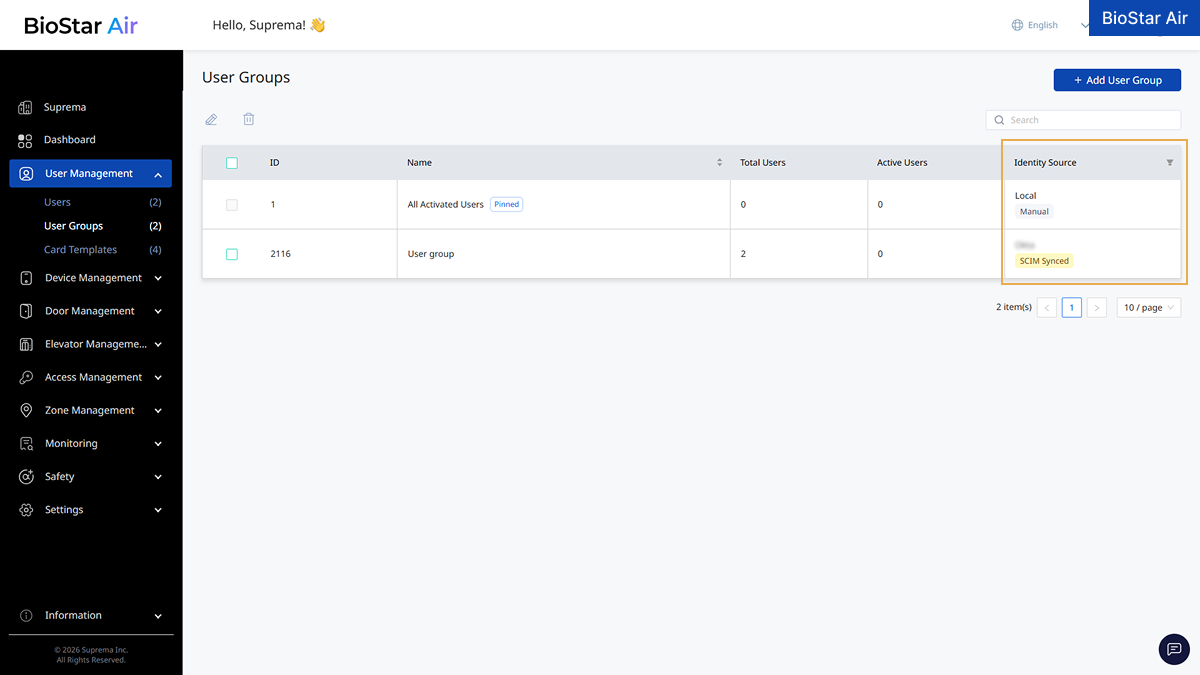
In User Management → User Groups, check the Identity Source column in the user group list.
How SCIM-synced entries work
-
Manually created users and admins remain manually managed.
-
BioStar Air prevents manual deletion of SCIM-synced entries.
-
BioStar Air prevents manually adding or removing users from SCIM-synced groups.
-
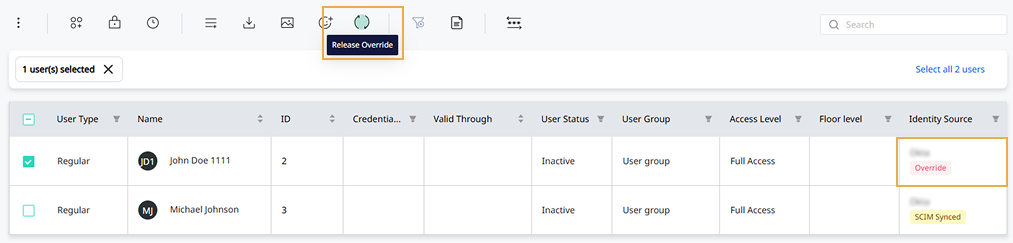
Manually changing a synchronized entry locally sets the status to Override. Run Release Override to cancel local changes and return the entry to SCIM management.
Sign in to Okta
After completing the Okta SSO connection, users can sign in with their Okta accounts on the BioStar Air login screen.
-
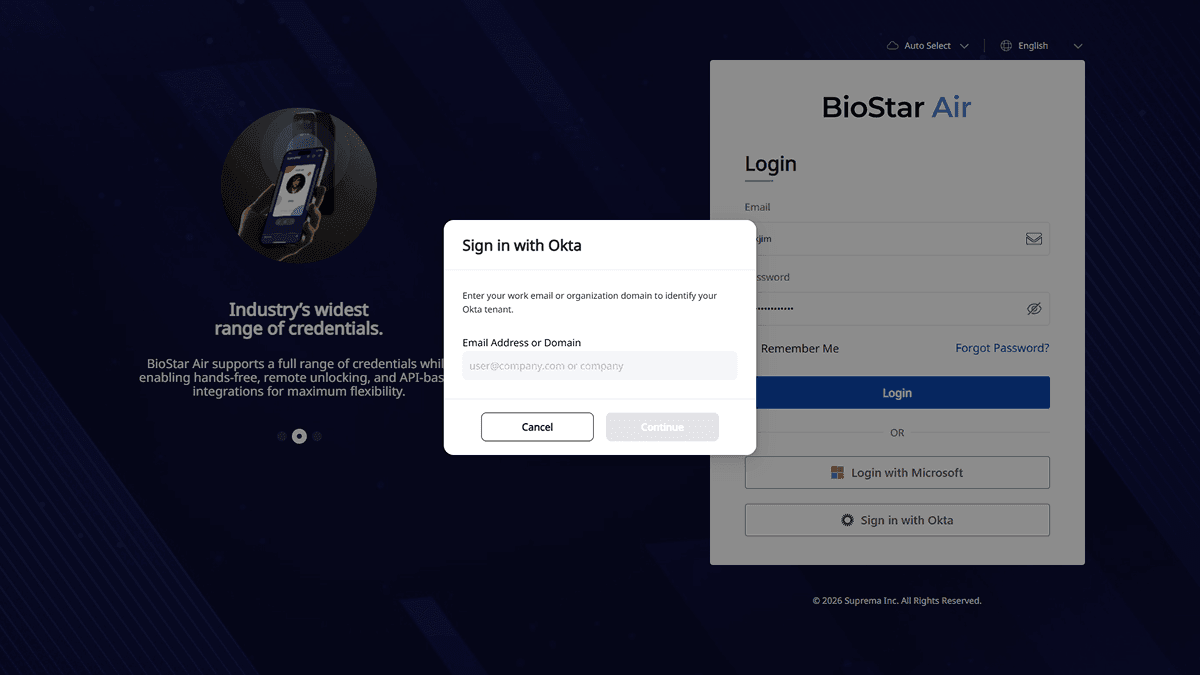
On the BioStar Air login screen, click Sign in with Okta.
-
Enter the organization's email address or domain in the Email Address or Domain field. (For example,
user@company.comorcompany) -
Click Continue.
-
When the Okta sign-in page opens, enter the email address and password for the organization account.
-
After authentication is complete, you are automatically redirected to BioStar Air, completing the sign-in process.
If Okta SSO is not set up for the entered email domain, an error message appears. Contact the site administrator.