Add Auxiliary Database
When adding a communication server, add and connect an auxiliary database to reduce the load on the main server.
-
You need a multi-communication server license to add an auxiliary database. For more information on licensing policies, see License Policy.
-
For more information on installing the communication server, see Install Communication Server.
Before you start
If you are using a domain or hostname instead of an IP address for communication between databases in a MariaDB environment, be sure to check the following guidance.
-
If you do not use an IP address,
Create userorGrantenrollment may not be possible. -
If you are communicating using a domain or hostname, ensure that user and permissions are registered for localhost.
-
If you installed BioStar X using the convenient installation method, the root account is registered only for localhost, so you must add the server's IP address or 127.0.0.1.
Registration method
Check if a password is set for the account with Host 127.0.0.1 and User root; if not set, be sure to establish a password and grant permissions.
-
Check if a password is set for the account with Host 127.0.0.1 and User root.
SELECT * FROM mysql.user;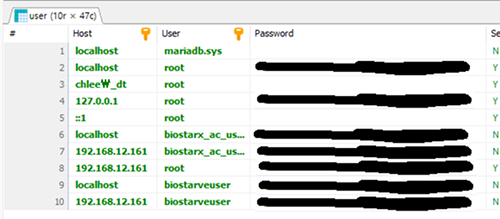
If blank, the password is not set, so be sure to run the query in the following items to add a password and grant permissions.
-
Set a password and grant permissions for the account with Host 127.0.0.1 and User root.
ALTER USER 'root'@'127.0.0.1' IDENTIFIED BY '<Main DB AC Schema Password>';GRANT ALL PRIVILEGES ON *.* TO 'root'@'127.0.0.1';CREATE USER '<Main DB AC User>'@'127.0.0.1' IDENTIFIED BY '<Main DB AC Schema Password>';GRANT ALL PRIVILEGES ON *.* TO '<Main DB AC User>'@'127.0.0.1';CREATE USER '<Main DB AC User>'@'::1' IDENTIFIED BY '<Main DB AC Schema Password>';GRANT ALL PRIVILEGES ON *.* TO '<Main DB AC User>'@'::1';CREATE USER '<Main DB TA User>'@'127.0.0.1' IDENTIFIED BY '<Main DB AC Schema Password>';GRANT ALL PRIVILEGES ON *.* TO '<Main DB TA User>'@'127.0.0.1';CREATE USER '<Main DB TA User>'@'::1' IDENTIFIED BY '<Main DB AC Schema Password>';GRANT ALL PRIVILEGES ON *.* TO '<Main DB TA User>'@'::1';CREATE USER '<Main DB VE User>'@'127.0.0.1' IDENTIFIED BY '<Main DB AC Schema Password>';GRANT ALL PRIVILEGES ON *.* TO '<Main DB VE User>'@'127.0.0.1';CREATE USER '<Main DB VE User>'@'::1' IDENTIFIED BY '<Main DB AC Schema Password>';GRANT ALL PRIVILEGES ON *.* TO '<Main DB VE User>'@'::1';FLUSH PRIVILEGES;ExampleALTER USER 'root'@'127.0.0.1' IDENTIFIED BY 'admin1234!';GRANT ALL PRIVILEGES ON *.* TO 'root'@'127.0.0.1';FLUSH PRIVILEGES;
IP address communication settings
The following settings can force communication via IP address.
-
After installing BioStar X, move to the following path.
C:\Program Files\BioStar X\ta\mariadb-11.4.4-winx64
-
Open the my.cnf file with the owner's permissions and add the
skip-name-resolveoption to the [mysqld] section.[mysqld]port = 3312character-set-server=utf8collation-server=utf8_unicode_cisocket = /tmp/mysql.sockskip-external-lockingkey_buffer_size = 32Mmax_allowed_packet = 64M...skip-name-resolve -
Restart the MariaDB service.
Add auxiliary database
This section provides guidance on adding an auxiliary database. Depending on the type of database being used, there are two methods: MariaDB and SQL Server.
MariaDB
Main database
Grant the account and permissions to access the main database from the new auxiliary database.
CREATE USER '<Main DB AC Schema User>'@'<Sub DB IP>' IDENTIFIED BY '<Main DB AC Schema Password>';

GRANT ALL PRIVILEGES ON <Main DB AC Schema>.* TO '<Main DB AC Schema User>'@'<Sub DB IP>';
FLUSH PRIVILEGES;
CREATE USER 'biostarx_ac_user'@'192.168.12.42' IDENTIFIED BY 'password';

GRANT ALL PRIVILEGES ON biostar2_ac.* TO 'biostarx_ac_user'@'192.168.12.42';
FLUSH PRIVILEGES;
Auxiliary database
Grant the account and permissions to access the new auxiliary database from the main database.
CREATE USER '<Sub DB AC Schema User>'@'<Main DB IP>' IDENTIFIED BY '<Sub DB AC Schema Password>';

GRANT ALL PRIVILEGES ON <Sub DB AC Schema>.* TO '<Sub DB AC Schema User>'@'<Main DB IP>';
FLUSH PRIVILEGES;
CREATE USER 'biostarx_ac_user'@'192.168.12.161' IDENTIFIED BY 'password';

GRANT ALL PRIVILEGES ON biostar2_ac.* TO 'biostarx_ac_user'@'192.168.12.161';
FLUSH PRIVILEGES;
Check for FederatedX usage
Run the command below in both the main and auxiliary databases to check if the FederatedX storage engine is enabled.
SHOW ENGINES;
If the query result shows Engine : FEDERATED, Support : YES, it is already installed. If the FederatedX storage engine is not installed, execute the query below.
INSTALL PLUGIN federated SONAME 'ha_federatedx';
Check if the ha_federatedx.dll file exists in the lib/plugin folder under the path where MariaDB is installed. Typically, the dll file exists at C:\Program Files\MariaDB {version}\lib\plugin path.
Register server alias
Register a server alias to allow the federatedX table created in the auxiliary database to access the source table in the main database.
CREATE SERVER 'default' FOREIGN DATA WRAPPER mysql OPTIONS (HOST '<Main DB IP>', PORT <Main DB PORT>, DATABASE '<Main DB AC Schema>', USER '<Main DB AC USER>', PASSWORD '<Main DB AC USER Password>');

-- Confirm registration
SELECT * FROM mysql.servers;
If you need to change information about Host, Port, DB, User, or Password for the existing registered server name, it can be modified using the Alter statement. You may also change certain information only.
ALTER SERVER 'default' OPTIONS (HOST '<Main DB IP>', PORT <Main DB PORT>, DATABASE '<Main DB AC Schema>', USER '<Main DB AC USER>', PASSWORD '<Main DB AC USER Password>');
CREATE SERVER 'default' FOREIGN DATA WRAPPER mysql OPTIONS (HOST '192.168.12.161', PORT 3312, DATABASE 'biostar2_ac', USER 'biostarx_ac_user', PASSWORD 'password');

ALTER SERVER 'default' OPTIONS (HOST '192.168.12.161', PORT 3312, DATABASE 'biostar2_ac', USER 'biostarx_ac_usermt__fttid__', PASSWORD 'password');
Table link settings
Follow the steps below to link the necessary tables in the auxiliary database to the tables in the main database.
-
The following is the query to generate
CREATE TABLEstatements in the main database.selectconcat('CREATE TABLE IF NOT EXISTS <SubDB_AC_Database_Schema>.', table_name,' ENGINE=FEDERATED ','CONNECTION=''default/', table_name, ''';') as create_table_sqlfrom information_schema.TABLESwhere TABLE_SCHEMA = '<MainDB_AC_Database_Schema>'AND TABLE_TYPE = 'BASE TABLE'AND NOT TABLE_NAME REGEXP '^t_lg[0-9]{6}$'AND NOT TABLE_NAME REGEXP '^t_almevt[0-9]{6}$'AND NOT TABLE_NAME REGEXP '^t_lgalmtrstrc[0-9]{6}$'ORDER BY TABLE_NAME;InfoDue to the nature of FederatedX, it is recommended to set
Table_typeto 'BASE TABLE'.VIEW typeis also possible but not recommended.
-
Be sure to input the
CREATEstatement generated by the above query into the auxiliary database.CREATE TABLE
CREATE TABLE IF NOT EXISTS biostar_x_ac_be_136.mt__fttid__ ENGINE=FEDERATED CONNECTION='default/mt__fttid__';CREATE TABLE IF NOT EXISTS biostar_x_ac_be_136.mt__lksrch ENGINE=FEDERATED CONNECTION='default/mt__lksrch';CREATE TABLE IF NOT EXISTS biostar_x_ac_be_136.temp_acsgrusr ENGINE=FEDERATED CONNECTION='default/temp_acsgrusr';CREATE TABLE IF NOT EXISTS biostar_x_ac_be_136.temp_doubleauthusr ENGINE=FEDERATED CONNECTION='default/temp_doubleauthusr';CREATE TABLE IF NOT EXISTS biostar_x_ac_be_136.temp_operator ENGINE=FEDERATED CONNECTION='default/temp_operator';CREATE TABLE IF NOT EXISTS biostar_x_ac_be_136.t_acsgr ENGINE=FEDERATED CONNECTION='default/t_acsgr';CREATE TABLE IF NOT EXISTS biostar_x_ac_be_136.t_acsgrlvls ENGINE=FEDERATED CONNECTION='default/t_acsgrlvls';CREATE TABLE IF NOT EXISTS biostar_x_ac_be_136.t_acsgrsent ENGINE=FEDERATED CONNECTION='default/t_acsgrsent';CREATE TABLE IF NOT EXISTS biostar_x_ac_be_136.t_acsgruss ENGINE=FEDERATED CONNECTION='default/t_acsgruss';CREATE TABLE IF NOT EXISTS biostar_x_ac_be_136.t_acslvl ENGINE=FEDERATED CONNECTION='default/t_acslvl';CREATE TABLE IF NOT EXISTS biostar_x_ac_be_136.t_acslvlitm ENGINE=FEDERATED CONNECTION='default/t_acslvlitm';CREATE TABLE IF NOT EXISTS biostar_x_ac_be_136.t_acslvlitmdrs ENGINE=FEDERATED CONNECTION='default/t_acslvlitmdrs';CREATE TABLE IF NOT EXISTS biostar_x_ac_be_136.t_acslvlitms ENGINE=FEDERATED CONNECTION='default/t_acslvlitms';CREATE TABLE IF NOT EXISTS biostar_x_ac_be_136.t_acslvlsent ENGINE=FEDERATED CONNECTION='default/t_acslvlsent';CREATE TABLE IF NOT EXISTS biostar_x_ac_be_136.t_adserver_setting ENGINE=FEDERATED CONNECTION='default/t_adserver_setting';CREATE TABLE IF NOT EXISTS biostar_x_ac_be_136.t_adt ENGINE=FEDERATED CONNECTION='default/t_adt';CREATE TABLE IF NOT EXISTS biostar_x_ac_be_136.t_advusrcrd ENGINE=FEDERATED CONNECTION='default/t_advusrcrd';CREATE TABLE IF NOT EXISTS biostar_x_ac_be_136.t_advusrgrp ENGINE=FEDERATED CONNECTION='default/t_advusrgrp';CREATE TABLE IF NOT EXISTS biostar_x_ac_be_136.t_ad_column ENGINE=FEDERATED CONNECTION='default/t_ad_column';CREATE TABLE IF NOT EXISTS biostar_x_ac_be_136.t_ad_group_filter ENGINE=FEDERATED CONNECTION='default/t_ad_group_filter';CREATE TABLE IF NOT EXISTS biostar_x_ac_be_136.t_ad_group_filter_setting ENGINE=FEDERATED CONNECTION='default/t_ad_group_filter_setting';CREATE TABLE IF NOT EXISTS biostar_x_ac_be_136.t_ad_usrmapping ENGINE=FEDERATED CONNECTION='default/t_ad_usrmapping';CREATE TABLE IF NOT EXISTS biostar_x_ac_be_136.t_almact ENGINE=FEDERATED CONNECTION='default/t_almact';CREATE TABLE IF NOT EXISTS biostar_x_ac_be_136.t_almdr ENGINE=FEDERATED CONNECTION='default/t_almdr';CREATE TABLE IF NOT EXISTS biostar_x_ac_be_136.t_almeml ENGINE=FEDERATED CONNECTION='default/t_almeml';CREATE TABLE IF NOT EXISTS biostar_x_ac_be_136.t_almmsg ENGINE=FEDERATED CONNECTION='default/t_almmsg';CREATE TABLE IF NOT EXISTS biostar_x_ac_be_136.t_almset ENGINE=FEDERATED CONNECTION='default/t_almset';CREATE TABLE IF NOT EXISTS biostar_x_ac_be_136.t_almsetevt ENGINE=FEDERATED CONNECTION='default/t_almsetevt';CREATE TABLE IF NOT EXISTS biostar_x_ac_be_136.t_almsetobj ENGINE=FEDERATED CONNECTION='default/t_almsetobj';CREATE TABLE IF NOT EXISTS biostar_x_ac_be_136.t_almsmtpset ENGINE=FEDERATED CONNECTION='default/t_almsmtpset';CREATE TABLE IF NOT EXISTS biostar_x_ac_be_136.t_almsndset ENGINE=FEDERATED CONNECTION='default/t_almsndset';CREATE TABLE IF NOT EXISTS biostar_x_ac_be_136.t_apbbpacgr ENGINE=FEDERATED CONNECTION='default/t_apbbpacgr';CREATE TABLE IF NOT EXISTS biostar_x_ac_be_136.t_area_info ENGINE=FEDERATED CONNECTION='default/t_area_info';CREATE TABLE IF NOT EXISTS biostar_x_ac_be_136.t_atmsyndevgrs ENGINE=FEDERATED CONNECTION='default/t_atmsyndevgrs';CREATE TABLE IF NOT EXISTS biostar_x_ac_be_136.t_atmsyndevs ENGINE=FEDERATED CONNECTION='default/t_atmsyndevs';CREATE TABLE IF NOT EXISTS biostar_x_ac_be_136.t_audit ENGINE=FEDERATED CONNECTION='default/t_audit';CREATE TABLE IF NOT EXISTS biostar_x_ac_be_136.t_authgrp ENGINE=FEDERATED CONNECTION='default/t_authgrp';CREATE TABLE IF NOT EXISTS biostar_x_ac_be_136.t_blkl ENGINE=FEDERATED CONNECTION='default/t_blkl';CREATE TABLE IF NOT EXISTS biostar_x_ac_be_136.t_bzoup ENGINE=FEDERATED CONNECTION='default/t_bzoup';CREATE TABLE IF NOT EXISTS biostar_x_ac_be_136.t_crd ENGINE=FEDERATED CONNECTION='default/t_crd';CREATE TABLE IF NOT EXISTS biostar_x_ac_be_136.t_crdidasm ENGINE=FEDERATED CONNECTION='default/t_crdidasm';CREATE TABLE IF NOT EXISTS biostar_x_ac_be_136.t_crdisshis ENGINE=FEDERATED CONNECTION='default/t_crdisshis';CREATE TABLE IF NOT EXISTS biostar_x_ac_be_136.t_crdlay ENGINE=FEDERATED CONNECTION='default/t_crdlay';CREATE TABLE IF NOT EXISTS biostar_x_ac_be_136.t_crdlay_felica ENGINE=FEDERATED CONNECTION='default/t_crdlay_felica';CREATE TABLE IF NOT EXISTS biostar_x_ac_be_136.t_crdmoachis ENGINE=FEDERATED CONNECTION='default/t_crdmoachis';CREATE TABLE IF NOT EXISTS biostar_x_ac_be_136.t_crdt ENGINE=FEDERATED CONNECTION='default/t_crdt';CREATE TABLE IF NOT EXISTS biostar_x_ac_be_136.t_crdtbin ENGINE=FEDERATED CONNECTION='default/t_crdtbin';CREATE TABLE IF NOT EXISTS biostar_x_ac_be_136.t_crdtyp ENGINE=FEDERATED CONNECTION='default/t_crdtyp';CREATE TABLE IF NOT EXISTS biostar_x_ac_be_136.t_cusfldtyp ENGINE=FEDERATED CONNECTION='default/t_cusfldtyp';CREATE TABLE IF NOT EXISTS biostar_x_ac_be_136.t_cusfldtyp_vst ENGINE=FEDERATED CONNECTION='default/t_cusfldtyp_vst';CREATE TABLE IF NOT EXISTS biostar_x_ac_be_136.t_dashboard_setting ENGINE=FEDERATED CONNECTION='default/t_dashboard_setting';CREATE TABLE IF NOT EXISTS biostar_x_ac_be_136.t_dblmdacsgrs ENGINE=FEDERATED CONNECTION='default/t_dblmdacsgrs';CREATE TABLE IF NOT EXISTS biostar_x_ac_be_136.t_dblmdflrgrs ENGINE=FEDERATED CONNECTION='default/t_dblmdflrgrs';CREATE TABLE IF NOT EXISTS biostar_x_ac_be_136.t_dev ENGINE=FEDERATED CONNECTION='default/t_dev';CREATE TABLE IF NOT EXISTS biostar_x_ac_be_136.t_dev3rdprnt ENGINE=FEDERATED CONNECTION='default/t_dev3rdprnt';CREATE TABLE IF NOT EXISTS biostar_x_ac_be_136.t_devcap ENGINE=FEDERATED CONNECTION='default/t_devcap';CREATE TABLE IF NOT EXISTS biostar_x_ac_be_136.t_devcaps ENGINE=FEDERATED CONNECTION='default/t_devcaps';CREATE TABLE IF NOT EXISTS biostar_x_ac_be_136.t_devcapsfrdev ENGINE=FEDERATED CONNECTION='default/t_devcapsfrdev';CREATE TABLE IF NOT EXISTS biostar_x_ac_be_136.t_devforcecmd ENGINE=FEDERATED CONNECTION='default/t_devforcecmd';CREATE TABLE IF NOT EXISTS biostar_x_ac_be_136.t_devgr ENGINE=FEDERATED CONNECTION='default/t_devgr';CREATE TABLE IF NOT EXISTS biostar_x_ac_be_136.t_devinactive ENGINE=FEDERATED CONNECTION='default/t_devinactive';CREATE TABLE IF NOT EXISTS biostar_x_ac_be_136.t_devoprmd ENGINE=FEDERATED CONNECTION='default/t_devoprmd';CREATE TABLE IF NOT EXISTS biostar_x_ac_be_136.t_devoprt ENGINE=FEDERATED CONNECTION='default/t_devoprt';CREATE TABLE IF NOT EXISTS biostar_x_ac_be_136.t_devrs4chns ENGINE=FEDERATED CONNECTION='default/t_devrs4chns';CREATE TABLE IF NOT EXISTS biostar_x_ac_be_136.t_devthm ENGINE=FEDERATED CONNECTION='default/t_devthm';CREATE TABLE IF NOT EXISTS biostar_x_ac_be_136.t_devtposdp ENGINE=FEDERATED CONNECTION='default/t_devtposdp';CREATE TABLE IF NOT EXISTS biostar_x_ac_be_136.t_devtyp ENGINE=FEDERATED CONNECTION='default/t_devtyp';CREATE TABLE IF NOT EXISTS biostar_x_ac_be_136.t_devwgd ENGINE=FEDERATED CONNECTION='default/t_devwgd';CREATE TABLE IF NOT EXISTS biostar_x_ac_be_136.t_dev_fllr ENGINE=FEDERATED CONNECTION='default/t_dev_fllr';CREATE TABLE IF NOT EXISTS biostar_x_ac_be_136.t_dr ENGINE=FEDERATED CONNECTION='default/t_dr';CREATE TABLE IF NOT EXISTS biostar_x_ac_be_136.t_drgr ENGINE=FEDERATED CONNECTION='default/t_drgr';CREATE TABLE IF NOT EXISTS biostar_x_ac_be_136.t_drtrgact ENGINE=FEDERATED CONNECTION='default/t_drtrgact';CREATE TABLE IF NOT EXISTS biostar_x_ac_be_136.t_drzn ENGINE=FEDERATED CONNECTION='default/t_drzn';CREATE TABLE IF NOT EXISTS biostar_x_ac_be_136.t_dr_flr_map ENGINE=FEDERATED CONNECTION='default/t_dr_flr_map';CREATE TABLE IF NOT EXISTS biostar_x_ac_be_136.t_dst ENGINE=FEDERATED CONNECTION='default/t_dst';CREATE TABLE IF NOT EXISTS biostar_x_ac_be_136.t_elvt ENGINE=FEDERATED CONNECTION='default/t_elvt';CREATE TABLE IF NOT EXISTS biostar_x_ac_be_136.t_elvtdevs ENGINE=FEDERATED CONNECTION='default/t_elvtdevs';CREATE TABLE IF NOT EXISTS biostar_x_ac_be_136.t_elvtgr ENGINE=FEDERATED CONNECTION='default/t_elvtgr';CREATE TABLE IF NOT EXISTS biostar_x_ac_be_136.t_elvttrgact ENGINE=FEDERATED CONNECTION='default/t_elvttrgact';CREATE TABLE IF NOT EXISTS biostar_x_ac_be_136.t_email_content ENGINE=FEDERATED CONNECTION='default/t_email_content';CREATE TABLE IF NOT EXISTS biostar_x_ac_be_136.t_emlst ENGINE=FEDERATED CONNECTION='default/t_emlst';CREATE TABLE IF NOT EXISTS biostar_x_ac_be_136.t_encmgr ENGINE=FEDERATED CONNECTION='default/t_encmgr';CREATE TABLE IF NOT EXISTS biostar_x_ac_be_136.t_erldev ENGINE=FEDERATED CONNECTION='default/t_erldev';CREATE TABLE IF NOT EXISTS biostar_x_ac_be_136.t_etrdevs ENGINE=FEDERATED CONNECTION='default/t_etrdevs';CREATE TABLE IF NOT EXISTS biostar_x_ac_be_136.t_evtflt ENGINE=FEDERATED CONNECTION='default/t_evtflt';CREATE TABLE IF NOT EXISTS biostar_x_ac_be_136.t_evtprio ENGINE=FEDERATED CONNECTION='default/t_evtprio';CREATE TABLE IF NOT EXISTS biostar_x_ac_be_136.t_evtprioaltdevs ENGINE=FEDERATED CONNECTION='default/t_evtprioaltdevs';CREATE TABLE IF NOT EXISTS biostar_x_ac_be_136.t_evtpriosnd ENGINE=FEDERATED CONNECTION='default/t_evtpriosnd';CREATE TABLE IF NOT EXISTS biostar_x_ac_be_136.t_evtspc ENGINE=FEDERATED CONNECTION='default/t_evtspc';CREATE TABLE IF NOT EXISTS biostar_x_ac_be_136.t_evttyp ENGINE=FEDERATED CONNECTION='default/t_evttyp';CREATE TABLE IF NOT EXISTS biostar_x_ac_be_136.t_evttyp_group ENGINE=FEDERATED CONNECTION='default/t_evttyp_group';CREATE TABLE IF NOT EXISTS biostar_x_ac_be_136.t_exdevs ENGINE=FEDERATED CONNECTION='default/t_exdevs';CREATE TABLE IF NOT EXISTS biostar_x_ac_be_136.t_extsys ENGINE=FEDERATED CONNECTION='default/t_extsys';CREATE TABLE IF NOT EXISTS biostar_x_ac_be_136.t_failsyncacsgrupdate ENGINE=FEDERATED CONNECTION='default/t_failsyncacsgrupdate';CREATE TABLE IF NOT EXISTS biostar_x_ac_be_136.t_failsyncacslvlupdate ENGINE=FEDERATED CONNECTION='default/t_failsyncacslvlupdate';CREATE TABLE IF NOT EXISTS biostar_x_ac_be_136.t_failsyncflrlvlupdate ENGINE=FEDERATED CONNECTION='default/t_failsyncflrlvlupdate';CREATE TABLE IF NOT EXISTS biostar_x_ac_be_136.t_failsyncusrupdate ENGINE=FEDERATED CONNECTION='default/t_failsyncusrupdate';CREATE TABLE IF NOT EXISTS biostar_x_ac_be_136.t_faldrgrs ENGINE=FEDERATED CONNECTION='default/t_faldrgrs';CREATE TABLE IF NOT EXISTS biostar_x_ac_be_136.t_faldrs ENGINE=FEDERATED CONNECTION='default/t_faldrs';CREATE TABLE IF NOT EXISTS biostar_x_ac_be_136.t_falelvts ENGINE=FEDERATED CONNECTION='default/t_falelvts';CREATE TABLE IF NOT EXISTS biostar_x_ac_be_136.t_fclty_info ENGINE=FEDERATED CONNECTION='default/t_fclty_info';CREATE TABLE IF NOT EXISTS biostar_x_ac_be_136.t_fctmpl ENGINE=FEDERATED CONNECTION='default/t_fctmpl';CREATE TABLE IF NOT EXISTS biostar_x_ac_be_136.t_flkbpacgr ENGINE=FEDERATED CONNECTION='default/t_flkbpacgr';CREATE TABLE IF NOT EXISTS biostar_x_ac_be_136.t_flkdrgrs ENGINE=FEDERATED CONNECTION='default/t_flkdrgrs';CREATE TABLE IF NOT EXISTS biostar_x_ac_be_136.t_flkdrs ENGINE=FEDERATED CONNECTION='default/t_flkdrs';CREATE TABLE IF NOT EXISTS biostar_x_ac_be_136.t_flkelvts ENGINE=FEDERATED CONNECTION='default/t_flkelvts';CREATE TABLE IF NOT EXISTS biostar_x_ac_be_136.t_flrgrlvls ENGINE=FEDERATED CONNECTION='default/t_flrgrlvls';CREATE TABLE IF NOT EXISTS biostar_x_ac_be_136.t_flrlvl ENGINE=FEDERATED CONNECTION='default/t_flrlvl';CREATE TABLE IF NOT EXISTS biostar_x_ac_be_136.t_flrlvlitm ENGINE=FEDERATED CONNECTION='default/t_flrlvlitm';CREATE TABLE IF NOT EXISTS biostar_x_ac_be_136.t_flrlvlitmelvts ENGINE=FEDERATED CONNECTION='default/t_flrlvlitmelvts';CREATE TABLE IF NOT EXISTS biostar_x_ac_be_136.t_flrlvlitms ENGINE=FEDERATED CONNECTION='default/t_flrlvlitms';CREATE TABLE IF NOT EXISTS biostar_x_ac_be_136.t_flrlvlsent ENGINE=FEDERATED CONNECTION='default/t_flrlvlsent';CREATE TABLE IF NOT EXISTS biostar_x_ac_be_136.t_flrs ENGINE=FEDERATED CONNECTION='default/t_flrs';CREATE TABLE IF NOT EXISTS biostar_x_ac_be_136.t_flr_info ENGINE=FEDERATED CONNECTION='default/t_flr_info';CREATE TABLE IF NOT EXISTS biostar_x_ac_be_136.t_fngptmpl ENGINE=FEDERATED CONNECTION='default/t_fngptmpl';CREATE TABLE IF NOT EXISTS biostar_x_ac_be_136.t_fngptmplver ENGINE=FEDERATED CONNECTION='default/t_fngptmplver';CREATE TABLE IF NOT EXISTS biostar_x_ac_be_136.t_fulacgrs ENGINE=FEDERATED CONNECTION='default/t_fulacgrs';CREATE TABLE IF NOT EXISTS biostar_x_ac_be_136.t_fuldrgrs ENGINE=FEDERATED CONNECTION='default/t_fuldrgrs';CREATE TABLE IF NOT EXISTS biostar_x_ac_be_136.t_fuldrs ENGINE=FEDERATED CONNECTION='default/t_fuldrs';CREATE TABLE IF NOT EXISTS biostar_x_ac_be_136.t_fulelvts ENGINE=FEDERATED CONNECTION='default/t_fulelvts';CREATE TABLE IF NOT EXISTS biostar_x_ac_be_136.t_gis_door_info ENGINE=FEDERATED CONNECTION='default/t_gis_door_info';CREATE TABLE IF NOT EXISTS biostar_x_ac_be_136.t_gis_vcm_info ENGINE=FEDERATED CONNECTION='default/t_gis_vcm_info';CREATE TABLE IF NOT EXISTS biostar_x_ac_be_136.t_grm ENGINE=FEDERATED CONNECTION='default/t_grm';CREATE TABLE IF NOT EXISTS biostar_x_ac_be_136.t_grmel ENGINE=FEDERATED CONNECTION='default/t_grmel';CREATE TABLE IF NOT EXISTS biostar_x_ac_be_136.t_grmeltyp ENGINE=FEDERATED CONNECTION='default/t_grmeltyp';CREATE TABLE IF NOT EXISTS biostar_x_ac_be_136.t_grmelvid ENGINE=FEDERATED CONNECTION='default/t_grmelvid';CREATE TABLE IF NOT EXISTS biostar_x_ac_be_136.t_grmgr ENGINE=FEDERATED CONNECTION='default/t_grmgr';CREATE TABLE IF NOT EXISTS biostar_x_ac_be_136.t_hol ENGINE=FEDERATED CONNECTION='default/t_hol';CREATE TABLE IF NOT EXISTS biostar_x_ac_be_136.t_holgr ENGINE=FEDERATED CONNECTION='default/t_holgr';CREATE TABLE IF NOT EXISTS biostar_x_ac_be_136.t_holsch ENGINE=FEDERATED CONNECTION='default/t_holsch';CREATE TABLE IF NOT EXISTS biostar_x_ac_be_136.t_holschtmprds ENGINE=FEDERATED CONNECTION='default/t_holschtmprds';CREATE TABLE IF NOT EXISTS biostar_x_ac_be_136.t_imglgjb ENGINE=FEDERATED CONNECTION='default/t_imglgjb';CREATE TABLE IF NOT EXISTS biostar_x_ac_be_136.t_inpcfg ENGINE=FEDERATED CONNECTION='default/t_inpcfg';CREATE TABLE IF NOT EXISTS biostar_x_ac_be_136.t_inpcfgex ENGINE=FEDERATED CONNECTION='default/t_inpcfgex';CREATE TABLE IF NOT EXISTS biostar_x_ac_be_136.t_ledoup ENGINE=FEDERATED CONNECTION='default/t_ledoup';CREATE TABLE IF NOT EXISTS biostar_x_ac_be_136.t_lgserverevt ENGINE=FEDERATED CONNECTION='default/t_lgserverevt';CREATE TABLE IF NOT EXISTS biostar_x_ac_be_136.t_lgtbidx ENGINE=FEDERATED CONNECTION='default/t_lgtbidx';CREATE TABLE IF NOT EXISTS biostar_x_ac_be_136.t_lgupdhis ENGINE=FEDERATED CONNECTION='default/t_lgupdhis';CREATE TABLE IF NOT EXISTS biostar_x_ac_be_136.t_licenses ENGINE=FEDERATED CONNECTION='default/t_licenses';CREATE TABLE IF NOT EXISTS biostar_x_ac_be_136.t_lstlog ENGINE=FEDERATED CONNECTION='default/t_lstlog';CREATE TABLE IF NOT EXISTS biostar_x_ac_be_136.t_lstsynsta ENGINE=FEDERATED CONNECTION='default/t_lstsynsta';CREATE TABLE IF NOT EXISTS biostar_x_ac_be_136.t_lstusrauth ENGINE=FEDERATED CONNECTION='default/t_lstusrauth';CREATE TABLE IF NOT EXISTS biostar_x_ac_be_136.t_lulacgrs ENGINE=FEDERATED CONNECTION='default/t_lulacgrs';CREATE TABLE IF NOT EXISTS biostar_x_ac_be_136.t_mblcrd ENGINE=FEDERATED CONNECTION='default/t_mblcrd';CREATE TABLE IF NOT EXISTS biostar_x_ac_be_136.t_mobile_credential ENGINE=FEDERATED CONNECTION='default/t_mobile_credential';CREATE TABLE IF NOT EXISTS biostar_x_ac_be_136.t_mobile_picture_hash ENGINE=FEDERATED CONNECTION='default/t_mobile_picture_hash';CREATE TABLE IF NOT EXISTS biostar_x_ac_be_136.t_mxdt ENGINE=FEDERATED CONNECTION='default/t_mxdt';CREATE TABLE IF NOT EXISTS biostar_x_ac_be_136.t_nested_dev ENGINE=FEDERATED CONNECTION='default/t_nested_dev';CREATE TABLE IF NOT EXISTS biostar_x_ac_be_136.t_nested_devgr ENGINE=FEDERATED CONNECTION='default/t_nested_devgr';CREATE TABLE IF NOT EXISTS biostar_x_ac_be_136.t_nested_drgr ENGINE=FEDERATED CONNECTION='default/t_nested_drgr';CREATE TABLE IF NOT EXISTS biostar_x_ac_be_136.t_nested_elvtgr ENGINE=FEDERATED CONNECTION='default/t_nested_elvtgr';CREATE TABLE IF NOT EXISTS biostar_x_ac_be_136.t_nested_grmgr ENGINE=FEDERATED CONNECTION='default/t_nested_grmgr';CREATE TABLE IF NOT EXISTS biostar_x_ac_be_136.t_nested_usrgr ENGINE=FEDERATED CONNECTION='default/t_nested_usrgr';CREATE TABLE IF NOT EXISTS biostar_x_ac_be_136.t_ntc ENGINE=FEDERATED CONNECTION='default/t_ntc';CREATE TABLE IF NOT EXISTS biostar_x_ac_be_136.t_occpbpacgr ENGINE=FEDERATED CONNECTION='default/t_occpbpacgr';CREATE TABLE IF NOT EXISTS biostar_x_ac_be_136.t_oupsig ENGINE=FEDERATED CONNECTION='default/t_oupsig';CREATE TABLE IF NOT EXISTS biostar_x_ac_be_136.t_perm ENGINE=FEDERATED CONNECTION='default/t_perm';CREATE TABLE IF NOT EXISTS biostar_x_ac_be_136.t_polygon_info ENGINE=FEDERATED CONNECTION='default/t_polygon_info';CREATE TABLE IF NOT EXISTS biostar_x_ac_be_136.t_prf ENGINE=FEDERATED CONNECTION='default/t_prf';CREATE TABLE IF NOT EXISTS biostar_x_ac_be_136.t_qcact ENGINE=FEDERATED CONNECTION='default/t_qcact';CREATE TABLE IF NOT EXISTS biostar_x_ac_be_136.t_qcactalm ENGINE=FEDERATED CONNECTION='default/t_qcactalm';CREATE TABLE IF NOT EXISTS biostar_x_ac_be_136.t_qcactperm ENGINE=FEDERATED CONNECTION='default/t_qcactperm';CREATE TABLE IF NOT EXISTS biostar_x_ac_be_136.t_reporttempid ENGINE=FEDERATED CONNECTION='default/t_reporttempid';CREATE TABLE IF NOT EXISTS biostar_x_ac_be_136.t_reporttempid_header ENGINE=FEDERATED CONNECTION='default/t_reporttempid_header';CREATE TABLE IF NOT EXISTS biostar_x_ac_be_136.t_report_export_setting ENGINE=FEDERATED CONNECTION='default/t_report_export_setting';CREATE TABLE IF NOT EXISTS biostar_x_ac_be_136.t_report_print_setting ENGINE=FEDERATED CONNECTION='default/t_report_print_setting';CREATE TABLE IF NOT EXISTS biostar_x_ac_be_136.t_report_schedules ENGINE=FEDERATED CONNECTION='default/t_report_schedules';CREATE TABLE IF NOT EXISTS biostar_x_ac_be_136.t_report_setting ENGINE=FEDERATED CONNECTION='default/t_report_setting';CREATE TABLE IF NOT EXISTS biostar_x_ac_be_136.t_report_template ENGINE=FEDERATED CONNECTION='default/t_report_template';CREATE TABLE IF NOT EXISTS biostar_x_ac_be_136.t_report_template_group_filter ENGINE=FEDERATED CONNECTION='default/t_report_template_group_filter';CREATE TABLE IF NOT EXISTS biostar_x_ac_be_136.t_report_template_user_filter ENGINE=FEDERATED CONNECTION='default/t_report_template_user_filter';CREATE TABLE IF NOT EXISTS biostar_x_ac_be_136.t_rmjb ENGINE=FEDERATED CONNECTION='default/t_rmjb';CREATE TABLE IF NOT EXISTS biostar_x_ac_be_136.t_rmjbev ENGINE=FEDERATED CONNECTION='default/t_rmjbev';CREATE TABLE IF NOT EXISTS biostar_x_ac_be_136.t_rmjbzn ENGINE=FEDERATED CONNECTION='default/t_rmjbzn';CREATE TABLE IF NOT EXISTS biostar_x_ac_be_136.t_sch ENGINE=FEDERATED CONNECTION='default/t_sch';CREATE TABLE IF NOT EXISTS biostar_x_ac_be_136.t_schdl ENGINE=FEDERATED CONNECTION='default/t_schdl';CREATE TABLE IF NOT EXISTS biostar_x_ac_be_136.t_schdltmprds ENGINE=FEDERATED CONNECTION='default/t_schdltmprds';CREATE TABLE IF NOT EXISTS biostar_x_ac_be_136.t_shf ENGINE=FEDERATED CONNECTION='default/t_shf';CREATE TABLE IF NOT EXISTS biostar_x_ac_be_136.t_shfgr ENGINE=FEDERATED CONNECTION='default/t_shfgr';CREATE TABLE IF NOT EXISTS biostar_x_ac_be_136.t_shfgrshfs ENGINE=FEDERATED CONNECTION='default/t_shfgrshfs';CREATE TABLE IF NOT EXISTS biostar_x_ac_be_136.t_shfgruss ENGINE=FEDERATED CONNECTION='default/t_shfgruss';CREATE TABLE IF NOT EXISTS biostar_x_ac_be_136.t_shfrul ENGINE=FEDERATED CONNECTION='default/t_shfrul';CREATE TABLE IF NOT EXISTS biostar_x_ac_be_136.t_shftmplshfs ENGINE=FEDERATED CONNECTION='default/t_shftmplshfs';CREATE TABLE IF NOT EXISTS biostar_x_ac_be_136.t_snd ENGINE=FEDERATED CONNECTION='default/t_snd';CREATE TABLE IF NOT EXISTS biostar_x_ac_be_136.t_srvsta ENGINE=FEDERATED CONNECTION='default/t_srvsta';CREATE TABLE IF NOT EXISTS biostar_x_ac_be_136.t_synctapb ENGINE=FEDERATED CONNECTION='default/t_synctapb';CREATE TABLE IF NOT EXISTS biostar_x_ac_be_136.t_syscfg ENGINE=FEDERATED CONNECTION='default/t_syscfg';CREATE TABLE IF NOT EXISTS biostar_x_ac_be_136.t_takey ENGINE=FEDERATED CONNECTION='default/t_takey';CREATE TABLE IF NOT EXISTS biostar_x_ac_be_136.t_tmapbbpacgr ENGINE=FEDERATED CONNECTION='default/t_tmapbbpacgr';CREATE TABLE IF NOT EXISTS biostar_x_ac_be_136.t_tmprd ENGINE=FEDERATED CONNECTION='default/t_tmprd';CREATE TABLE IF NOT EXISTS biostar_x_ac_be_136.t_trgact ENGINE=FEDERATED CONNECTION='default/t_trgact';CREATE TABLE IF NOT EXISTS biostar_x_ac_be_136.t_usersent ENGINE=FEDERATED CONNECTION='default/t_usersent';CREATE TABLE IF NOT EXISTS biostar_x_ac_be_136.t_usr ENGINE=FEDERATED CONNECTION='default/t_usr';CREATE TABLE IF NOT EXISTS biostar_x_ac_be_136.t_usracsgrtmpl ENGINE=FEDERATED CONNECTION='default/t_usracsgrtmpl';CREATE TABLE IF NOT EXISTS biostar_x_ac_be_136.t_usrcrd ENGINE=FEDERATED CONNECTION='default/t_usrcrd';CREATE TABLE IF NOT EXISTS biostar_x_ac_be_136.t_usrcusfld ENGINE=FEDERATED CONNECTION='default/t_usrcusfld';CREATE TABLE IF NOT EXISTS biostar_x_ac_be_136.t_usrcusfldtmpl ENGINE=FEDERATED CONNECTION='default/t_usrcusfldtmpl';CREATE TABLE IF NOT EXISTS biostar_x_ac_be_136.t_usrgr ENGINE=FEDERATED CONNECTION='default/t_usrgr';CREATE TABLE IF NOT EXISTS biostar_x_ac_be_136.t_usrgr_order ENGINE=FEDERATED CONNECTION='default/t_usrgr_order';CREATE TABLE IF NOT EXISTS biostar_x_ac_be_136.t_usrmsksyn ENGINE=FEDERATED CONNECTION='default/t_usrmsksyn';CREATE TABLE IF NOT EXISTS biostar_x_ac_be_136.t_usroprmd ENGINE=FEDERATED CONNECTION='default/t_usroprmd';CREATE TABLE IF NOT EXISTS biostar_x_ac_be_136.t_usrphoto ENGINE=FEDERATED CONNECTION='default/t_usrphoto';CREATE TABLE IF NOT EXISTS biostar_x_ac_be_136.t_usrtmpl ENGINE=FEDERATED CONNECTION='default/t_usrtmpl';CREATE TABLE IF NOT EXISTS biostar_x_ac_be_136.t_usr_phrase ENGINE=FEDERATED CONNECTION='default/t_usr_phrase';CREATE TABLE IF NOT EXISTS biostar_x_ac_be_136.t_usr_rep ENGINE=FEDERATED CONNECTION='default/t_usr_rep';CREATE TABLE IF NOT EXISTS biostar_x_ac_be_136.t_vcm_flr_map ENGINE=FEDERATED CONNECTION='default/t_vcm_flr_map';CREATE TABLE IF NOT EXISTS biostar_x_ac_be_136.t_vipphbks ENGINE=FEDERATED CONNECTION='default/t_vipphbks';CREATE TABLE IF NOT EXISTS biostar_x_ac_be_136.t_visit ENGINE=FEDERATED CONNECTION='default/t_visit';CREATE TABLE IF NOT EXISTS biostar_x_ac_be_136.t_visitacsgrmap ENGINE=FEDERATED CONNECTION='default/t_visitacsgrmap';CREATE TABLE IF NOT EXISTS biostar_x_ac_be_136.t_visitcusfld ENGINE=FEDERATED CONNECTION='default/t_visitcusfld';CREATE TABLE IF NOT EXISTS biostar_x_ac_be_136.t_visitfngptmpl ENGINE=FEDERATED CONNECTION='default/t_visitfngptmpl';CREATE TABLE IF NOT EXISTS biostar_x_ac_be_136.t_visitfngptmplver ENGINE=FEDERATED CONNECTION='default/t_visitfngptmplver';CREATE TABLE IF NOT EXISTS biostar_x_ac_be_136.t_visitorterminal ENGINE=FEDERATED CONNECTION='default/t_visitorterminal';CREATE TABLE IF NOT EXISTS biostar_x_ac_be_136.t_visitorterminalacgroupmap ENGINE=FEDERATED CONNECTION='default/t_visitorterminalacgroupmap';CREATE TABLE IF NOT EXISTS biostar_x_ac_be_136.t_visitorterminalregion ENGINE=FEDERATED CONNECTION='default/t_visitorterminalregion';CREATE TABLE IF NOT EXISTS biostar_x_ac_be_136.t_visitorterminalregionmap ENGINE=FEDERATED CONNECTION='default/t_visitorterminalregionmap';CREATE TABLE IF NOT EXISTS biostar_x_ac_be_136.t_visitorterms ENGINE=FEDERATED CONNECTION='default/t_visitorterms';CREATE TABLE IF NOT EXISTS biostar_x_ac_be_136.t_wgdbz ENGINE=FEDERATED CONNECTION='default/t_wgdbz';CREATE TABLE IF NOT EXISTS biostar_x_ac_be_136.t_wgdfmt ENGINE=FEDERATED CONNECTION='default/t_wgdfmt';CREATE TABLE IF NOT EXISTS biostar_x_ac_be_136.t_wgdled ENGINE=FEDERATED CONNECTION='default/t_wgdled';CREATE TABLE IF NOT EXISTS biostar_x_ac_be_136.t_wgdtmpr ENGINE=FEDERATED CONNECTION='default/t_wgdtmpr';CREATE TABLE IF NOT EXISTS biostar_x_ac_be_136.t_widget ENGINE=FEDERATED CONNECTION='default/t_widget';CREATE TABLE IF NOT EXISTS biostar_x_ac_be_136.t_zn ENGINE=FEDERATED CONNECTION='default/t_zn';CREATE TABLE IF NOT EXISTS biostar_x_ac_be_136.t_znacsgr ENGINE=FEDERATED CONNECTION='default/t_znacsgr';CREATE TABLE IF NOT EXISTS biostar_x_ac_be_136.t_znapb ENGINE=FEDERATED CONNECTION='default/t_znapb';CREATE TABLE IF NOT EXISTS biostar_x_ac_be_136.t_znapbusrio ENGINE=FEDERATED CONNECTION='default/t_znapbusrio';CREATE TABLE IF NOT EXISTS biostar_x_ac_be_136.t_zncrd ENGINE=FEDERATED CONNECTION='default/t_zncrd';CREATE TABLE IF NOT EXISTS biostar_x_ac_be_136.t_zndr ENGINE=FEDERATED CONNECTION='default/t_zndr';CREATE TABLE IF NOT EXISTS biostar_x_ac_be_136.t_znelvt ENGINE=FEDERATED CONNECTION='default/t_znelvt';CREATE TABLE IF NOT EXISTS biostar_x_ac_be_136.t_znfal ENGINE=FEDERATED CONNECTION='default/t_znfal';CREATE TABLE IF NOT EXISTS biostar_x_ac_be_136.t_znfalinpsns ENGINE=FEDERATED CONNECTION='default/t_znfalinpsns';CREATE TABLE IF NOT EXISTS biostar_x_ac_be_136.t_znflk ENGINE=FEDERATED CONNECTION='default/t_znflk';CREATE TABLE IF NOT EXISTS biostar_x_ac_be_136.t_znflrs ENGINE=FEDERATED CONNECTION='default/t_znflrs';CREATE TABLE IF NOT EXISTS biostar_x_ac_be_136.t_znful ENGINE=FEDERATED CONNECTION='default/t_znful';CREATE TABLE IF NOT EXISTS biostar_x_ac_be_136.t_zninp ENGINE=FEDERATED CONNECTION='default/t_zninp';CREATE TABLE IF NOT EXISTS biostar_x_ac_be_136.t_znital ENGINE=FEDERATED CONNECTION='default/t_znital';CREATE TABLE IF NOT EXISTS biostar_x_ac_be_136.t_znlul ENGINE=FEDERATED CONNECTION='default/t_znlul';CREATE TABLE IF NOT EXISTS biostar_x_ac_be_136.t_znmst ENGINE=FEDERATED CONNECTION='default/t_znmst';CREATE TABLE IF NOT EXISTS biostar_x_ac_be_136.t_znoccp ENGINE=FEDERATED CONNECTION='default/t_znoccp';CREATE TABLE IF NOT EXISTS biostar_x_ac_be_136.t_znoccp_lstusrevt ENGINE=FEDERATED CONNECTION='default/t_znoccp_lstusrevt';CREATE TABLE IF NOT EXISTS biostar_x_ac_be_136.t_znrc ENGINE=FEDERATED CONNECTION='default/t_znrc';CREATE TABLE IF NOT EXISTS biostar_x_ac_be_136.t_zntapb ENGINE=FEDERATED CONNECTION='default/t_zntapb';CREATE TABLE IF NOT EXISTS biostar_x_ac_be_136.t_zntmapb ENGINE=FEDERATED CONNECTION='default/t_zntmapb';CREATE TABLE IF NOT EXISTS biostar_x_ac_be_136.t_zntrck ENGINE=FEDERATED CONNECTION='default/t_zntrck';CREATE TABLE IF NOT EXISTS biostar_x_ac_be_136.t_zntrgact ENGINE=FEDERATED CONNECTION='default/t_zntrgact';CREATE TABLE IF NOT EXISTS biostar_x_ac_be_136.t_znusr ENGINE=FEDERATED CONNECTION='default/t_znusr';CREATE TABLE IF NOT EXISTS biostar_x_ac_be_136.v_devices ENGINE=FEDERATED CONNECTION='default/v_devices';CREATE TABLE IF NOT EXISTS biostar_x_ac_be_136.v_dr ENGINE=FEDERATED CONNECTION='default/v_dr';CREATE TABLE IF NOT EXISTS biostar_x_ac_be_136.v_elvt ENGINE=FEDERATED CONNECTION='default/v_elvt';
Service Manager settings
-
Run BioStar X Service Manager. (Start → BioStar X → BioStar X Service Manager)
-
Click the DATABASE menu in the left sidebar.
-
Click + Add Database in the upper right corner of the screen.
-
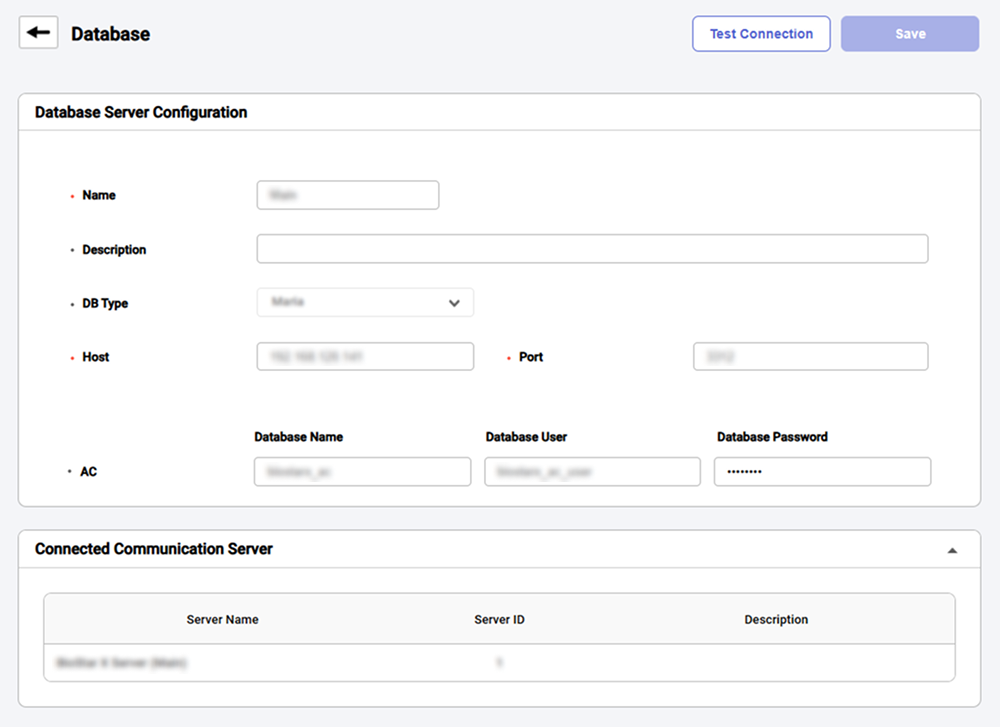
Enter each item in the database addition screen.
-
Name: Enter the database name.
-
Description: Enter the database description.
-
DB Type: Select the database type. (Maria, MS SQL)
-
Host: Enter the hostname or IP address of the database server.
-
Port: Enter the port number of the database server.
-
AC / TA: Enter the name, user, and password of the AC, TA databases.
-
-
Click the Test Connection button in the upper-right corner to check if the database is connected properly.
-
Click Save at the top right of the screen to save settings.
SQL Server
Grant permissions for the main database
Grant the following permissions on the main database with an account that has sysadmin privileges.
GRANT ALTER ANY LINKED SERVER TO [<MAIN DATABASE AC USER>];
GRANT ALTER ANY LOGIN TO [<MAIN DATABASE AC USER>];
GRANT ALTER ANY LINKED SERVER TO [biostar_x_user];
GRANT ALTER ANY LOGIN TO [biostar_x_user];
Grant permissions for the auxiliary database
-
Connect User Mapping for tables and users in the auxiliary database with an account that has sysadmin privileges. At this time, adding the
db_ownerrole is necessary.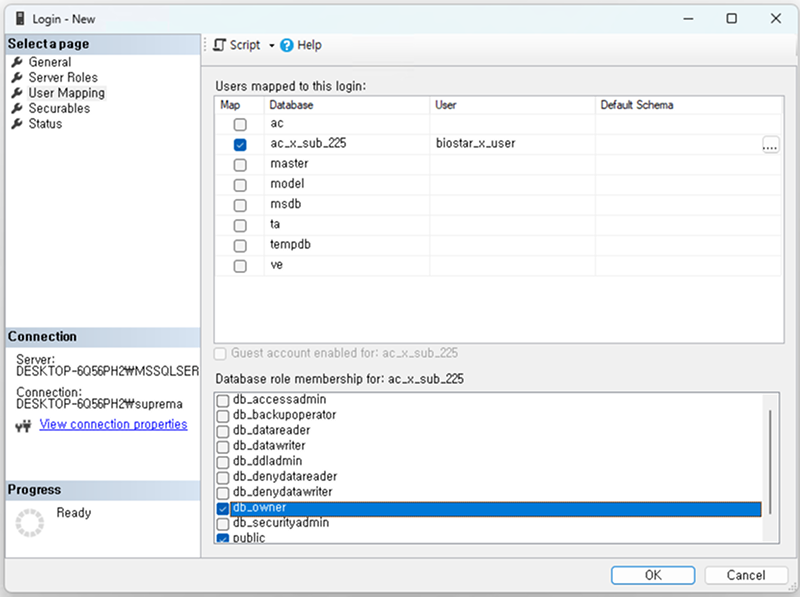
-
Grant the following permissions to the database to be added.
GRANT ALTER ANY LINKED SERVER TO [<SUB DATABASE AC USER>];GRANT ALTER ANY LOGIN TO [<SUB DATABASE AC USER>];ExampleGRANT ALTER ANY LINKED SERVER TO [biostar_x_user_sub];GRANT ALTER ANY LOGIN TO [biostar_x_user_sub];
Service Manager settings
Use BioStar X Service Manager to add the auxiliary database.
-
Run BioStar X Service Manager. (Start → BioStar X → BioStar X Service Manager)
-
Click the DATABASE menu in the left sidebar.
-
Click + Add Database in the upper right corner of the screen.
-
Enter each item in the database addition screen.
-
Name: Enter the database name.
-
Description: Enter the database description.
-
DB Type: Select the database type. (Maria, MS SQL)
-
Host: Enter the hostname or IP address of the database server.
-
Port: Enter the port number of the database server.
-
AC / TA: Enter the name, user, and password of the AC, TA databases.
-
-
Click the Test Connection button in the upper-right corner to check if the database is connected properly.
-
Click Save at the top right of the screen to save settings.
-
After completing the settings, Linked Server settings for both main and auxiliary databases will be automatically applied.
-
Even when modifying database information, the Linked Server settings will be automatically changed. When modifying the main database, the changes will reflect in the Linked Server settings of all registered auxiliary databases. When modifying the auxiliary database, only changes for the main database and that auxiliary database will be reflected.
Generate Linked Temp Table query
Run the query below in the main database to generate the Linked Temp Table query to be created in the auxiliary database.
USE [<AC Schema>];
GO
DECLARE @LinkedServer  sysname = N'default';
DECLARE @SourceSchema  sysname = N'dbo';
DECLARE @TargetSchema  sysname = N'dbo';

SELECT
    'IF OBJECT_ID(N''' + QUOTENAME(@TargetSchema,'') + '.' + QUOTENAME(t.name,'') + ''', ''SN'') IS NOT NULL '
  + 'DROP SYNONYM ' + QUOTENAME(@TargetSchema) + '.' + QUOTENAME(t.name) + ';'
  + 'CREATE SYNONYM ' + QUOTENAME(@TargetSchema) + '.' + QUOTENAME(t.name)
  + ' FOR ' + QUOTENAME(@LinkedServer) + '.' + QUOTENAME(DB_NAME()) + '.' + QUOTENAME(s.name) + '.' + QUOTENAME(t.name) + ';'
  AS recreate_synonym_sql
FROM sys.tables AS t
JOIN sys.schemas AS s
  ON s.schema_id = t.schema_id
WHERE s.name = @SourceSchema
  AND t.is_ms_shipped = 0
  AND t.name NOT LIKE 't_lg[0-9][0-9][0-9][0-9][0-9][0-9]'
  AND t.name NOT LIKE 't_almevt[0-9][0-9][0-9][0-9][0-9][0-9]'
  AND t.name NOT LIKE 't_lgalmtrstrc[0-9][0-9][0-9][0-9][0-9][0-9]'
ORDER BY t.name;
-- Example
USE [main_ac_x_215];
GO
DECLARE @LinkedServer  sysname = N'default';  -- Linked Server name set in the sub DB
DECLARE @SourceSchema  sysname = N'dbo';      -- Schema to target in the main DB
DECLARE @TargetSchema  sysname = N'dbo';      -- Schema to create synonyms in the sub DB (reflected in the output string)

SELECT
    'IF OBJECT_ID(N''' + QUOTENAME(@TargetSchema,'') + '.' + QUOTENAME(t.name,'') + ''', ''SN'') IS NOT NULL '
  + 'DROP SYNONYM ' + QUOTENAME(@TargetSchema) + '.' + QUOTENAME(t.name) + ';'
  + 'CREATE SYNONYM ' + QUOTENAME(@TargetSchema) + '.' + QUOTENAME(t.name)
  + ' FOR ' + QUOTENAME(@LinkedServer) + '.' + QUOTENAME(DB_NAME()) + '.' + QUOTENAME(s.name) + '.' + QUOTENAME(t.name) + ';'
  AS recreate_synonym_sql
FROM sys.tables AS t
JOIN sys.schemas AS s
  ON s.schema_id = t.schema_id
WHERE s.name = @SourceSchema
  AND t.is_ms_shipped = 0
  AND t.name NOT LIKE 't_lg[0-9][0-9][0-9][0-9][0-9][0-9]'
  AND t.name NOT LIKE 't_almevt[0-9][0-9][0-9][0-9][0-9][0-9]'
  AND t.name NOT LIKE 't_lgalmtrstrc[0-9][0-9][0-9][0-9][0-9][0-9]'
ORDER BY t.name;
This is an example of a CREATE statement generated by the above query.CREATE TABLE
Execute query in the auxiliary database.
Copy the previously generated CREATE SYNONYM query in full. Connect to the auxiliary database server to be added, write the query as below, and execute it. It will be stored in Synonyms in the AC schema of the auxiliary database.
use [<Sub DB AC Database>];

IF OBJECT_ID(N'[dbo].[T_ACSGR]', 'SN') IS NOT NULL DROP SYNONYM [dbo].[T_ACSGR];CREATE SYNONYM [dbo].[T_ACSGR] FOR [default].[main_ac_x_215].[dbo].[T_ACSGR];
IF OBJECT_ID(N'[dbo].[T_ACSGRLVLS]', 'SN') IS NOT NULL DROP SYNONYM [dbo].[T_ACSGRLVLS];CREATE SYNONYM [dbo].[T_ACSGRLVLS] FOR [default].[main_ac_x_215].[dbo].[T_ACSGRLVLS];
IF OBJECT_ID(N'[dbo].[T_ACSGRSENT]', 'SN') IS NOT NULL DROP SYNONYM [dbo].[T_ACSGRSENT];CREATE SYNONYM [dbo].[T_ACSGRSENT] FOR [default].[main_ac_x_215].[dbo].[T_ACSGRSENT];
IF OBJECT_ID(N'[dbo].[T_ACSGRUSS]', 'SN') IS NOT NULL DROP SYNONYM [dbo].[T_ACSGRUSS];CREATE SYNONYM [dbo].[T_ACSGRUSS] FOR [default].[main_ac_x_215].[dbo].[T_ACSGRUSS];
...