Before You Start
This guide provides important information you should know before starting BioStar X. BioStar X supports 64-bit operating systems. Check the system requirements of the PC where you want to install BioStar X, then install it.
Pre-installation Notes
Before installing BioStar X, check the following and proceed with the installation.
-
BioStar X can only be installed on a 64bit operating system.
-
If you are using MS SQL 2012 Express, refer to the following link to install the Service Pack 3.
-
If you are using MS SQL 2014 Express, refer to the following link to install Service Pack 2.
-
If you are using MS SQL Server, set the
Collationoption of the server and each table to CI (Case-insensitive). -
When backing up a database from an older version of BioStar X, disable all services before proceeding. Furthermore, if you do not back up and restore the AC database and the TA database together, you will not be able to use the TA database.
-
If you want to back up the database of BioStar X, be sure to also back up the enckey in the \Program Files\BioStar X\util folder and the system.conf and setting.conf file in the \Program Files\BioStar X folder. Otherwise, the database will be unavailable.
-
For the default port used by BioStar X, see Service Settings. If another program occupies the same port, BioStar X may not work properly.
Check the database
If you are using a user-configured database, check the items below before installing BioStar X.
MariaDB
-
Please change the options below under the
[mysql]section in the my.cnf file.my.cnfcharacter-set-server=utf8collation-server=utf8_unicode_cimax_connections = 600 -
Please add the options below under the
[mysql]section in the my.cnf file.my.cnflog_bin_trust_function_creators = 1group_concat_max_len = 102400 -
Connect to MariaDB with root privileges and execute the command below.
SQLGRANT SUPER ON . TO user_id@'localhost' IDENTIFIED BY "password";GRANT SUPER ON . TO user_id@'%' IDENTIFIED BY "password";
MS SQL Server
-
Set the
Collationoptions for all databases and tables to be case-insensitive (CI). -
Database names can only contain numbers, English letters (case-sensitive), and special symbols
-_.
Setting the port
-
Run SQL Server Configuration Manager and set TCP/IP Protocol for Protocols for SQLEXPRESS to the desired port number.
-
Restart the SQL Server Services to apply the settings.
Creating the user and database
-
Log in with the sa account using SQL Server Authentication in SQL Server Management Studio.
-
Right-click on Security and click New Login.
-
Enter the desired name in the Login Name field and select SQL Server Authentication.
-
Enter the desired password in the Password and Confirm password fields, then uncheck Enforce password policy.
-
Click OK to save the settings.
-
Right-click on Database and click New Database.
-
Enter the desired name in the Database Name field.
-
Enter the login name set in step 3 in the Owner field.
Set the following recommended values in the Database Files section. Configure Autogrowth using fixed sizes (MB/GB) rather than percentages, and avoid very small increments that would cause frequent growth events.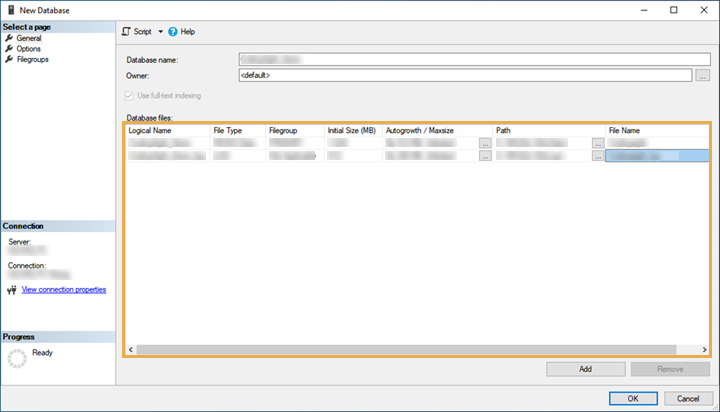
Small (under 10 GB)
-
Data: Initial Size 1 - 5 GB, Autogrowth 100 - 512 MB
-
Log: Initial Size 512 MB - 2 GB, Autogrowth 100 - 512 MB
-
TempDB: Initial Size 512 MB - 1 GB
e.g. Data 2 GB (Autogrowth 256 MB) / Log 1 GB (Autogrowth 128 MB) / TempDB 512 MB
Medium (10 - 500 GB)
-
Data: Initial Size 10 - 50 GB, Autogrowth 512 MB - 1 GB
-
Log: Initial Size 5 - 10 GB, Autogrowth 512 MB - 1 GB
-
TempDB: Initial Size 2 - 8 GB
e.g. Data 20 GB (Autogrowth 1 GB) / Log 5 GB (Autogrowth 512 MB) / TempDB 4 GB
Enterprise (500 GB or higher)
-
Data: Initial Size 100 GB or higher, Autogrowth 1 - 4 GB
-
Log: Initial Size 20 ~ 100 GB, Autogrowth 1 ~ 4 GB
-
TempDB: Initial Size 8 - 32 GB
e.g. Data 100 GB (Autogrowth 2 GB) / Log 50 GB (Autogrowth 2 GB) / TempDB 16 GB
-
Do not set Autogrowth to very small increments or leave the Maxsize to Unlimited. Instead, set appropriate limits based on expected growth and monitor usage.
-
In environments with many transactions, backup the logs periodically to ensure that the size of the log files does not increase.
Setting the Windows Authentication database
Presetting
If you are using Microsoft Windows Active Directory, complete the presets as below before setting up the Windows Authentication database.
-
Log in as an administrator account in SQL Server Management Studio.
-
Right-click on Security and click New Login.
-
Select Windows Authentication and then click Search.
-
Click on the location in the Select a user or group window, select the Active Directory path, and click OK.
-
Enter the user name in the Enter object name to select field, then click Check Names > OK.
-
Click on Server Roles in the Select a page.
-
Select sysadmin and then click OK.
-
Click on User Mapping in the Select page.
-
Select ac, master, ta, ve and set the Default Schema to dbo.
-
Click OK to save the settings.
Set up MS SQL Windows Authentication with an Active Directory account
-
Run services.msc.
-
In the Properties > Logon window of the SQL Server database, select Specify account and log in as a domain user.
-
Add port 1433 as an exception in the Windows Firewall.
-
Create empty ac, ta, ve databases in SQL Server with sysadmin authentication.
-
Set the domain user to use Windows Authentication for SQL Server and assign all permissions except sysadmin to the ac, ta, ve databases.
-
Connect all services except the local computer in services.msc.
-
Set the domain user as an administrator on the local service computer.
-
Connect to MS SQL ODBC.
Setting the database
-
After running the SQL Server Configuration Manager, click on Client Protocol under SQL Native Client.
-
Select TCP/IP and check the default port.
-
Click on the Protocols for SQL EXPRESS under SQL Server Network Configuration.
-
Check if the ODBC port in TCP/IP is set to the same value as the default port.
-
Log in as an administrator account in SQL Server Management Studio.
-
Click on Security > Log In, then double-click NT AUTHORITY\SYSTEM.
-
Click on Server Roles in the Select a page.
-
Select public and sysadmin, then click OK.
-
Click on User Mapping in the Select page.
-
Select the ac, ta, ve database and click OK to save.