Check status
Monitor door, elevator, and advanced access control status in real time to operate the security system reliably. Use the status icons in Monitoring to check alarms and abnormal status at a glance. Review only entries that need action and respond immediately.
Click Monitoring on the Launcher page or select Monitoring from the shortcut list at the top left of the screen. Check the status of each entry in the Door tab on the left sidebar of the screen.
Before you start
Ensure that the devices connected to the door are correctly configured. It is important to check if the device is connected to the network and updated with the latest firmware. In case of an issue, it is advisable to first check the power status and network connection of the device.
-
For more information on adding and configuring devices, see Manage Devices.
-
For more information on adding and configuring doors, see Manage Doors.
-
The Log Upload feature must be enabled to monitor or control the status of the access door. Enable this feature under Settings → System → Server in the General section.
-
The feature to connect cameras to doors through the VMS server is available as an additional option with an Essential license or higher. For more information on licensing policies, see License Policy.
Learn about the tree structure
The tree structure in the Door tab of the left sidebar is organized as follows.
-
For more information on adding and configuring devices, see Manage Devices.
-
For more information on adding and configuring doors, see Manage Doors.
-
For more information on adding and configuring elevators, see Manage Elevators.
-
For more information on advanced access control settings, see Advanced Access Control Settings.
-
For more information on linking doors and cameras, see Set Video Rules.
Check status
Check connection errors and alarms
You can check the status of the door or elevator to verify proper operation. Refer to the information below for the status of each icon.
| Status Icon | Description |
|---|---|
| Displays device abnormal statuses such as disconnection, Multi Communications Server errors, and synchronization errors. | |
| Displays the status of entry doors, elevators, advanced access control, and AI video analysis alarms. |
Click a status icon to view detailed information in a tooltip. Click the link in the tooltip error message to navigate to the list of devices connected to the door or elevator.

Right-click on the device and select the Reconnect or Reboot option.
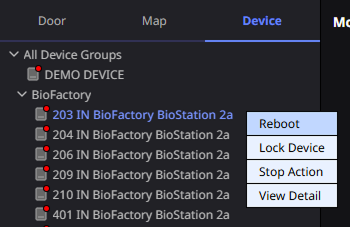
-
Alarms occurring from the door or elevator can be configured through the following settings.
-
You can connect the entrance door and the camera in video rules to set alarms. For more information on configuring video rules, see Set Video Rules.
-
When linked with the VMS server, AI event alarms for videos can be sent to BioStar X. For more information, refer to the manual for the VMS server.
-
For more information on acknowledging alarms, see Monitor Event.
Check alarms in the preview panel
In the Door tab, select a door, elevator, or advanced access control area with an alarm() icon. Review alarm details at the top of the preview panel on the right. For doors and elevators, the top of the panel also shows abnormal status ().
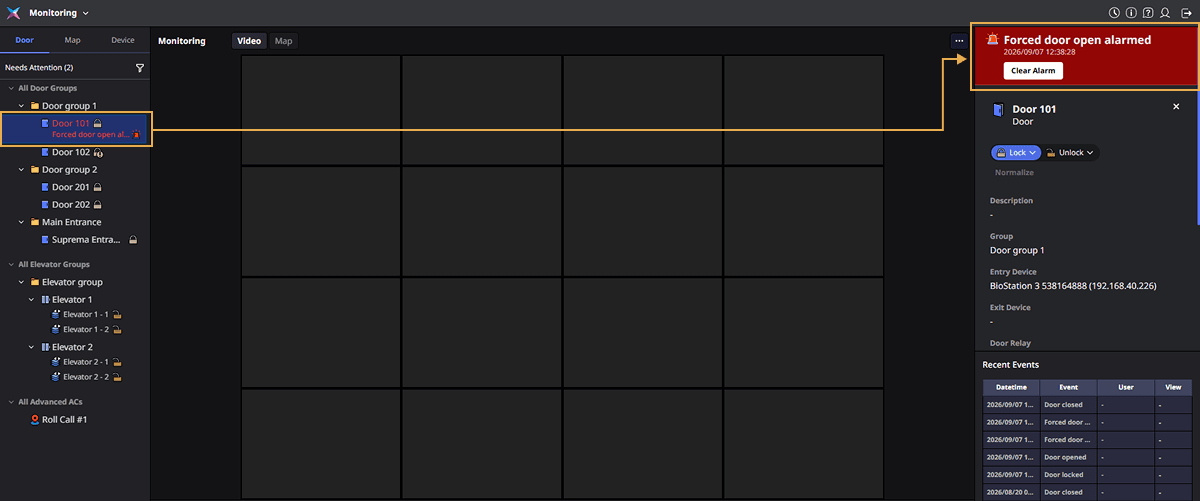
A banner at the top of the panel shows current status details, such as the alarm name and time. It also provides buttons to execute the appropriate action.
-
Even if multiple alarms occur at the same time, the banner displays only 1 alarm—the most recent one.
-
For doors or elevators, alarms triggered while the device is disconnected show only the alarm type, without a timestamp.
-
The buttons on the banner vary by alarm type. Click a button to take the action for the alarm.
-
Door controls, such as locking and unlocking, remain available while an alarm appears. For more information on door control, see Door Control.
View entries that need attention
Administrators can view only doors and elevators that need action at a glance. In the left sidebar, click the Needs Attention. Check door and elevator status and take immediate action when problems occur.
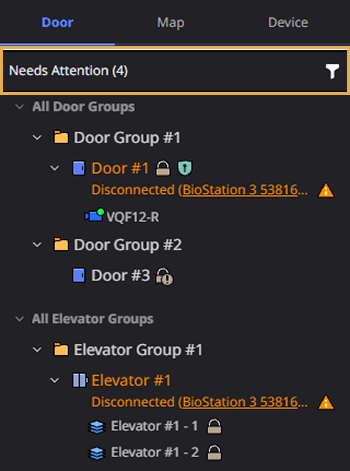
See #check-the-attention-criteria for the conditions that mark doors and elevators as requiring attention.
Attention criteria
Door
A door requires attention if any condition below applies.
Door mode change
This includes doors locked or unlocked by an administrator, a schedule, or an emergency.
| Reason | Status indicator |
|---|---|
| Manual operation by an administrator | Locked by Operator / Unlocked by Operator |
| Schedule | Locked by Schedule / Unlocked by Schedule |
| Emergency | Locked by Emergency / Unlocked by Emergency |
Alarm
If any alarm remains uncleared, the system marks it as needing attention. Forced open, door held open, and anti-passback alarms are classified as alarms, not abnormal statuses.
| Alarm types | Description |
|---|---|
| Door forced open | Door opened by force without unlocking |
| Door held open too long | Door remains open longer than the set time |
| Anti-passback (APB) alarm | Anti-passback rule violated |
| Timed anti-passback alarm | Time-based anti-passback rule violated |
| Lock override alarm | Unlocked by lock override card authentication in a locked state (locked by an administrator or by schedule) |
| AI video analytics alarm | Video analytics-based alarms, such as tailgating, loitering, intrusion, falls, and abandoned objects |
Abnormal status
The system determines it based on the connection status of devices connected to the door.
| Abnormal status type | Description |
|---|---|
| Disconnected | The device is disconnected from the network |
| Synchronization error | Connected, but data is out of sync |
| Multi Communications Server error | An error has occurred on the device's Multi Communications Server |
-
The Needs Attention filter includes device lock and lockout due to consecutive authentication failures (Auth Fail Lockout), in addition to the abnormal statuses above.
-
If an alarm and an abnormal status occur together, both icons appear in one row without overlap.
-
Abnormal statuses from child devices roll up to the parent door node. Follow the hierarchy to find the problem while the filter is on.
Elevator
Evaluate elevators under the same conditions as doors. However, abnormal status and alarm conditions differ as follows.
-
Mode change: Same as doors. The system marks the elevator as needing attention when an admin, schedule, or emergency locks or unlocks it.
-
Abnormal status: Use door criteria. However, elevators do not have forced open or long-held open status, so exclude them from evaluation.
-
Alarm: Elevators have dedicated alarms that differ from door alarms. Please refer to the below.
Alarm types Description Elevator alarm triggered Elevator alarm activated Elevator input alarm Alarm triggered by an external input signal Elevator all-floor unlock alarm All floors forcibly opened
-
Floors appear as independent nodes under the elevator node, and each floor has only locked () or unlocked () status.
-
Alarms and abnormal statuses appear on the parent elevator node, not on floors. When the elevator expands, only floors that require action appear, and the system hides normal floors.
Advanced access control
Entries in the advanced access control group (anti-passback, fire alarm, intrusion, muster, occupancy limit, and interlock) are also included when determining whether action is required. However, unlike doors or elevators, mode changes and abnormal status conditions do not apply. If any alarm remains uncleared, it appears as requiring action.
| Alarm types | Description |
|---|---|
| Anti-passback (APB) alarm | Anti-passback rule violated |
| Fire Alarm | Alarm triggered by detecting a fire |
| Scheduled lock alarm | Alarm triggered while scheduled lock is set |
| Intrusion alarm | Alarm triggered by detecting an intrusion |
| Interlock alarm | Interlock rule violation |
| Muster alarm | Alarm triggered during a muster event |
-
Armed status and disabled items are not shown as requiring action. Armed means the zone operates normally, and Disabled means it is intentionally off.
-
Each entry appears directly under the advanced access control group, and doors do not expand under it. Only entries that require action remain in the tree. If no entries require action, the advanced access control group is removed from the tree.
Checking door status
Check whether the door is closed, open, or in an abnormal state. Refer to the following for door status.
| Status Icon | Description |
|---|---|
| The door is closed. | |
| The door is open. | |
| The door sensor is not set up. |
Checking door lock status
You can check the locking status of the door through the door relay status. Refer to the following for the status of the door relay.
| Status Icon | Description |
|---|---|
| The entrance door is locked. | |
| The system locks the door using the Timed or Permanent option. | |
| The entrance door is open. | |
| The system unlocks the door using the Timed or Permanent option. |
For more information about door control options, see Door Control.
Checking camera status
Check the camera status to verify that the camera is operating normally. Refer to the following for camera status.
| Status Icon | Description |
|---|---|
| The camera is connected. | |
| The camera is off or disconnected. |
-
If the camera linked to the access door isn't visible, check the camera group's permissions. If the administrator for a custom permission hasn't configured the camera group permissions, the camera may not be visible. For more information on configuring camera group permissions, see Set Up the Camera.
-
To link a door to a camera, add a video rule. For more information, see Set Video Rules.
Checking arming status
You can check the security status of the entrance door or advanced access control settings.
| Status Icon | Description |
|---|---|
| The door is armed. | |
| The door is disarmed. |
The security status is displayed only when the entrance door is set to guard. For more information on intrusion alarm settings, see Intrusion Alarm.
Check elevator status
You can check the floor access control status via the elevator.
| Status Icon | Description |
|---|---|
| The corresponding floor is locked via the elevator. | |
| The corresponding floor is unlocked via the elevator. |
Expand/collapse group list
You can expand or collapse the list through the top-level group or sub-group.
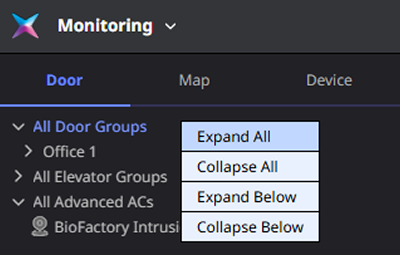
Top-level group
-
In the Door tab, select All Door Groups or All Elevator Groups, All Advanced ACs and right-click.
-
Choose Expand All or Collapse All from the popup menu.
All sub-lists can be expanded or collapsed based on the selected top-level group.
Sub-group
-
To expand or collapse the list of sub-groups in each top-level group, select the sub-group and right-click.
-
Select Expand Below or Collapse Below option from the popup menu.
You can expand or collapse the list of the selected sub-group.