Check Network Priority
Instructions for checking and setting the server's network priority before installing BioStar X.
When is it needed?
You need to check and set network priority in the following situations.
-
When two or more network adapters (LAN cards) are installed on the server
-
When a specific network adapter must be used for the BioStar X service
-
To prevent network connection issues after installing BioStar X
If none of the above situations apply, there is no need to change the network priority. Skip this step and proceed with the installation of BioStar X. For more information on installing BioStar X, see Express Installation.
A network adapter with a lower metric (higher priority) will be automatically selected during the installation of BioStar X. Since it may be difficult to change this setting after installation, be sure to check and adjust the network priority before installation.
Check Network Priority
Check in command prompt
-
Search for
cmdin the Start menu and run Command Prompt. -
Enter the following command.
route print -
Look for entries in the IPv4 Route Table section where Network Destination is
0.0.0.0. -
Check the value in the Metric column. The lower the value, the higher the priority.
Example output:
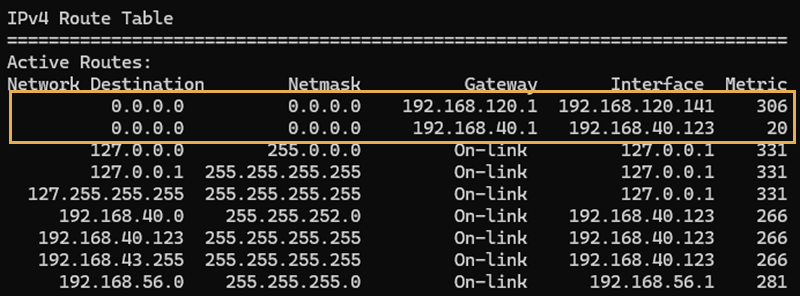
In the above example, the 192.168.40.123 interface has a metric value of 20, resulting in a higher priority.
Check network adapter information
Verify which network adapter corresponds to each interface.
-
In the Command Prompt window, enter the command below.
ipconfig /all -
Match each network adapter's IPv4 address with the Gateway address identified earlier to identify which adapter it is.
Change network priority
To raise the priority of the desired network adapter, follow the steps below.
The following steps are based on Windows 11. The menu location may vary depending on the version of Windows you are using.
Open network settings
-
In the Start menu, type View Network Connections.

-
Click View Network Connections from the search results.
-
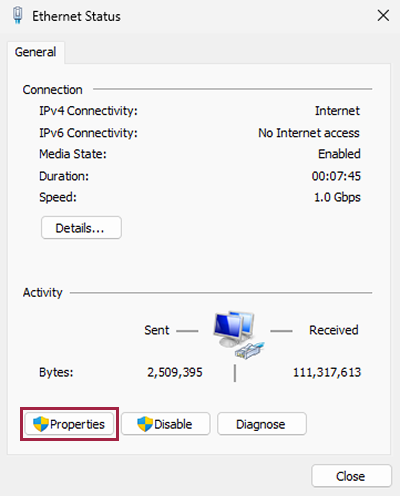
Double-click on the adapter connected to the internet from the list.

Open adapter options
-
When the Ethernet Status window appears, click the Properties button.
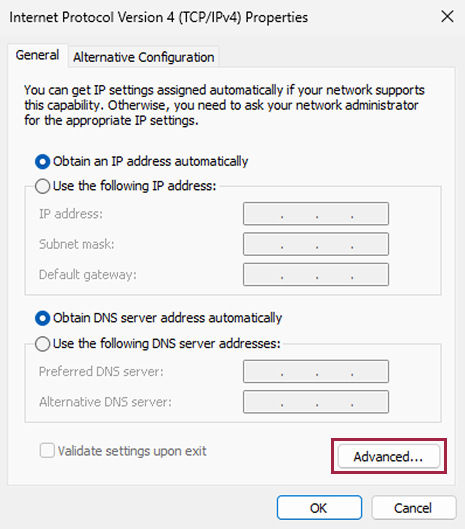
-
When the Ethernet Properties window appears, select Internet Protocol Version 4 (TCP/IPv4) from the list.

-
Click the Properties button.
-
When the Internet Protocol Version 4 (TCP/IPv4) Properties window appears, click the Advanced button.
Metric settings
-
Uncheck the Automatic Metric checkbox.
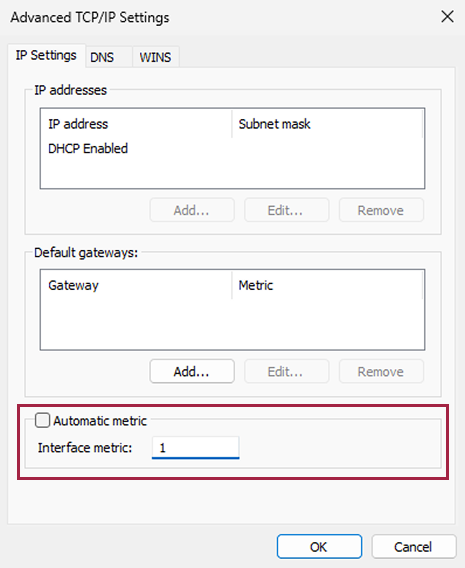
-
Enter the desired value in the Interface Metric field.
-
If you want the highest priority, enter
1. -
If you want a higher priority than other adapters, enter a number smaller than the metric values of other adapters.
-
-
To save the settings and close all windows, click the OK button.
The values you can enter for Interface Metric range from 1 to 9999. The lower the value, the higher the priority.
Check settings
-
Reopen Command Prompt and execute the
route printcommand. -
Check whether the metric value has changed.
Troubleshooting
-
If the settings are not applied, restart your computer or disable and then re-enable the network adapter.
-
If the network connection is lost, revert to the original settings and re-enable the Automatic Metric option. Contact your network administrator to verify the correct settings.
If you need to change network settings after installing BioStar X, it's recommended to completely uninstall the program and then reinstall it.