Enroll Access Card
Guide users on how to enroll access cards. Explain the enrollment methods for CSN cards, Wiegand cards, and smart cards, as well as the card reading/formatting features. Refer to the manual of the device for the types of cards supported by the device.
Card enrollment using a USB agent
| Card Type | CSN | Wiegand | Smart Card |
|---|---|---|---|
| EM | ❌ | ❌ | ❌ |
| MIFARE | ✅ | ❌ | ✅ |
| DESFire | ✅ | ❌ | ✅ |
| FeliCa | ✅ | ❌ | ❌ |
| HID Prox | ❌ | ❌ | ❌ |
| HID iCLASS | ❌ | ❌ | ❌ |
CSN card
-
In the Credential section, click the + Card button.
-
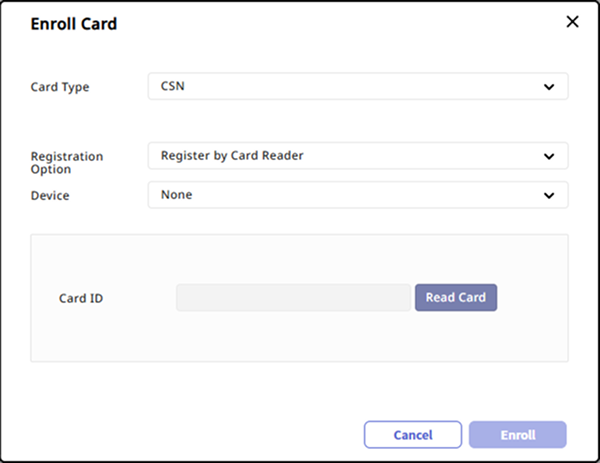
When the Enroll Card window appears, select CSN from the Card Type options.
-
Select your desired card enrollment method from the Registration Option field.
-
Register by Card Reader: Select the device from the Device list to scan the card and click the Read Card button.
-
Assign Card: Select the card you want to assign to the user from the list. You can search through the input field.
-
Enter Manually: Enter the card number manually or click the Use User ID button.
-
-
Click the Enroll button.
Wiegand card
-
In the Credential section, click the + Card button.
-
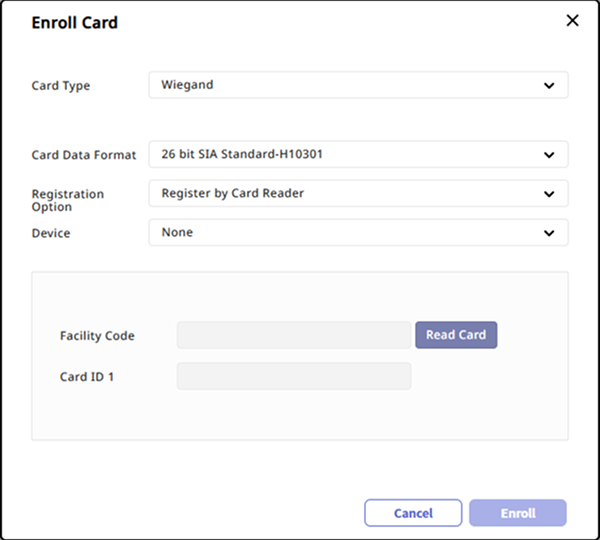
When the Enroll Card window appears, select Wiegand from the Card Type options.
-
Select the desired format from the Card Data Format field.
-
Select your desired card enrollment method from the Registration Option field.
-
Register by Card Reader: Select the device from the Device list to scan the card and click the Read Card button.
-
Assign Card: Select the card you want to assign to the user from the list. You can search through the input field.
-
Enter Manually: Enter the facility code and card ID manually.
-
-
Click the Enroll button.
If the desired card data format isn't available in the Card Data Format options, see Set Wiegand Card Format.
Smart card
Enroll an access-on card, secure credential card, or custom smart card.
-
To issue a smart card, the correct card type must be set. For more information on card formats, see Set Smart Card Format.
-
The user information stored on the smart card uses information stored in BioStar X. Failure to store updated user information may result in incorrect information being stored on the smart card. Additionally, if the updated user information is not synchronized with the device, the device may fail to perform authentication.
-
To use a face template, select Use Face Template in the Layout section when adding a new smart card in the Settings → Credential → Card Format menu. For more information on card layout, see Set Smart Card Format.
-
See Authentication Settings to set up the smart card layout on the device.
-
See #readformatcard to format the smart card and rewrite its data.
Access On Card
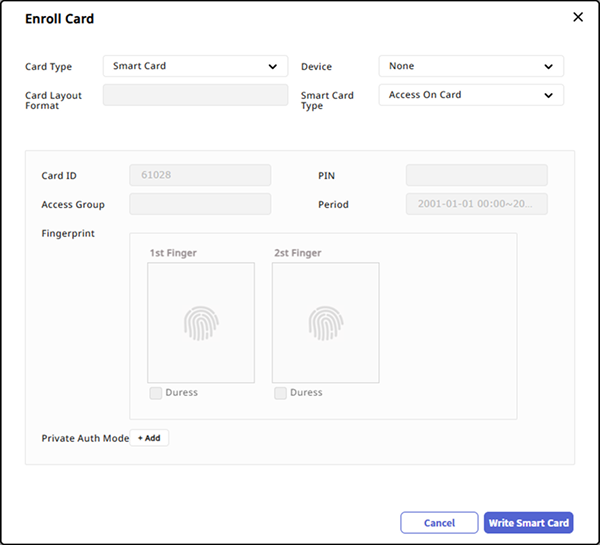
Select Access On Card to store user information on the card. This includes card ID, PIN, access group, period, fingerprint template, face template, and personal authentication mode.
-
In the Credential section, click the + Card button.
-
When the Enroll Card window appears, select Smart Card from the Card Type options.
-
Select the device for card enrollment from the Device field.
-
Once selected, the card layout format set in the Card Layout Format field will be displayed.
-
Select Access On Card from the Smart Card Type options.
-
Select a fingerprint template if available. If no template is available, skip this step.
-
Click the Write Smart Card button.
Access On Card cannot set the card ID manually.
Secure Credential Card
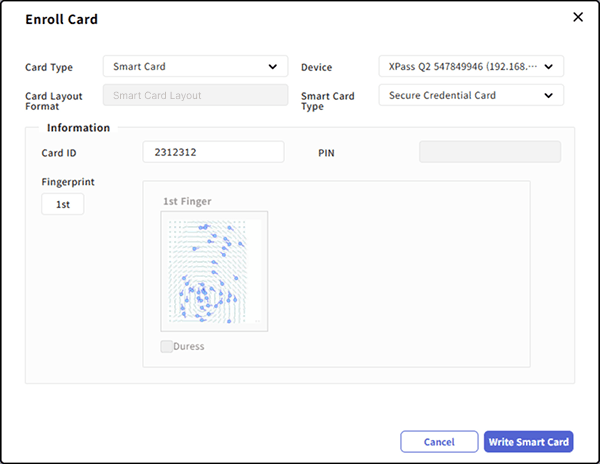
Select Secure Credential Card to store user information on the card. This includes card ID, PIN, fingerprint template, and face template.
-
In the Credential section, click the + Card button.
-
When the Enroll Card window appears, select Smart Card from the Card Type options.
-
Select the device for card enrollment from the Device field.
-
Once selected, the card layout format set in the Card Layout Format field will be displayed.
-
Select Secure Credential Card from the Smart Card Type options.
-
Directly enter Card ID.
-
Select a fingerprint or face template if available. If no template is available, skip this step.
-
Click the Write Smart Card button.
Custom Smart Card
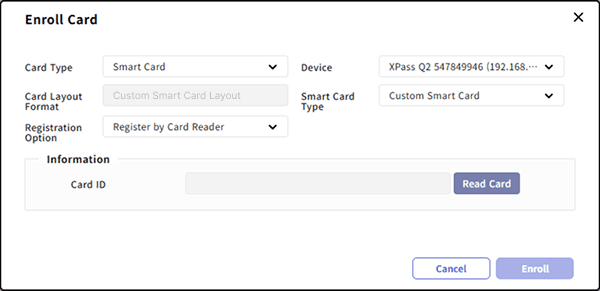
Select Custom Smart Card to enroll a third-party smart card.
-
In the Credential section, click the + Card button.
-
When the Enroll Card window appears, select Smart Card from the Card Type options.
-
Select the device for card enrollment from the Device field.
-
Once selected, the card layout format set in the Card Layout Format field will be displayed.
-
Select Custom Smart Card from the Smart Card Type options.
-
Select your desired card enrollment method from the Registration Option field.
-
Register by Card Reader: Select the device from the Device list to scan the card and click the Read Card button.
-
Assign Card: Select the card you want to assign to the user from the list. You can search through the input field.
-
Enter Manually: Enter the card number manually in base-10 (decimal) format.
-
-
Click the Enroll button.
For devices and firmware versions supporting Custom Smart Card, refer to the list below. BioStation 3 Max firmware 1.0.0 or later XPass Q2 firmware 1.0.0 or later BioEntry W3 firmware version 1.0.0 or higher BioStation 2a firmware version 1.1.0 or higher BioStation 3 firmware version 1.3.0 or higher X-Station 2 firmware version 1.3.0 or higher BioLite N2 firmware version 1.6.2 or higher XPass D2 firmware version 1.7.1 or higher BioEntry P2 firmware version 1.5.1 or higher BioEntry W2 firmware version 1.8.0 or higherView devices and firmware versions that support custom smart cards
Read/format card
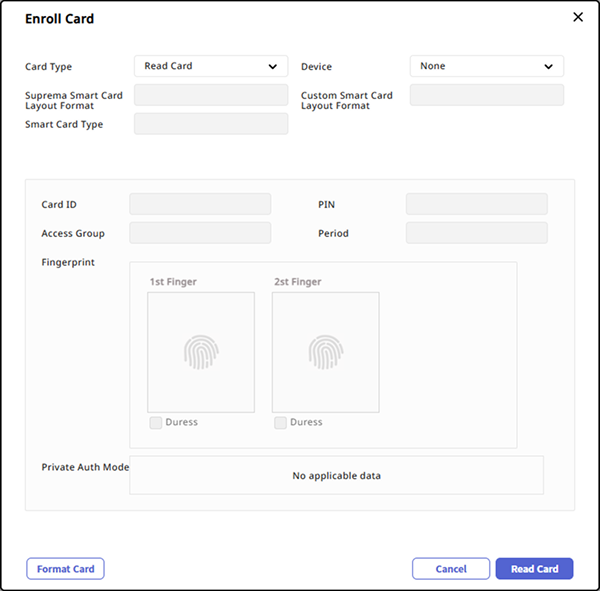
You can format smart cards and rewrite information.
-
In the Credential section, click the + Card button.
-
When the Enroll Card window appears, select Read Card from the Card Type options.
-
Select the device capable of reading smart cards from the Device field.
-
Select the Smart Card Type.
-
Click the Read Card button.
-
Verify the card information and click the Format Card button.
-
The device list in the Device field is shown only when the smart card layout has been configured. For more information on this setting, see Authentication Settings.
-
Custom smart cards cannot be formatted.
Assigned card information confirmation
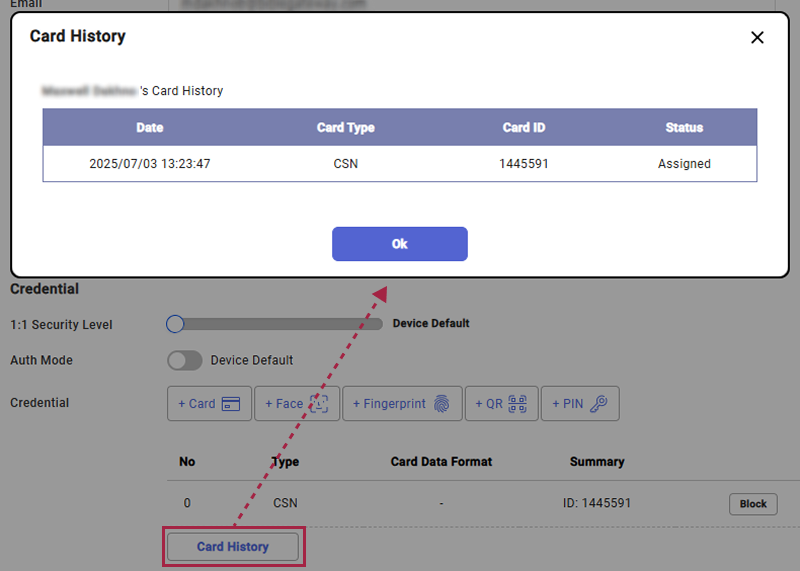
To view the assigned card information for the user, click the Card History button in the Credential section. You can check the date of card assignment, card type, card ID, and status.