Bulk Control
This guide explains selecting multiple doors, elevators, or advanced access control settings and running Unlock, Lock, or Clear Alarm at once.
-
If you select two or more entries in the status tree, the bulk control panel appears on the right side of the screen. Execute commands at once without controlling each entry individually.
-
Respond quickly during emergencies or when controlling multiple entrances at the same time.
-
Select doors, elevators (floors), or advanced access control settings in bulk and control them. The system does not allow bulk control for mixed types.
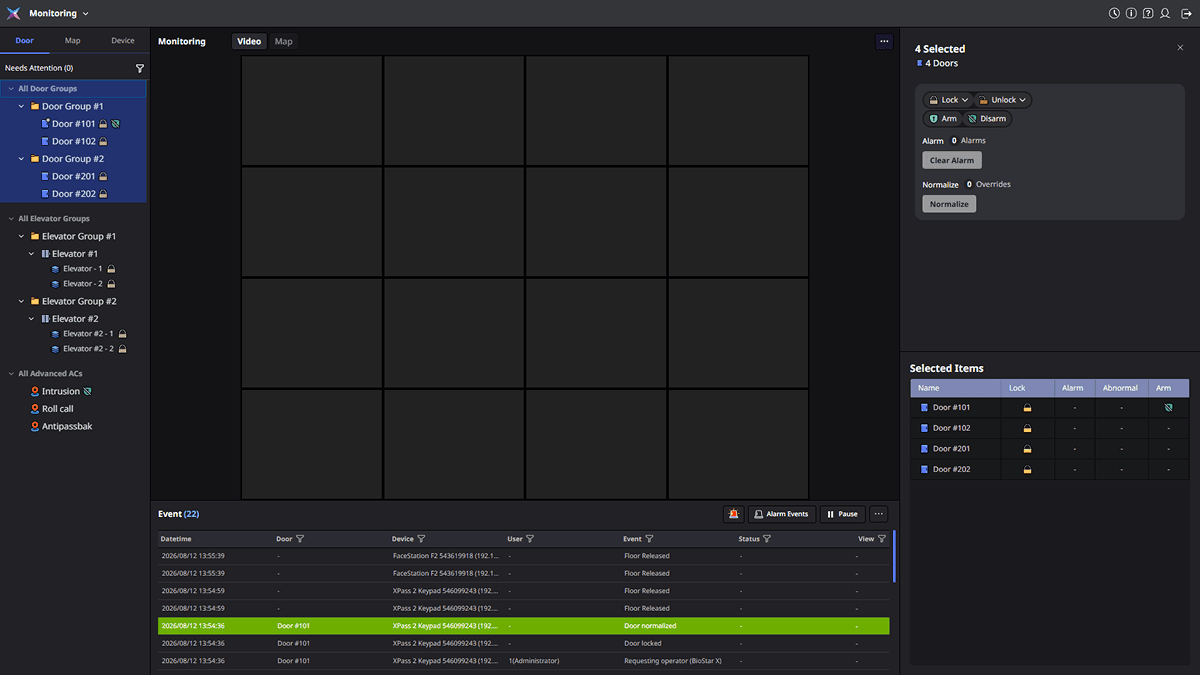
Click Monitoring on the Launcher page or select Monitoring from the shortcut list at the top left of the screen. If you select two or more entries in the status tree on the left sidebar, the bulk control panel appears on the right side of the screen.
-
Bulk control does not include cameras. If you select cameras with other entries, the system removes them from the selection list.
-
This document covers how to control multiple entries at once. To control a single door, elevator, or advanced access control setting, see the following document.
Select multiple entries
To select doors, elevators, floors, or advanced access control in the status tree on the left sidebar, do the following. This works the same way as selecting multiple files in Windows File Explorer.
-
Click: Select one entry. This clears the previous selection.
-
Ctrl + Click: Add the clicked entry to the selection list or remove it. This keeps the remaining selection.
-
Shift + Click: Select the visible range from the last clicked entry to the current entry. Replace the current selection with this range.
-
Ctrl + Shift + Click: Add a range without clearing the current selection. Use this to select multiple nonadjacent entries.
-
Click a group: Click a group () name to select all doors, elevators, floors, and advanced access control settings under it. To expand or collapse a group, click the arrow () before the group name.
The bulk control panel does not open when none or only one entry is selected. When only one entry remains selected, its view detail appears. When all selections are cleared, the right panel disappears.
Bulk control panel layout
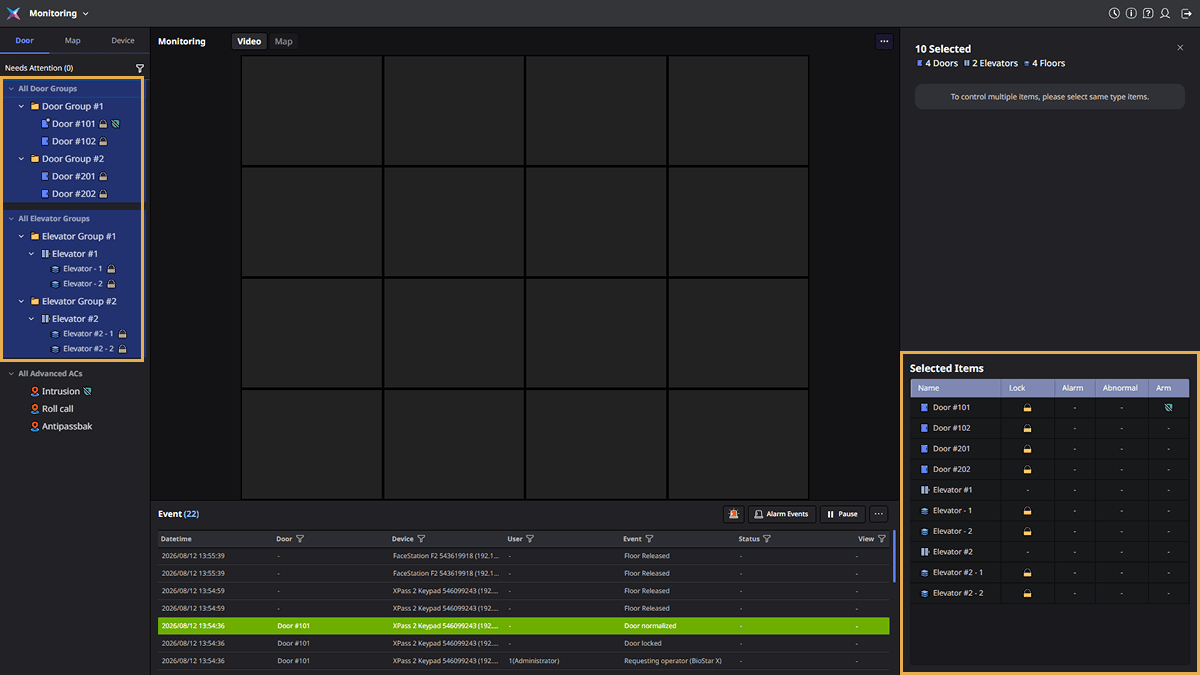
Select multiple entries in the status tree on the left sidebar. The bulk control panel appears on the right as follows.
-
Selection count and types: For example, if you select 4 doors, 2 elevators, and 4 floors, it is displayed as follows.
10 Selected / 4 Doors 2 Elevators 4 Floors
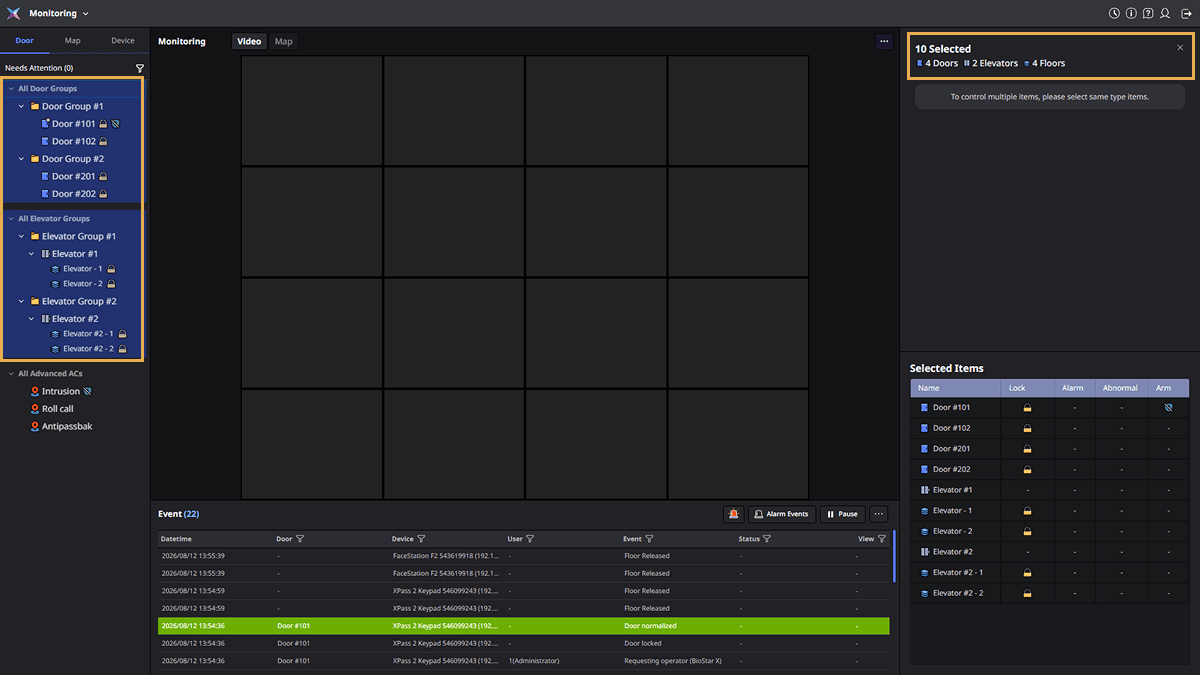
Control features are unavailable when you select different types together.
-
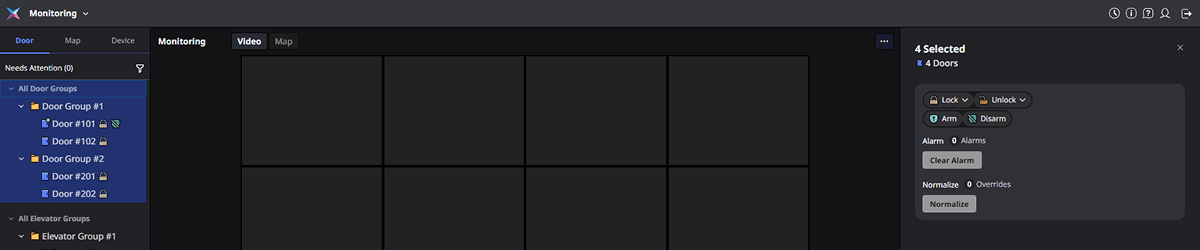
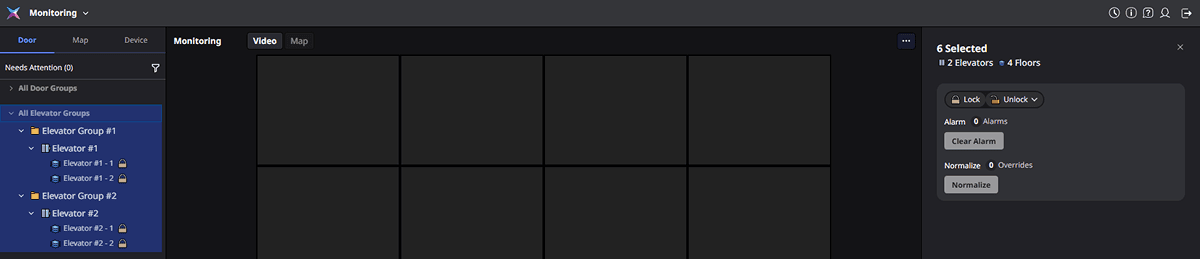
Door/Elevator control: Shows control features available for doors and elevators.
-
Advanced access control: Shows control features available in advanced access control.
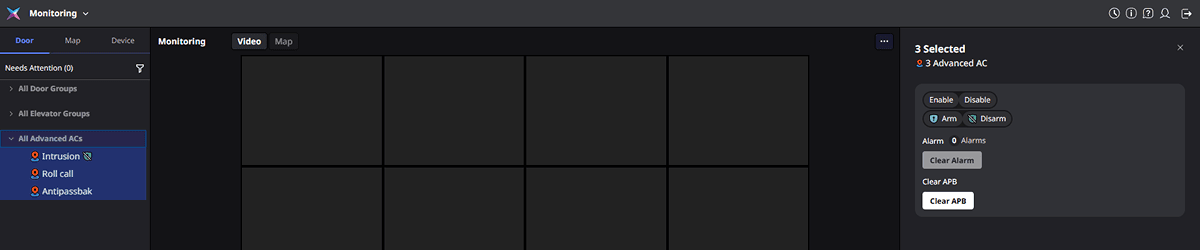
-
Summary table of selected entries: The bottom of the right panel shows the name and status of each selected entry. Drag the divider between the control area and the summary table up or down to adjust their heights. If many entries are selected, drag the divider to expand the summary table area.
Bulk door control
When at least two doors are selected, use the same basic and advanced controls as single-door control.
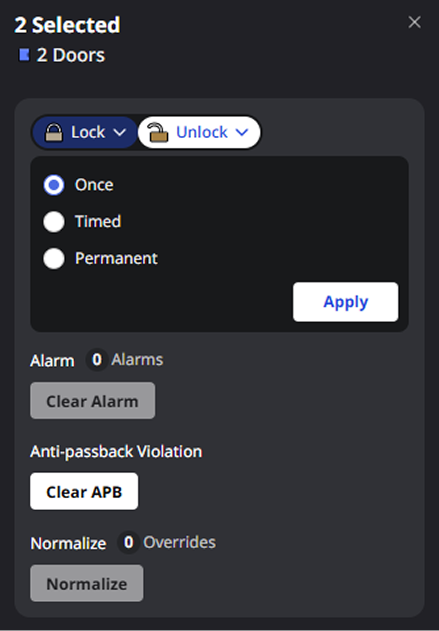
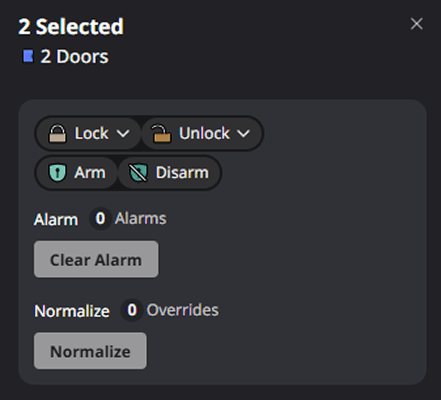
Basic control
-
Once: Applies the unlock state once.
-
Timed: Keeps the locked or unlock state for the specified time.
-
Permanent: Sets the locked or unlock state regardless of time.
Select a command to apply, and click Apply.
Advanced control
Use the following buttons when at least one selected entry meets the conditions below.
-
Clear Alarm: Available when at least one selected door has an active alarm.
-
Clear APB: Available when at least one selected door has anti-passback enabled. For more information, refer to Door Control.
-
Normalize: Available when an administrator manually unlocks or locks a door. This excludes statuses changed by schedules or emergencies.
-
Arm / Disarm: Appears only when a door is set to intrusion alarm, an advanced access control setting.
-
Click Clear Alarm or Normalize. A pop-up appears. In the pop-up, click Normalize or Normalize to clear it. In contrast, Arm/Disarm changes the status without a confirmation dialog.
-
Advanced access control settings are available by purchasing an add-on with an Essential license, or with an Enterprise license or higher. For more information on the licensing policy, see License Policy.
Bulk control of elevators and floors
Select an elevator to control all configured floors together. To control only certain floors, select the floors directly.
The differences from doors are as follows.
| Control feature | Door | Elevator, floor |
|---|---|---|
| Unlock | Once, Timed, Permanent | Once, Permanent |
| Lock | Timed, Permanent | Permanent |
| Normalize | Supported | Supported |
| Clear Alarm | Supported | Appears when the selection includes an elevator; does not appear when only floors are selected |
| Clear APB | Supported | Not supported |
If you select an elevator and its floors, the system sends one unlock/lock command per elevator.
Bulk control of advanced access control
Select multiple advanced access control settings to control them at once. When selecting two or more, the right panel switches to the bulk control panel. Selection, range, and filter actions match doors and elevators.
Advanced access control settings lack lock relays and operator unlock/lock, so control options differ from doors and elevators. The following control buttons appear depending on the selected setting type.
-
Enable/Disable: Appears for all advanced access control settings.
-
Arm/Disarm: Appears only when the selection is set to intrusion alarm.
-
Clear Alarm: Appears only when the selection includes alarm-triggering settings (anti-passback, fire alarm, schedule lock, intrusion alarm, interlock, or muster). It does not appear when you select only non-alarm settings, such as Occupancy limit or Headcount check.
-
Clear APB: Appears only when the selection includes the anti-passback setting. Click this button. In the user selection window, select a user who violated anti-passback, and clear the APB alarm. For more information, see Control Advanced Access Control.
-
Bulk control does not include Lock, Unlock, or Normalize. The bulk control panel also excludes features that open other screens, such as muster report and occupancy limit monitoring. Use these features on the details screen when one setting is selected.
-
For more information on advanced access control, see Control Advanced Access Control.
Check execution results
-
If all selected entries succeed, a success message appears at the top of the screen.
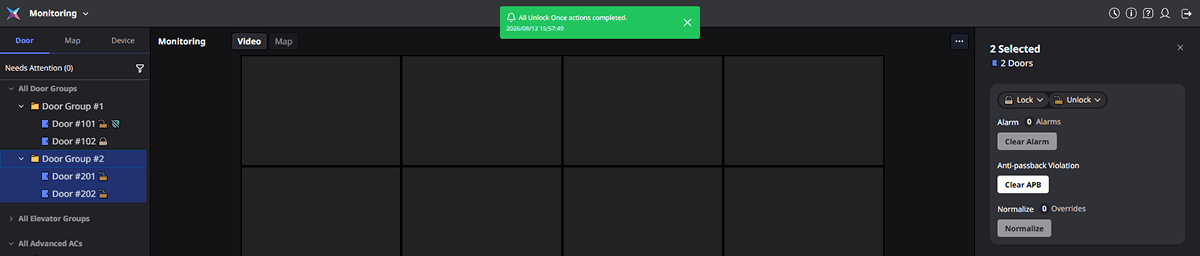
The image above is an example screen and may differ from the actual screen. -
If any entry fails, a failure message appears with the Show Details button.
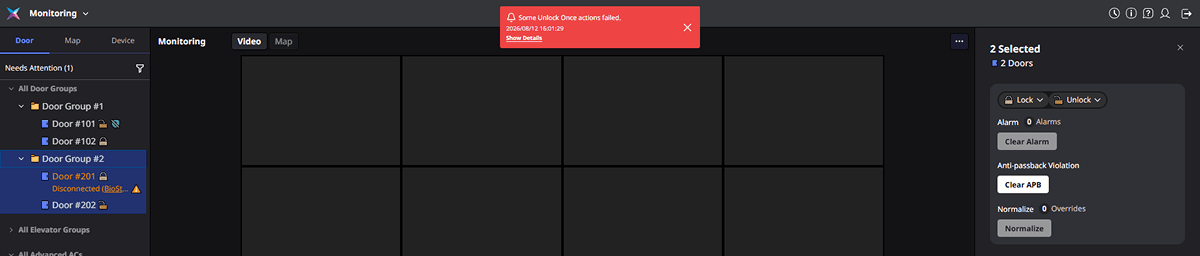
The image above is an example screen and may differ from the actual screen. Click Show Details to view results grouped into Success, Failure, and Skipped. Click Copy Failure details to copy the names and reasons for failed entries to the clipboard.
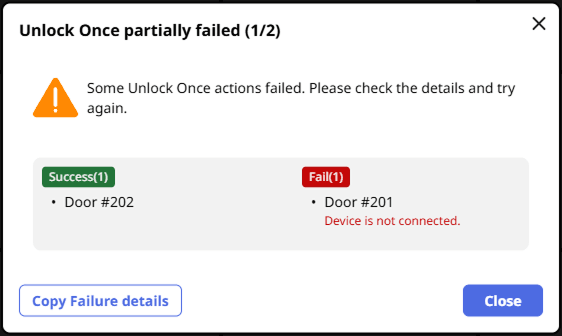
The image above is an example screen and may differ from the actual screen.