Monitor Device
This document provides guidance on using the device and camera monitoring features. You can check the status of devices and cameras, view detailed information, and play camera video in real-time, among various other features. Additionally, review recent events to efficiently manage the status of devices and cameras.
To access the Monitoring page, click Monitoring in the Launcher or select Monitoring from the menu at the top left of the screen.
Checking device and camera status
Click the Device tab on the left sidebar. You can check the status of all devices and cameras. Refer to the following for the status of devices and cameras.
| Status Icon | Description |
|---|---|
| The device is connected properly. | |
| The device is off or disconnected. | |
| The camera is connected. | |
| The camera is off or disconnected. |
View devices that need attention
Administrators can view only devices that require action in one list. In the left sidebar, click the Needs Attention. Check device status and take action on devices with issues.
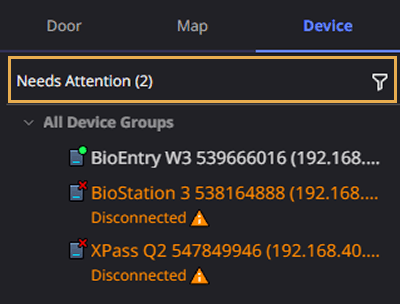
Criteria for action-required devices
In the device tree, the system marks abnormal devices as action-required.
| Abnormal status type | Status indicator | Description |
|---|---|---|
| Disconnected | Disconnected | The device is disconnected from the network |
| Synchronization error | Sync Error | Connected, but data is out of sync |
| Multi Communications Server error | Communications Server Error | An error has occurred on the device's Multi Communications Server |
| Lock device | Device Locked | The device is locked due to job conditions and actions |
| Authentication failure lockout | Auth Failure Lockout | The device is locked after authentication fails more than the specified number of times |
-
The Device Locked condition depends on the job conditions and actions set in Trigger and Action Settings. For information on checking and releasing this status, see #deviceLockRelease.
-
Configure the Auth Failure Lockout condition in device settings. For details, see Authentication Settings. For information on checking and releasing this status, see #authFailLockout.
Device control
Select the desired device from the list on the left sidebar and right-click. You can select the desired feature from the popup menu.
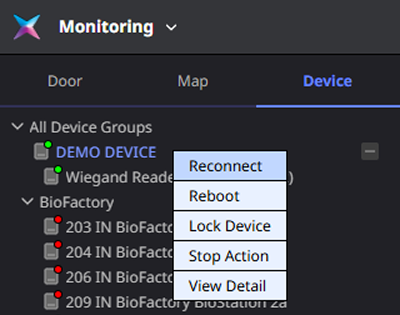
The control features shown may vary depending on the device type.
| Device type | Control feature |
|---|---|
| Master device, a primary device that connects directly to the server without slaves | Stop Action, Reboot, Unlock Device, Release Auth Failure Lockout, Reconnect(only when the server connects to the device) |
| Slave device | Stop Action, Reboot, Unlock Device, Release Auth Failure Lockout |
| OSDP communication device | Unlock Device, Reconnect (depends on the connection method) |
| Wiegand device | Unlock Device |
| Expansion modules (Secure I/O 2, DM-20, OM-120, IM-120) | Stop Action |
| Devices using device-to-server connections | Stop Action, Reboot, Unlock Device, Release Auth Failure Lockout |
| Wireless antenna module | None |
Reconnect device
Regardless of the device connection status, click Reconnect in the popup menu. Use this to reconnect disconnected devices, or resend settings and clear abnormal states on connected devices. When the device reconnects, the status icon changes to normal status ().
The Reconnect feature does not support devices set to the Device ▶ Server Connection option. For more information on registering devices, see Register Device.
Restart device
To restart the device, click Reboot in the popup menu. When the warning message window appears, click Ok.
Unlock the device
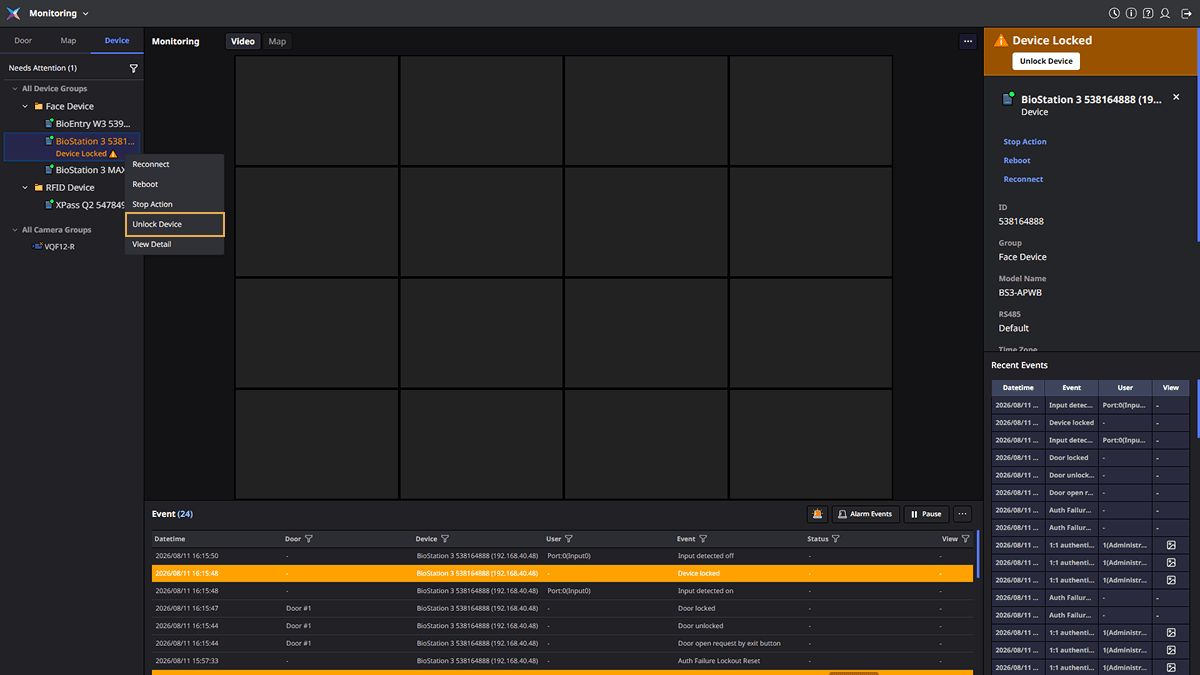
When the device locks based on admin-defined conditions, Device Locked appears under the device name in the left sidebar. Selecting the device shows the same banner at the top of the right preview panel.
-
The popup menu shows Unlock Device only when the device is locked. Select the locked device, then click Unlock Device in the popup menu.
-
Select the locked device. In the banner at the top of the right preview panel, click Unlock Device.
Only users with Administrator or Monitoring Operator privileges see Unlock Device.
Clear authentication failure lockout
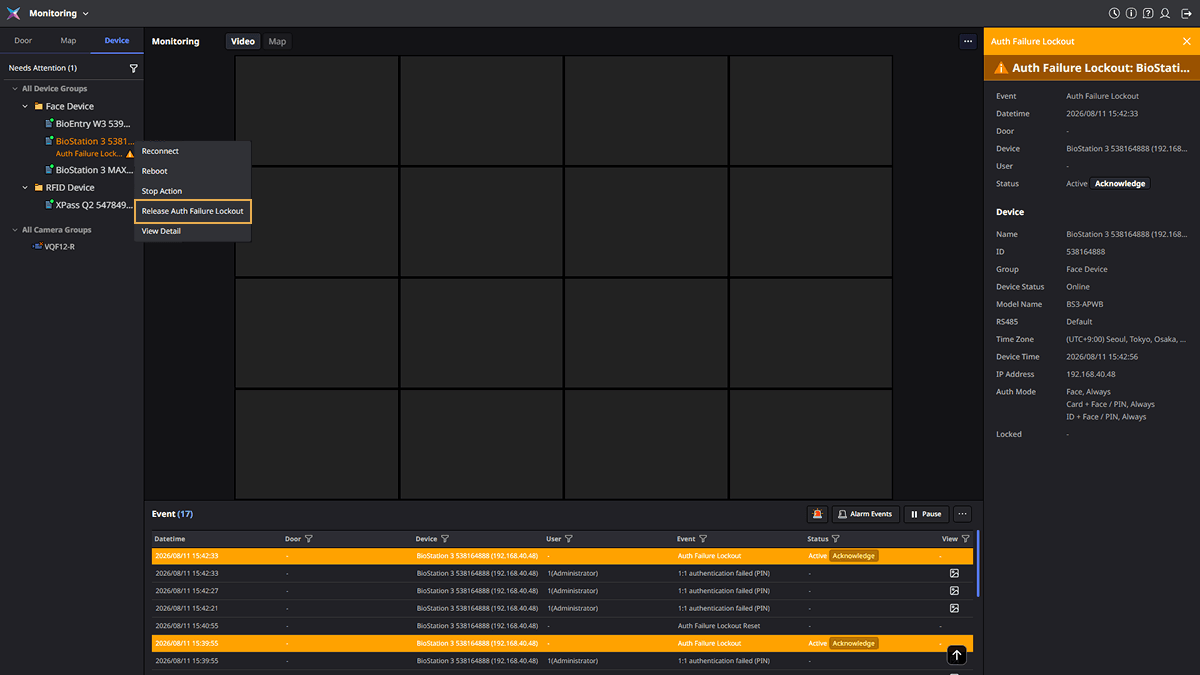
If authentication fails the number of times set in Auth Failure Lockout, the device switches to the locked state. When the device is in authentication failure lockout, Auth Failure Lockout appears under the device name in the left sidebar. Selecting the device shows the same banner at the top of the right preview panel. The banner shows the event time and device information.
The popup menu shows Release Auth Failure Lockout only when the device is in authentication failure lockout. Select the locked device, then click Release Auth Failure Lockout in the popup menu.
-
Only users with Administrator or Monitoring Operator privileges see the Release Auth Failure Lockout menu.
-
After the set lockout time (1st Lockout Duration/2nd Lockout Duration) elapses, the device unlocks automatically. The lockout clears without additional action. For more information on lockout conditions and lockout time settings, see Authentication Settings.
Stop action
To stop all alarm-based and trigger-based actions running on the device, click Stop Action in the context menu. A success message for stopping the action will appear at the top of the screen.
Device detailed view
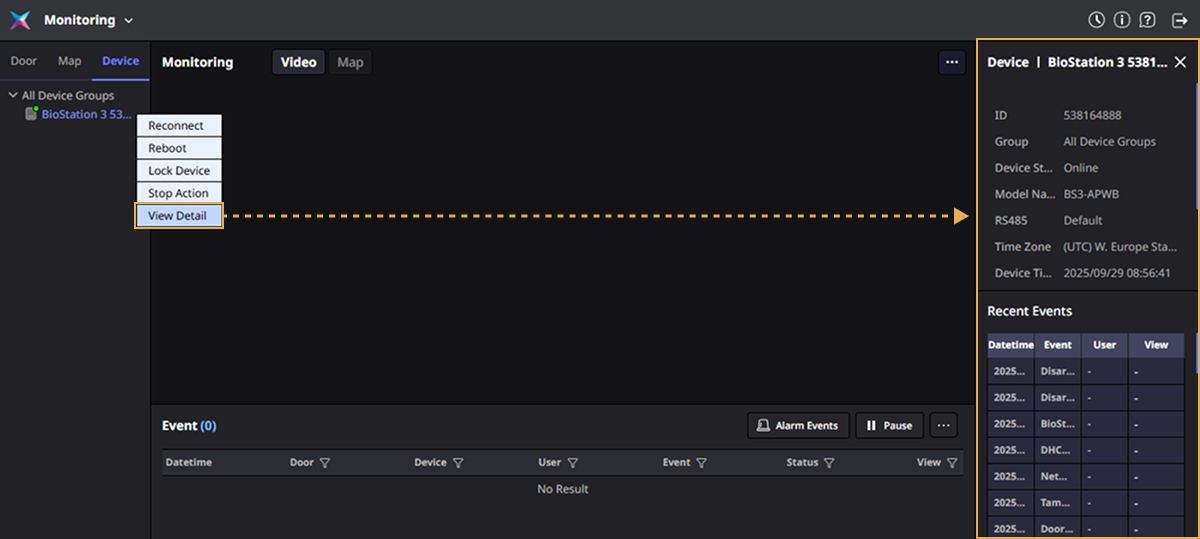
To view detailed information about the device, click View Detail in the popup menu. Or double-click the device. The detailed information of the device will appear on the right side of the screen.
-
Device control: Use controls to stop tasks, restart, or reconnect.
-
Device details: Check the device ID, group, model name, uptime, and IP address.
-
Recent Events: View the list of recent events on the selected device.
Control multiple devices at once
This section describes how to select multiple devices and run commands such as reconnect, restart, or unlock. Select two or more devices in the Device tab on the left sidebar. The batch control panel appears on the right.
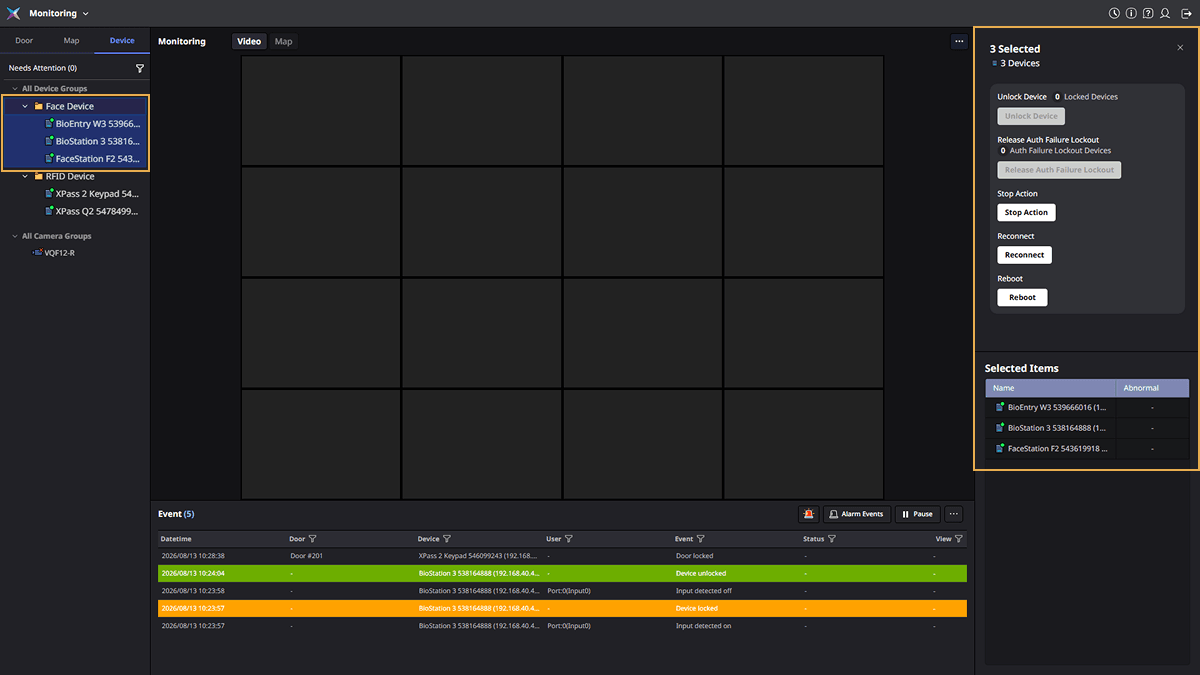
Bulk control does not include cameras. For camera control, see #controlCamera.
Select multiple devices
Use the following methods to select devices in the Device tab on the left sidebar.
-
Ctrl + click: Add or remove the clicked device from the selection list. This keeps the remaining selection.
-
Shift + click: Select a range from the last clicked device to the clicked device. Device groups are excluded from range selection.
-
Click a group (): Click a group name to add all devices under it to the selection list. Keep currently selected devices selected.
-
If only an empty group with no devices is selected, the right panel closes.
-
Selecting one device opens the device details panel. Selecting two or more devices switches to the batch control panel.
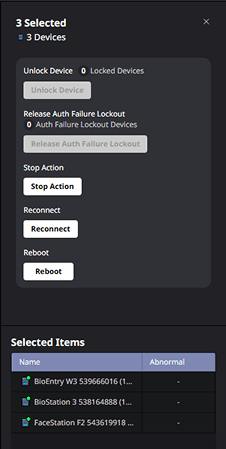
Batch control panel layout
-
Unlock Device, Release Auth Failure Lockout: These buttons activate when selected devices are locked or in authentication-failure lockout. The target count appears next to each button.
-
Stop Action, Reconnect, Reboot: These buttons activate if selected devices support the control. They do not show the target device count.
-
Device control: Use these buttons: Unlock Device, Release Auth Failure Lockout, Stop Action, Reconnect, and Reboot.
-
Divider: Drag the divider between device control and Selected Items up or down to adjust each area's height.
-
Selected Items: Check the connection status, name, and abnormal status of the selected devices. See #attention-criteria for abnormal status types.
Click each button to open the confirmation dialog. In the confirmation dialog, click Cancel to close without executing the selected feature. Click the button for the selected feature to execute it on all selected devices.
If the selection includes different device types, the system shows the combined supported controls. Buttons do not appear for controls that none of the selected devices support. If no controls are supported, only the guidance text and the selected device list table appear.
Check execution results
-
If all selected devices succeed, only a success message appears.
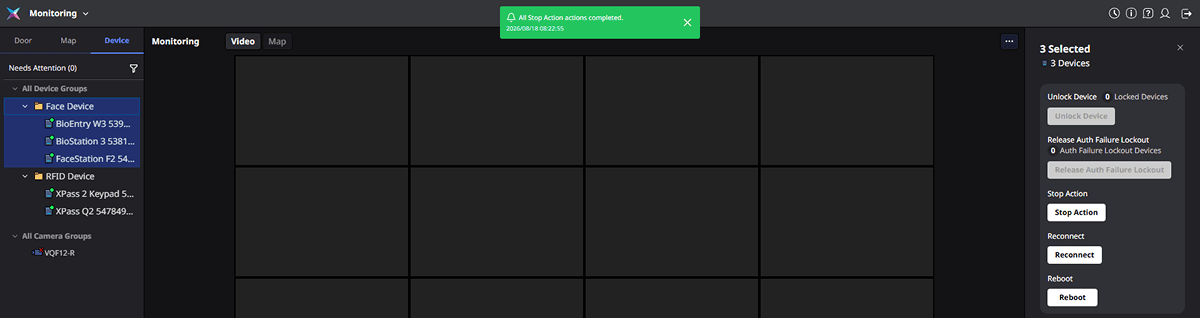
The image above is an example screen and may differ from the actual screen. -
If any device fails, a failure message appears, along with the Show Details button.
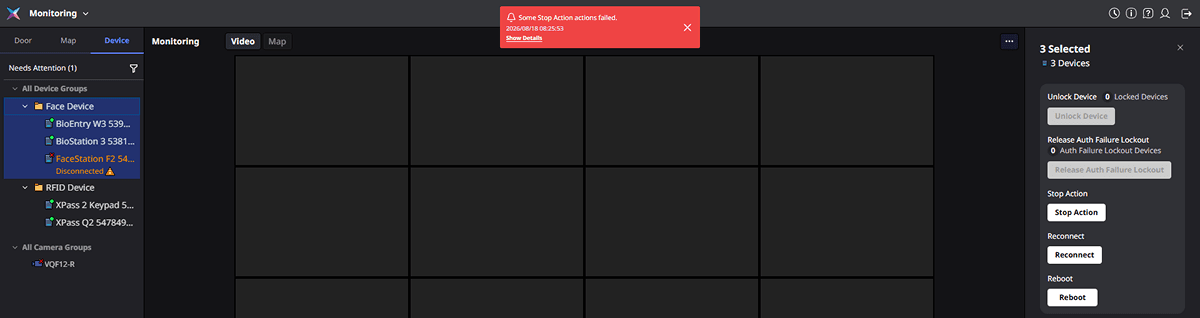
The image above is an example screen and may differ from the actual screen. Click Show Details to view results grouped into Success, Failure, and Skipped. Click Copy Failure details to copy the names and reasons for failed entries to the clipboard.
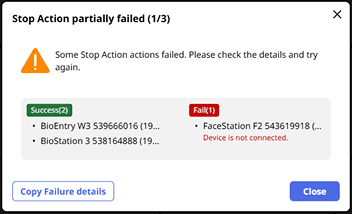
The image above is an example screen and may differ from the actual screen.
-
The Reconnect button is an exception. After the system accepts the request, only a success message appears. It does not provide failure status or a detailed results window. Check the status tree to confirm whether the connection succeeded.
-
Unlock Device and Release Auth Failure Lockout execute separately, and separate result windows appear.
Controlling camera
Select the desired camera from the list on the left sidebar and right-click. You can select the desired feature from the popup menu.
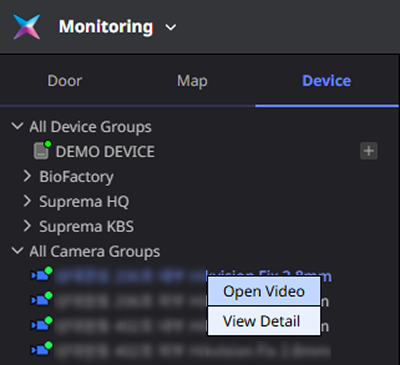
Playing camera video
To place the camera video in the video tile and monitor in real-time, click Open Video in the popup menu.
Adding camera video to video tiles can also be done in the following ways:
-
Double-click the camera to play the video from the camera on the left sidebar.
-
You can also add video by dragging and dropping the camera into the video tile area.
-
Video tiles are added in order from the top left of the screen. If there is no space to add more, an error message appears.
-
For more information on video controls and the tools displayed on the video, see Monitor Video.
-
If a camera does not appear in the All Camera Groups list, check the camera group permissions. If the administrator for a custom permission hasn't configured the camera group permissions, the camera may not be visible. For more information on configuring camera group permissions, see Set Up the Camera.
Camera detailed view
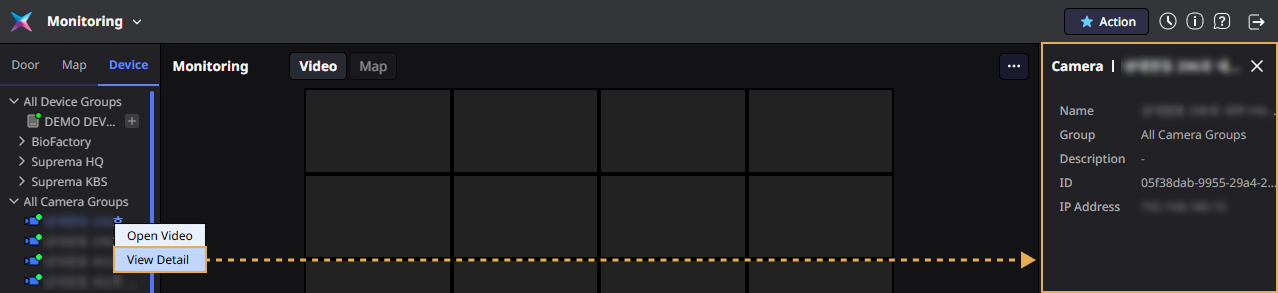
To view the camera details, click View Detail in the popup menu. You can check the camera's group, description, ID, and IP address.