Manage Long-Term Inactive Users
Leaving credentials active for users who have not accessed for a long time, such as after resignation or leave, can lead to security threats, including credential theft and unauthorized access. The auto deactivation feature automatically deactivates users after a set period since their last access, so administrators can manage accounts securely without manual cleanup each time. Before auto deactivation, the system sends a pre-notification email to the specified recipients, giving time to review or make exceptions.
Click Settings on the Launcher page. Click Account → User Auto-Deactivation on the left sidebar.
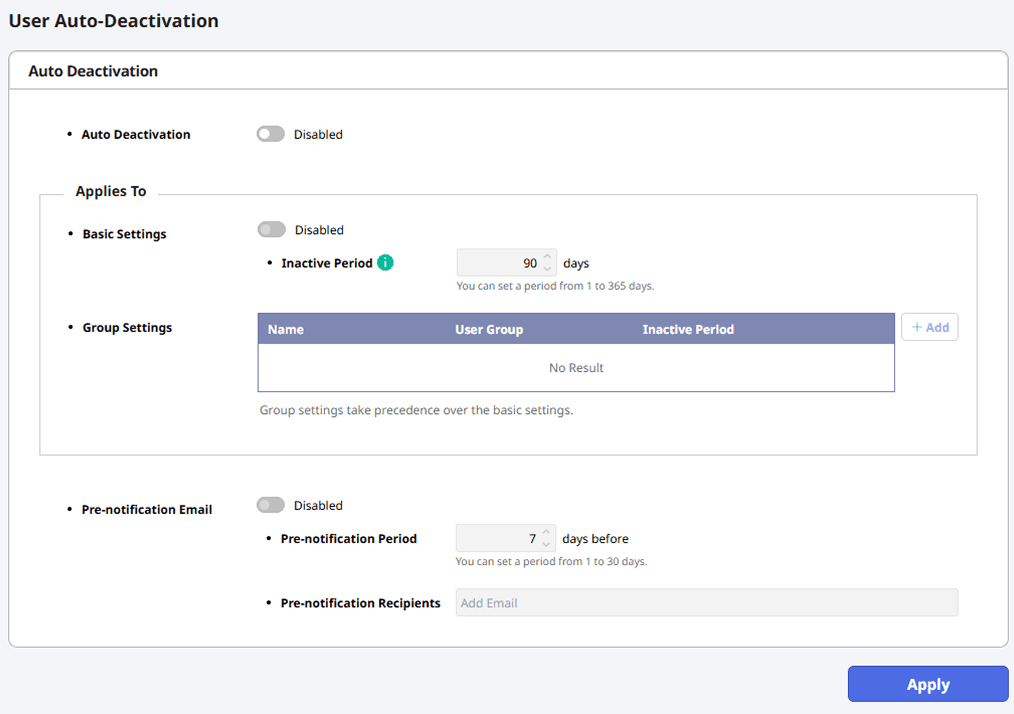
Only administrators with permission for this menu can access Account → User Auto-Deactivation. To grant an administrator permission for a specific menu, see Manage Operation Permissions.
Configure auto deactivation
-
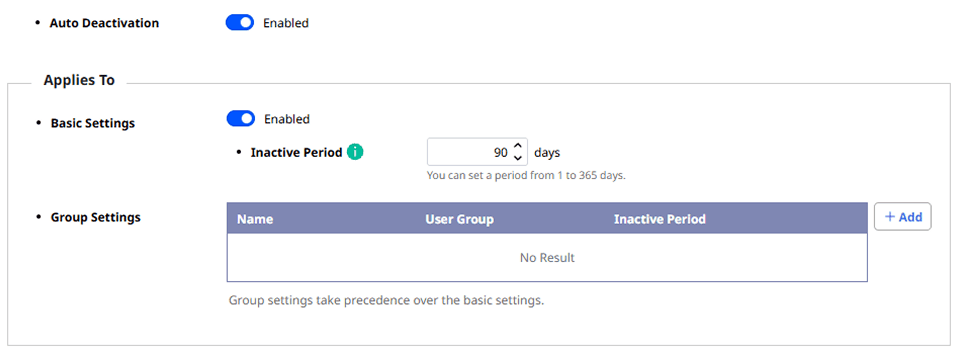
In Auto Deactivation, click the toggle button to enable it.
-
In the Applies To section, set the targets for auto deactivation.
-
To apply the same criteria to all users, enable Basic Settings and enter Inactive Period. Set a value from 1 to 365 days.
-
To apply different criteria to certain user groups, add Group Settings. For more information, see #exception-group.
-
-
Once you complete the settings, click Apply at the very bottom of the screen.
-
When the confirmation window appears, check the next scheduled date for automatic processing and the number of users scheduled for deactivation, then click Save Changes.
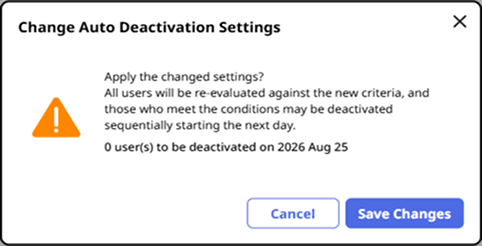
The image above is an example screen and may differ from the actual screen.
-
To email the specified recipients before a user is automatically deactivated, configure Pre-notification Email. See #pre-notification-email for details.
-
Enabling the Auto Deactivation option does not automatically enable Basic Settings. To build the policy using only Group Settings, leave Basic Settings disabled.
-
Auto deactivation uses the last access authentication time. The system excludes users with no access history or only pre-registration access history.
-
If a user meets both Basic Settings and Group Settings, Inactive Period in Group Settings takes precedence. If the user belongs to 2 or more Group Settings, the shortest Inactive Period applies.
-
Automatic deactivation runs 1 time a day (midnight). Setting changes apply at the next processing time and do not affect advance notice schedules already sent.
-
When you set the Auto Deactivation option to inactive, the system saves it immediately without a confirmation dialog.
Apply different criteria by group
Apply a different Inactive Period to certain user groups than Basic Settings.
Add group settings
-
Click + Add to the right of the Group Settings list.

-
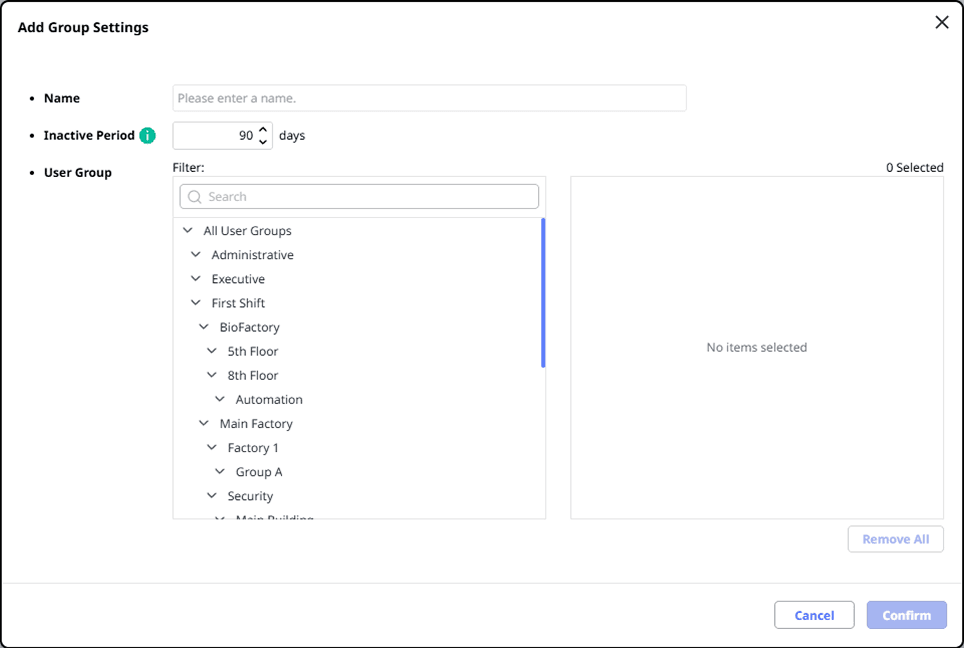
When the Add Group Settings window appears, set each field.
-
Name: Enter a name that does not duplicate other group settings. Case and leading or trailing spaces do not matter.
-
Inactive Period: Set from 1 to 365 days.
-
User Group: Select the user groups to apply this setting to. Selecting a group also selects its subgroups.
-
-
After selecting user groups, click Confirm.
-
Click Apply at the bottom of the screen to save changes.
-
When the confirmation window appears, check the next scheduled date for automatic processing and the number of users scheduled for deactivation, then click Save Changes.
-
In User Group, user groups outside the administrator's permission scope appear disabled, but remain visible in the list. Expand this group. Select subgroups within the permission scope.
-
Administrators with administrator privileges set to All users, or full administrators, have no limits on user group selection. For more information on administrator roles, see Manage Operation Permissions.
Edit and delete group settings

-
To edit, in the Group Settings list, click for the desired row, change the value, and then click Confirm.
-
Click for the row to delete. When the confirmation message appears, click Delete.
To save your edits or deletions, click Apply at the bottom of the screen. When the confirmation window appears, check the next scheduled date for automatic processing and the number of users scheduled for deactivation, then click Save Changes.
-
If Group Settings includes user groups outside the administrator’s permission scope, the list still shows them. The system disables editing and deletion.
-
Group Settings takes precedence over Basic Settings.
-
Deleting Group Settings does not restore users already deactivated. After deletion, the system switches to another applicable setting (such as Basic Settings).
Pre-notification email settings
This feature sends an email notice to specified recipients before users are automatically deactivated.
-
Click the toggle in the Pre-notification Email option to enable it.

-
Enter a value for Pre-notification Period. The system sends auto-deactivation notice emails for the entered period. Set the period from 1 to 30 days.
-
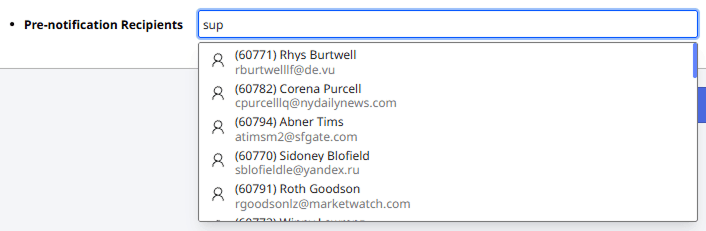
In the Pre-notification Recipients field, search and select a user by name, ID, or email, or enter an email address, then press Enter.
-
Once you complete the settings, click Apply at the very bottom of the screen.
-
When the confirmation window appears, check the next scheduled date for automatic processing and the number of users scheduled for deactivation, then click Save Changes.
-
Set up SMTP settings to use pre-notification emails. For more information, see Email Setting.
-
Set Pre-notification Period shorter than the inactive period in Basic Settings and every Group Settings.
-
Add email addresses not in BioStar X as recipients.
-
The system sends a consolidated email 1 time per day, not separate emails for each user.
-
If Basic Settings is disabled and no Group Settings exists, enabling only Pre-notification Email leaves no targets, so the system sends no emails.
Related information
-
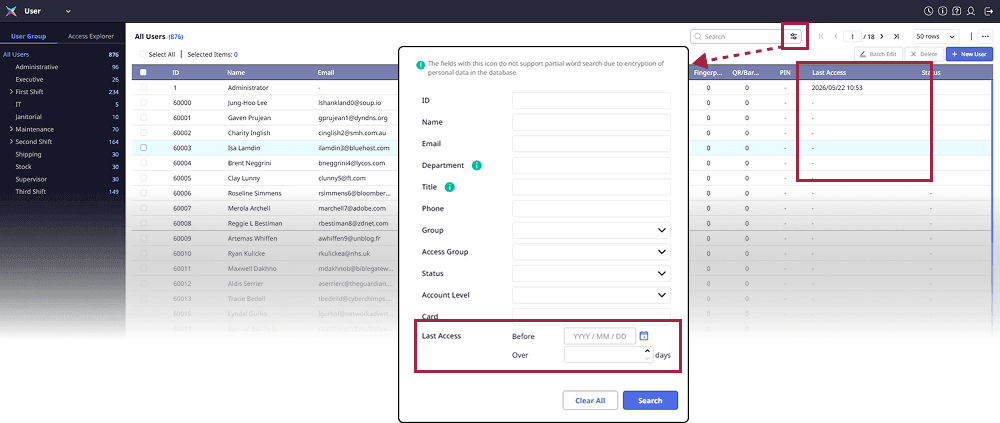
View long-term inactive users in the Last Access column of the user list or use Advanced Search. For more information on selecting view options, refer to Explore Users.
-
Check the history of users deactivated automatically or manually in the Inactive Users report. For more information on selecting view options, refer to Generate Report.