Add Custom Permissions
This guide describes how to add the desired permission level. Custom permissions are user-customizable features that allow for additional permissions beyond the default operational permissions.
Add custom permissions
-
Click Settings on the Launcher page.
-
Click Account → Account on the left sidebar.
-
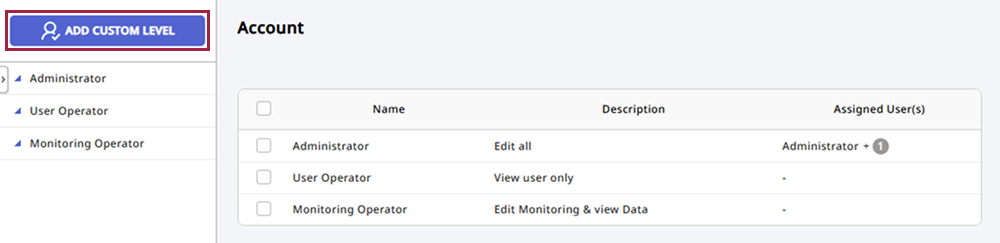
Click Add Custom Level.
-
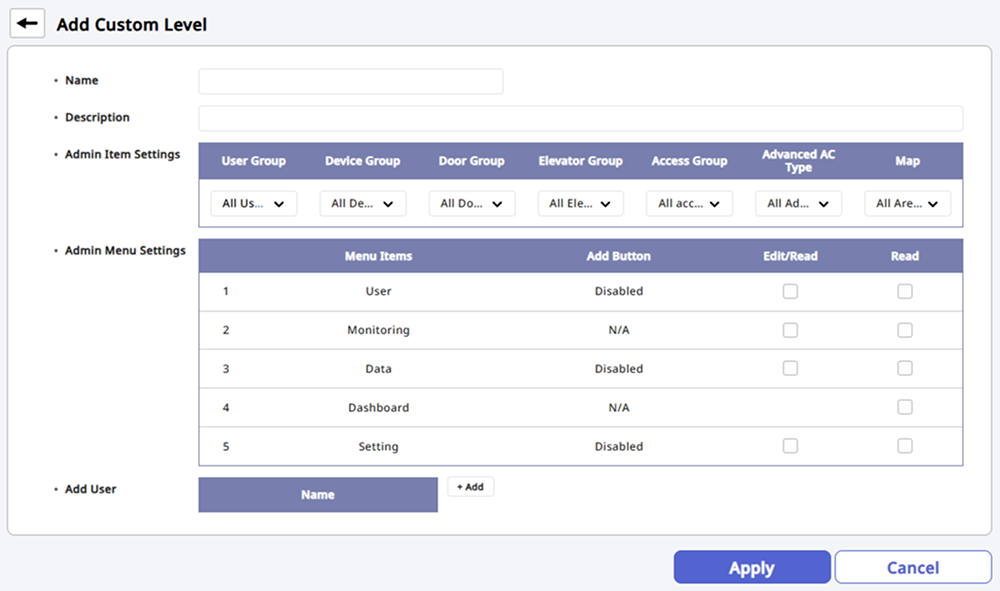
Enter a name and description for the newly created permission.
-
Fill in or select each of the remaining items.
-
Click Apply at the bottom of the screen to save the settings.
-
The types of Admin Menu Settings settings you can configure may vary depending on the activated license type.
-
For more information on Admin Item Settings, see #detailSetting.
-
For more information on Admin Menu Settings, see #menuSetting.
-
For more information on Add User, see #addUser.
Admin Item Settings
Set detailed permissions for items. You can select groups to grant edit and view permissions for each menu. You can set item permissions for User Group, Device Group, Door Group, Access Group based on the information of already created groups in each menu.

-
If your desired group is not available, go to the appropriate menu to add a new group. For more information about adding groups, refer to the followings:
-
The Map permission is available with an Essential license or higher. For more information on the licensing policy, see License Policy.
-
The Elevator Group, Advanced AC Type, Camera Group permissions are available as an add-on option with an Essential license or higher. For more information on licensing policies, see License Policy.
Admin Menu Settings
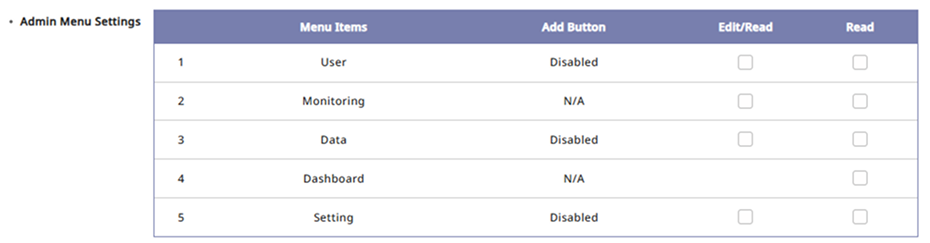
Select Read Only or Full Access for each menu. Assign different permissions to each menu. Click the Permission checkbox, then select Read Only or Full Access.
-
Read Only: Grants permission to enter the menu and only view the settings.
-
Full Access: Grants permission to add, edit, or delete entries in the menu.
-
In the Monitoring menu, Full Access allows adding tabs or controlling state tree entries.
-
In the Data menu, Full Access allows saving reports, adding automatic report schedules, and accessing settings.
-
In the Dashboard menu, Read Only permission allows creating new dashboards and widgets.
-
Menus not listed in Menu Items are accessible regardless of permissions.
Click a parent menu permission to enable permissions for all submenus.

Plugin
After adding a plugin, configure plugin permissions. Users without plugin permissions cannot access the plugin, and the plugin does not appear on the home screen or launcher.

-
A plugin license is required to use plugin features. For more information on licensing policies, see License Policy.
-
Apply Read Only or Full Access only to the Time & Attendance plugin.
Add User
You can add or verify user information for granting permissions. Click + Add to add a user. Select the user to grant permissions from the user list.
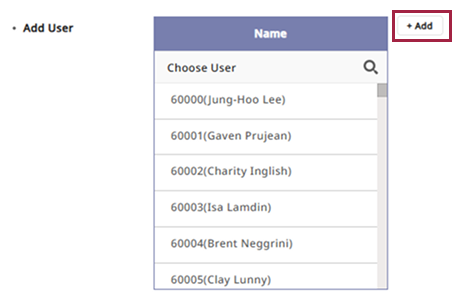
Clicking next to a user in the user list will exclude that user from permissions.