Occupancy Limit
The occupancy limit feature is a key access control function to ensure the safety and efficiency of spaces. This feature allows administrators to set a maximum number of occupants that can enter simultaneously for each location, preventing overcrowding and enabling more systematic space management.
The main applications of the occupancy limit setting are as follows.
-
Safety Management: Prevention of safety incidents by limiting the maximum number of occupants based on fire safety regulations or building capacity limits.
-
Space Efficiency: Optimization of the work environment by maintaining appropriate occupancy in meeting rooms, laboratories, and workspaces.
-
Infectious Disease Response: Management of personnel in situations requiring social distancing or crowd density restrictions.
-
Real-time monitoring: Check the current occupancy and entry/exit status for each location in real time.
-
Automatic Alerts: Immediate notifications to administrators upon reaching the set occupancy limit, enabling swift responses.
By utilizing these features, administrators can establish tailored personnel management policies suited to the characteristics of each space, ensuring safe and efficient facility operations.
-
You can add up to 100 occupancy limit settings.
-
The devices and firmware versions that can be configured for the occupancy limit setting are as follows.
-
FaceStation F2 firmware version 1.1.0 or higher
-
FaceStation 2 firmware version 1.5.0 or higher
-
Occupancy limit registration
-
Click Settings on the Launcher page.
-
Click Advanced AC in the left sidebar.
-
Click ADD ADVANCED AC.
-
Select Occupancy Limit and click Apply.
-
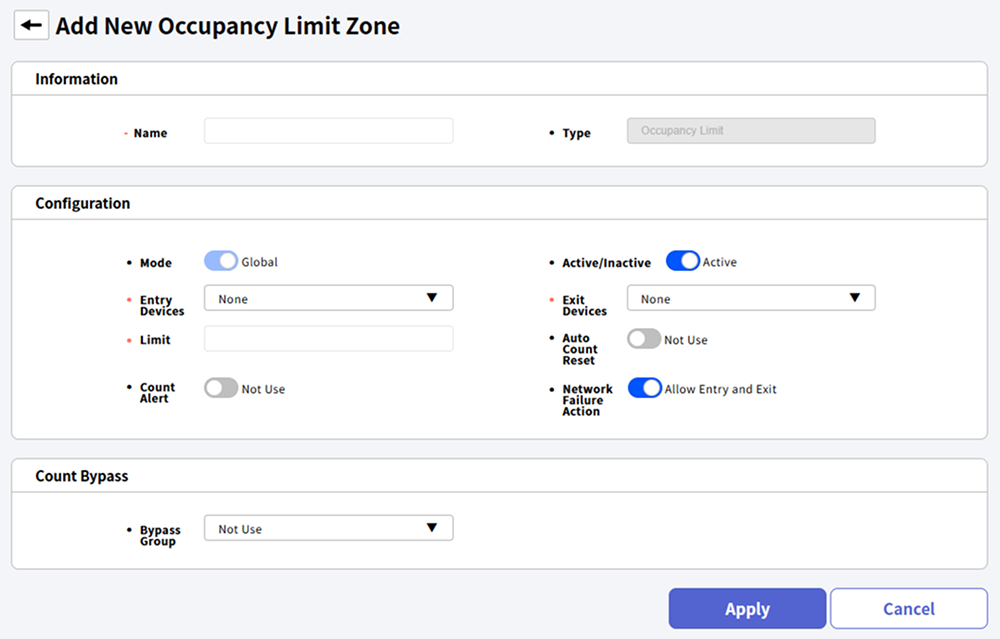
Enter the name of the occupancy limit setting to add in the Info section.
-
Configure the details of the occupancy limit setting in the Configuration section. For more information, see #setting.
-
In the Count Bypass section, you can select access groups that can always bypass the occupancy limit setting. For more information, see #countByPass.
-
After completing all settings, click Apply at the bottom of the screen.
Name can accept up to 48 characters and cannot be set with the same name as other settings.
Setting options guide
The details for the occupancy limit setting are as follows.
-
Mode: You can check the scope of application. The occupancy limit setting supports only Global mode and can be set for all devices registered to BioStar X.
-
Active/Inactive: You can activate or temporarily deactivate the settings.
-
Entry Devices: Select the device to be used when entering. You can choose from the list of registered devices.
-
Exit Devices: Select the device to be used when exiting. You can choose from the list of registered devices.
-
Limit: Enter the number of persons to limit for entry. Entry is restricted if the number of individuals reaches the set occupancy limit. You can enter a number from 0 to 10,000, and setting it to 0 allows access without limits.
-
Auto Count Reset: You can set the time to automatically initialize the stored occupancy count. Every day at the set time, the occupancy count and the number of always-passing individuals will be reset.
-
Count Alert: You can send an alert to the administrator or log an event before the number of entrants reaches the set limit. When occupancy pre-alerts are enabled, the Alert 1 input field becomes active. To set Alert 2, click the button.
-
Network Failure Action: You can determine whether to allow entry and exit when a network error occurs with the configured device. When set to allow entry and exit, the entry restriction stops when the device loses network connection, and users can enter even if the actual number of entrants exceeds the limit.
-
The same device cannot be set for both Entry Devices and Exit Devices at the same time.
-
You can select up to 128 devices for Entry Devices and Exit Devices.
-
A device configured with Dual Authentication on a door cannot be assigned to Entry Devices or Exit Devices.
-
Set the time for the Auto Count Reset option while considering the standard time zone of the actual location. For example, if a BioStar X server is located in a UTC+1:00 region and the auto-reset time is set to 00:00, the BioStar X client in the UTC+2:00 region will have the occupancy automatically reset at 01:00.
-
You can set up to 2 Count Alert limits, and only numbers smaller than the limit can be entered. Alert 1 and Alert 2 cannot be set to the same value.
-
For more information about device registration, refer to the following.
Always-pass personnel setting
You can select access groups that can always bypass the occupancy limit setting. Users who belong to the always bypass group can enter and exit regardless of the occupancy count and will not be counted in the occupancy numbers. Currently active members who are always bypassing can be seen in the always bypass occupants column in the occupancy limit settings list.
-
When using a thermal camera connected to the device, setting Thermal & Mask Check Mode to Check without authentication will not work even if always-pass individuals are set.
-
You can set up to 16 Bypass Group groups.
Check occupancy list status
You can check the occupancy limit settings list. You can check the status of each setting and the occupancy count, and change the settings as needed.
-
Name: You can check the name.
-
Status: You can check the status.
-
Normal: Indicates that the number of users in the zone is less than the number set by Limit, Count Alert(Alert 1, Alert 2). Users can enter this location.
-
Count Alert: Indicates that the number of users present has reached the value set in Alert 1 or Alert 2.
-
Full: Indicates that the number of users present has reached the limit set. Further entries are restricted.
-
-
Count/Limit: Check the current number of occupants compared to the capacity. If there is a discrepancy between the recorded occupancy and the actual number of users present due to situations like network errors, the administrator can click or or click the occupancy count to directly modify the count.
-
Count Bypass: Check the number of users currently in the always-pass group.
-
Device Status: Check the status of the configured devices.
-
Normal: The network of all configured devices is functioning normally.
-
Network Failure: Indicates that one or more devices are experiencing network errors.
-
-
Full Screen: You can view the status of the occupancy limit settings in full screen.
When Limit is set, you can enter occupancy counts up to a maximum of 50,000. If Limit is not set, you can enter counts up to a maximum of 999,999. You cannot enter numbers exceeding the maximum input value, and if the actual occupancy exceeds this value, the excess will not be recorded in the database.
Initialize occupancy
You can reset the occupancy count and the number of always-pass individuals. Proceeding with the occupancy reset will delete all user's entry and exit information, and the accuracy of the occupancy count may vary depending on the network connection status.
-
Click Settings on the Launcher page.
-
Click Advanced AC in the left sidebar.
-
Click Occupancy Limit in the list.
-
Click the checkbox for the setting you want to initialize from the occupancy limit settings list.
-
Click Reset Count at the top right of the screen.
-
When a confirmation message appears, click Apply.
Activate/deactivate
You can activate a deactivated occupancy limit setting or deactivate an activated setting. Deactivating the settings will reset Current Occupancy and Bypass Count.
-
Click Settings on the Launcher page.
-
Click Advanced AC in the left sidebar.
-
Click Occupancy Limit in the list.
-
Click the checkbox for the item in the occupancy limit settings list to activate or deactivate.
-
Click Activate or Deactivate at the top right of the screen.
Delete
-
Click Settings on the Launcher page.
-
Click Advanced AC in the left sidebar.
-
Click Occupancy Limit in the list.
-
Click the checkbox for the item you want to delete from the occupancy limit settings list.
-
Click Delete at the top right of the screen.
-
When a confirmation message appears, click Apply.
Navigate the list page
Move between pages or set the number of items to appear on each page. Use the page navigation tool in the top right corner of the screen.

-
: Move to the first page.
-
: Move to the previous page.
-
: Move to the next page.
-
: Move to the last page.
-
Enter the page number in the input field to move to the desired page.
-
Click the row selection box to set the number of items displayed on each page.