Roll Call
Roll Call quickly generates a personnel list based on entry records within a specific time and place. When an emergency occurs, the system can determine whether a user has arrived at the roll call location by authenticating through the entry or exit device at a predesignated location.
Can be used for emergency response, safety checks, and providing rescue team information. This allows for efficient management of personnel status utilizing entry and exit records.
Roll call settings can be used through additional options available with an Advanced license or above. For more information on licensing policies, see License Policy.
Register roll call
-
Click Settings on the Launcher page.
-
Click Advanced AC in the left sidebar.
-
Click ADD ADVANCED AC.
-
Select Roll Call and click Apply.
-
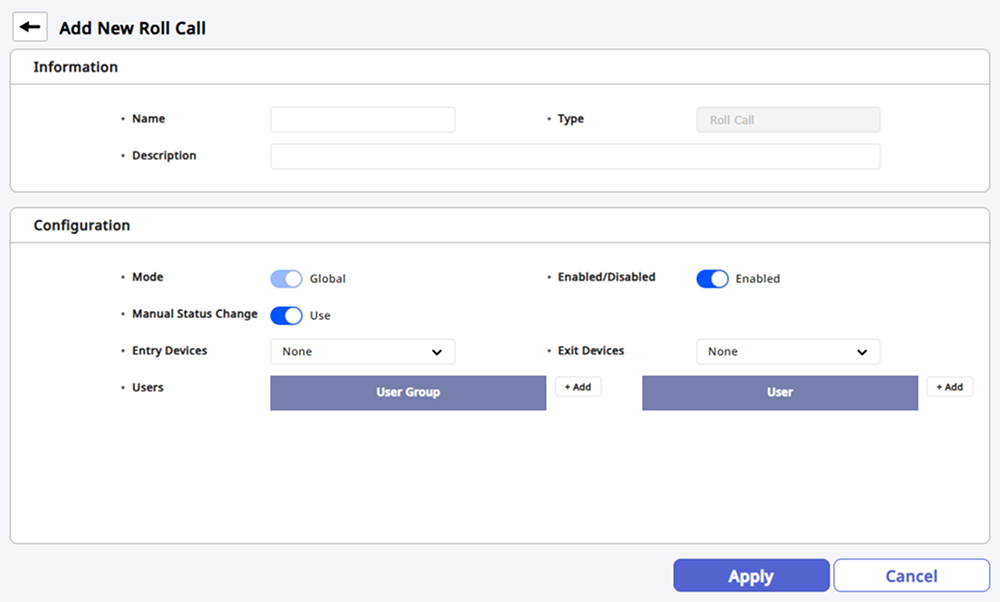
Enter the name and description of the roll call setting to be added in the Info section.
-
Set details in the Configuration section. For more information, see #setting.
-
After completing all settings, click Apply at the bottom of the screen.
Name can accept up to 48 characters and cannot be set with the same name as other settings.
Setting options guide
The details for roll call settings are as follows.

-
Mode: You can check the scope of application. Roll call settings are supported only in Global mode, and can be configured for all devices registered in BioStar X.
-
Enabled/Disabled: You can activate or temporarily deactivate the settings.
-
Manual Status Change: You can set it to change the status manually.
-
Entry Devices: Select the device to be used when entering. You can choose from the list of registered devices.
-
Exit Devices: Select the device to be used when exiting. You can choose from the list of registered devices.
-
Users: You can select user groups or individual users who are allowed to enter.
-
The same device cannot be set for both Entry Devices and Exit Devices at the same time.
-
You can select up to 10 devices for Entry Devices and Exit Devices.
-
For more information about device registration, refer to the following.
Activate/deactivate
You can activate disabled roll call settings or deactivate activated settings.
-
Click Settings on the Launcher page.
-
Click Advanced AC in the left sidebar.
-
Click Roll Call from the list.
-
Click the checkbox for the item you want to activate or deactivate in the roll call settings list.
-
Click Enable or Disable in the upper right corner of the screen.
Delete
-
Click Settings on the Launcher page.
-
Click Advanced AC in the left sidebar.
-
Click Roll Call from the list.
-
Click the checkbox for the item you want to delete from the roll call settings list.
-
Click Delete Advanced AC at the top right of the screen.
-
When the warning message appears, click the Continue button.
Navigate the list page
Move between pages or set the number of items to appear on each page. Use the page navigation tool in the top right corner of the screen.

-
: Move to the first page.
-
: Move to the previous page.
-
: Move to the next page.
-
: Move to the last page.
-
Enter the page number in the input field to move to the desired page.
-
Click the row selection box to set the number of items displayed on each page.
Start roll call
The roll call feature is available in the BioStar X mobile app.
You can install the BioStar X mobile app via the following links.
-
iOS: Apple App Store
-
Android: Google Play
Start roll call in the mobile app
To start the roll call feature in the mobile app, follow these steps.
-
Launch the BioStar X mobile app on your mobile device.
-
From the app home screen, tap ROLL CALL.
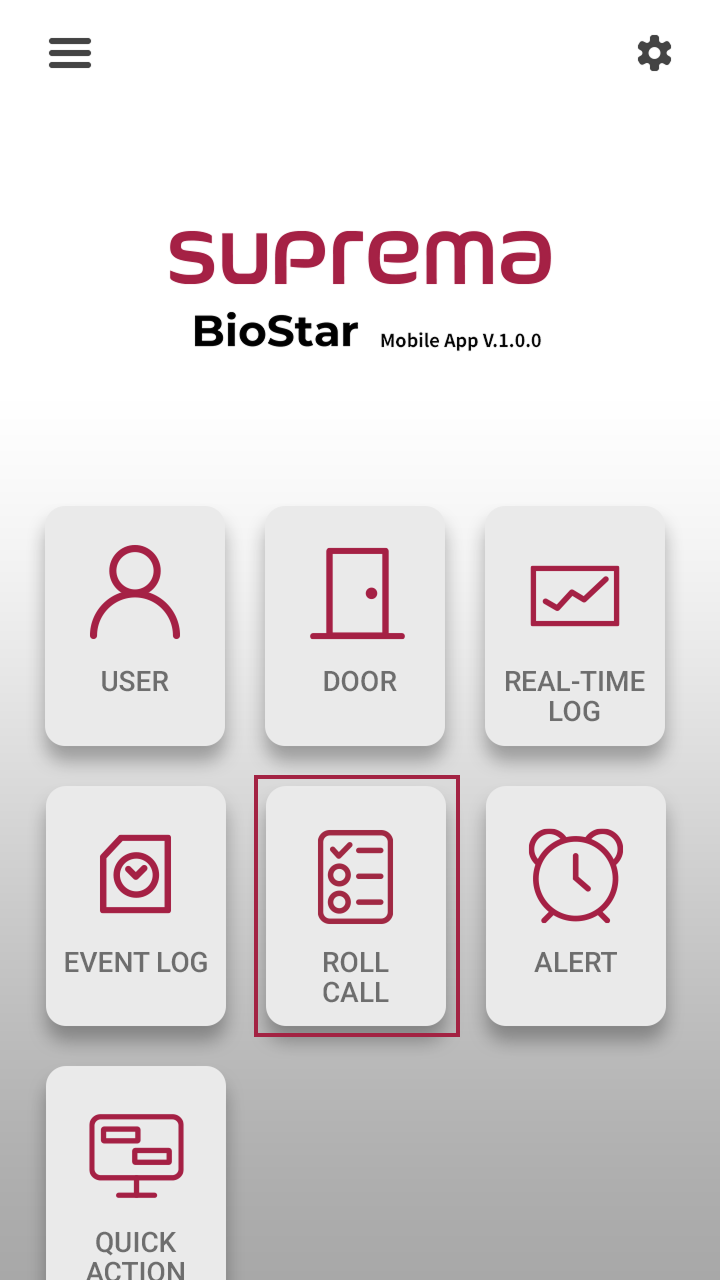
You can also access it through the side menu. Tap → Monitoring → Roll Call.
-
In the Roll Call list, tap for the item you want to execute roll call.

-
When the confirmation message appears, tap Yes.
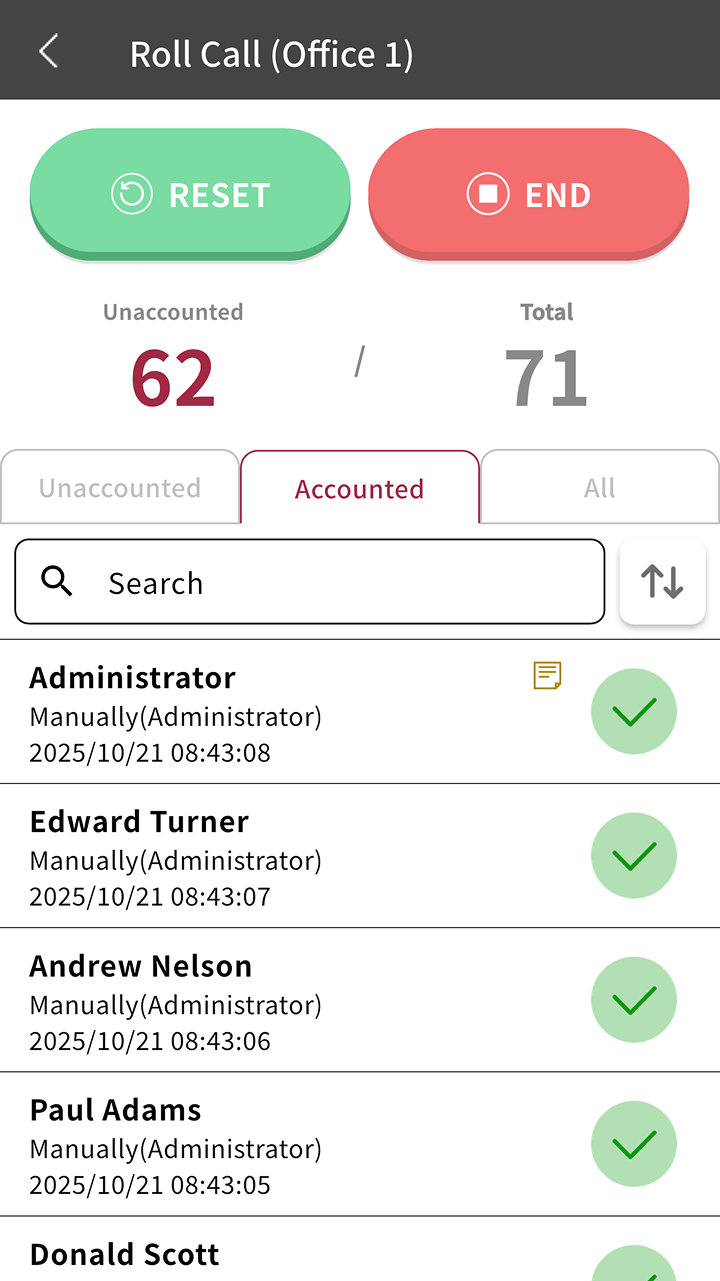
Roll call will start, and by tapping on the ongoing roll call item, you can check the status of the roll call.
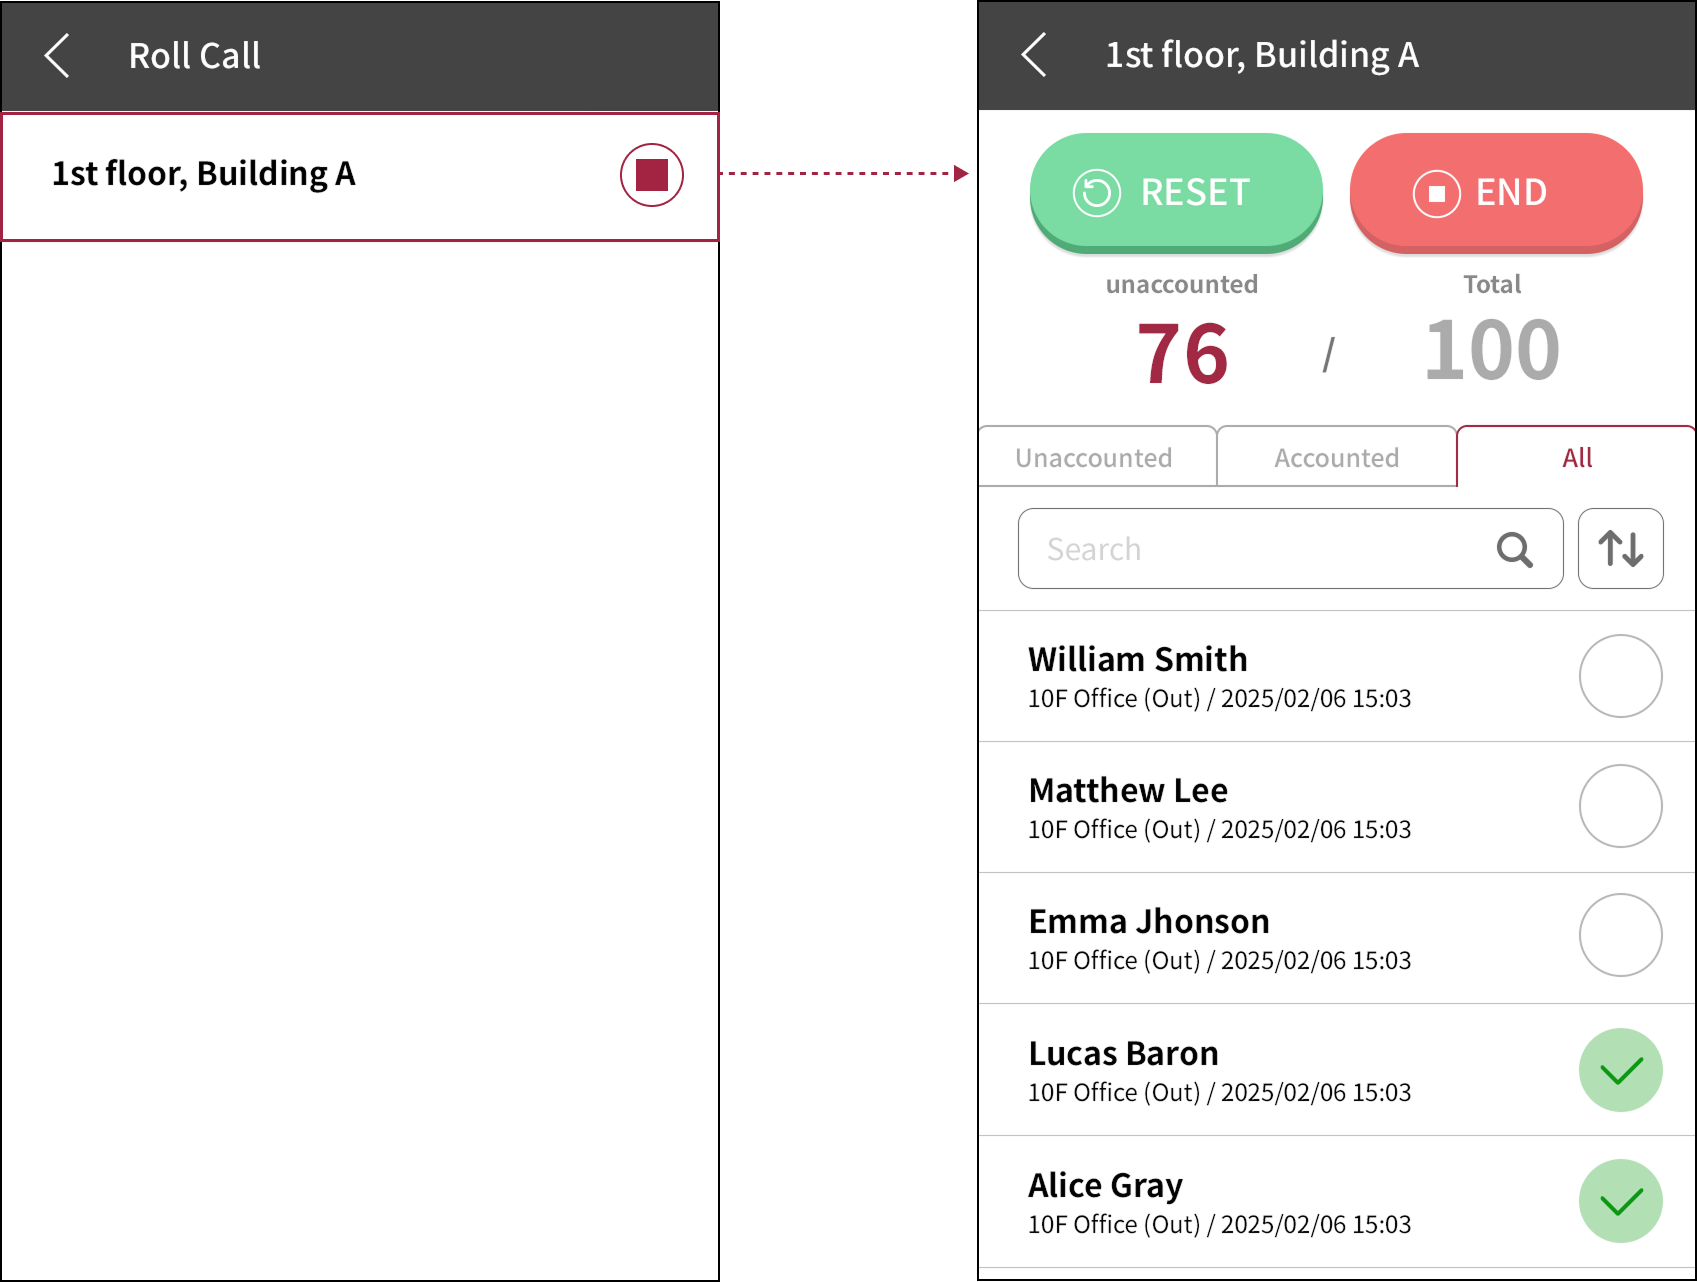
Ongoing roll call control
-
Users entering will be marked with the icon. When all users have entered, a message indicating that roll call has ended will appear. To end the roll call, tap Yes.
-
The administrator can manually change the user's entry or status. Long press the round button on the far right of the user whose status you wish to change from the user list.

-
To reset the roll call, tap Reset. All progress is discarded and the roll call restarts from the beginning.
-
If roll call is ended by another administrator, a notification message will appear.
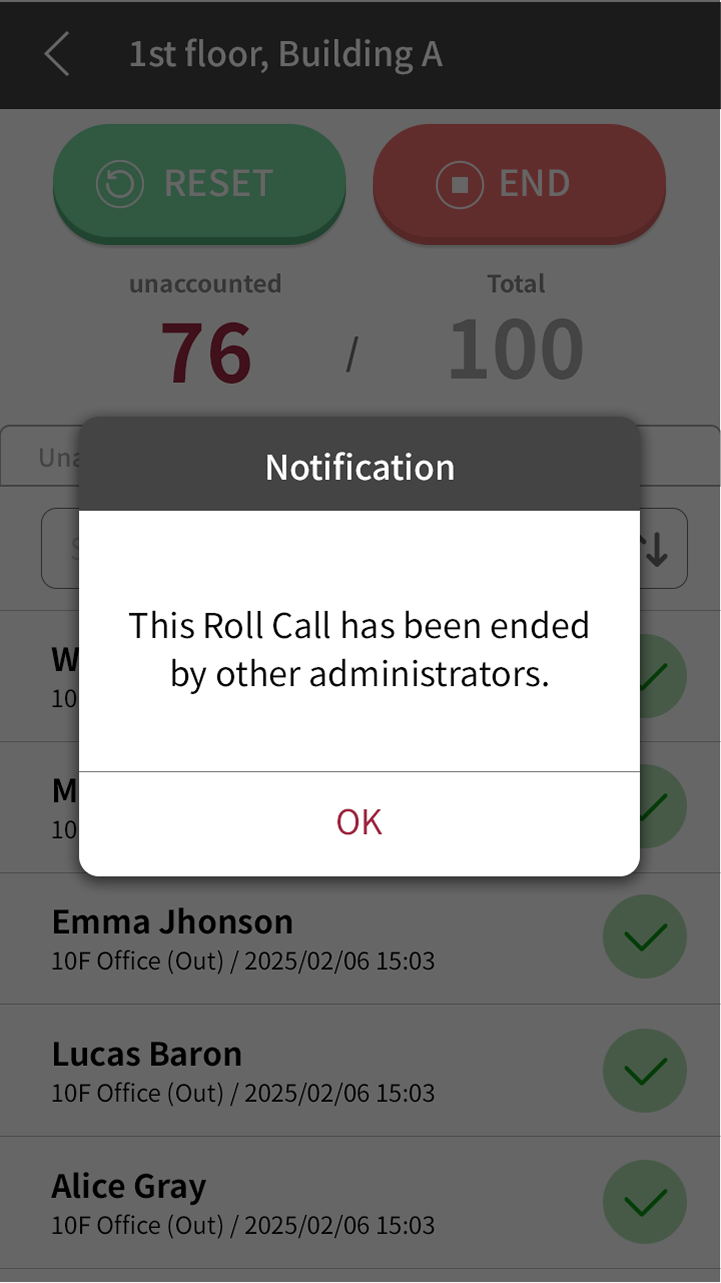
-
To end an ongoing roll call, tap the button in the roll call list screen, or tap END button in the roll call status screen.
-
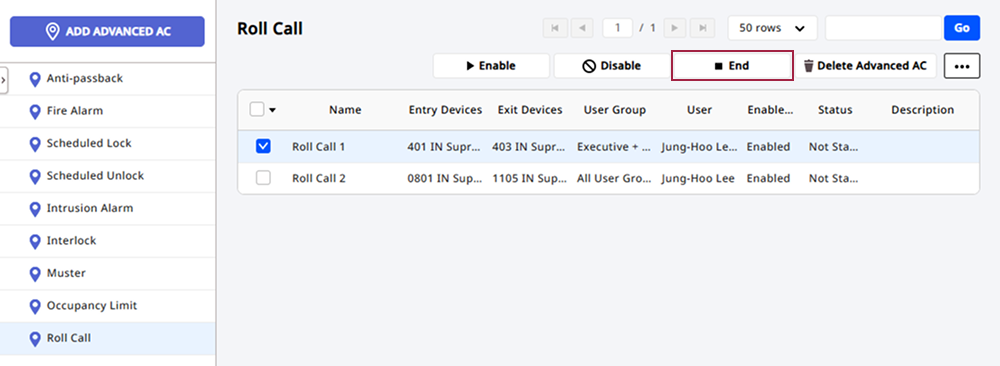
You can also end the ongoing roll call in BioStar X. Go to the Settings → Advanced AC → Events → Roll Call menu, select the ongoing roll call item, and click the End button at the top right of the screen.
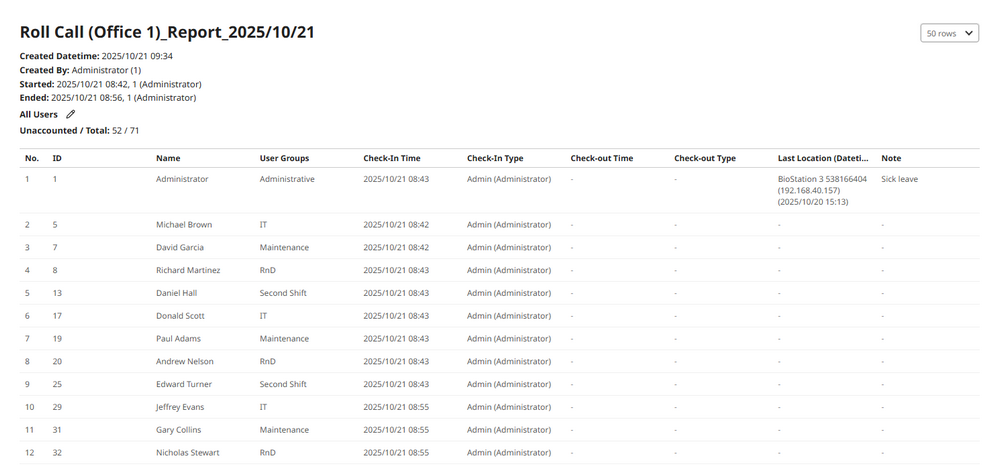
- After completing the roll call, you can check related reports from Data → Generate Report → Roll Call. For more information, see #viewRollCallReport.
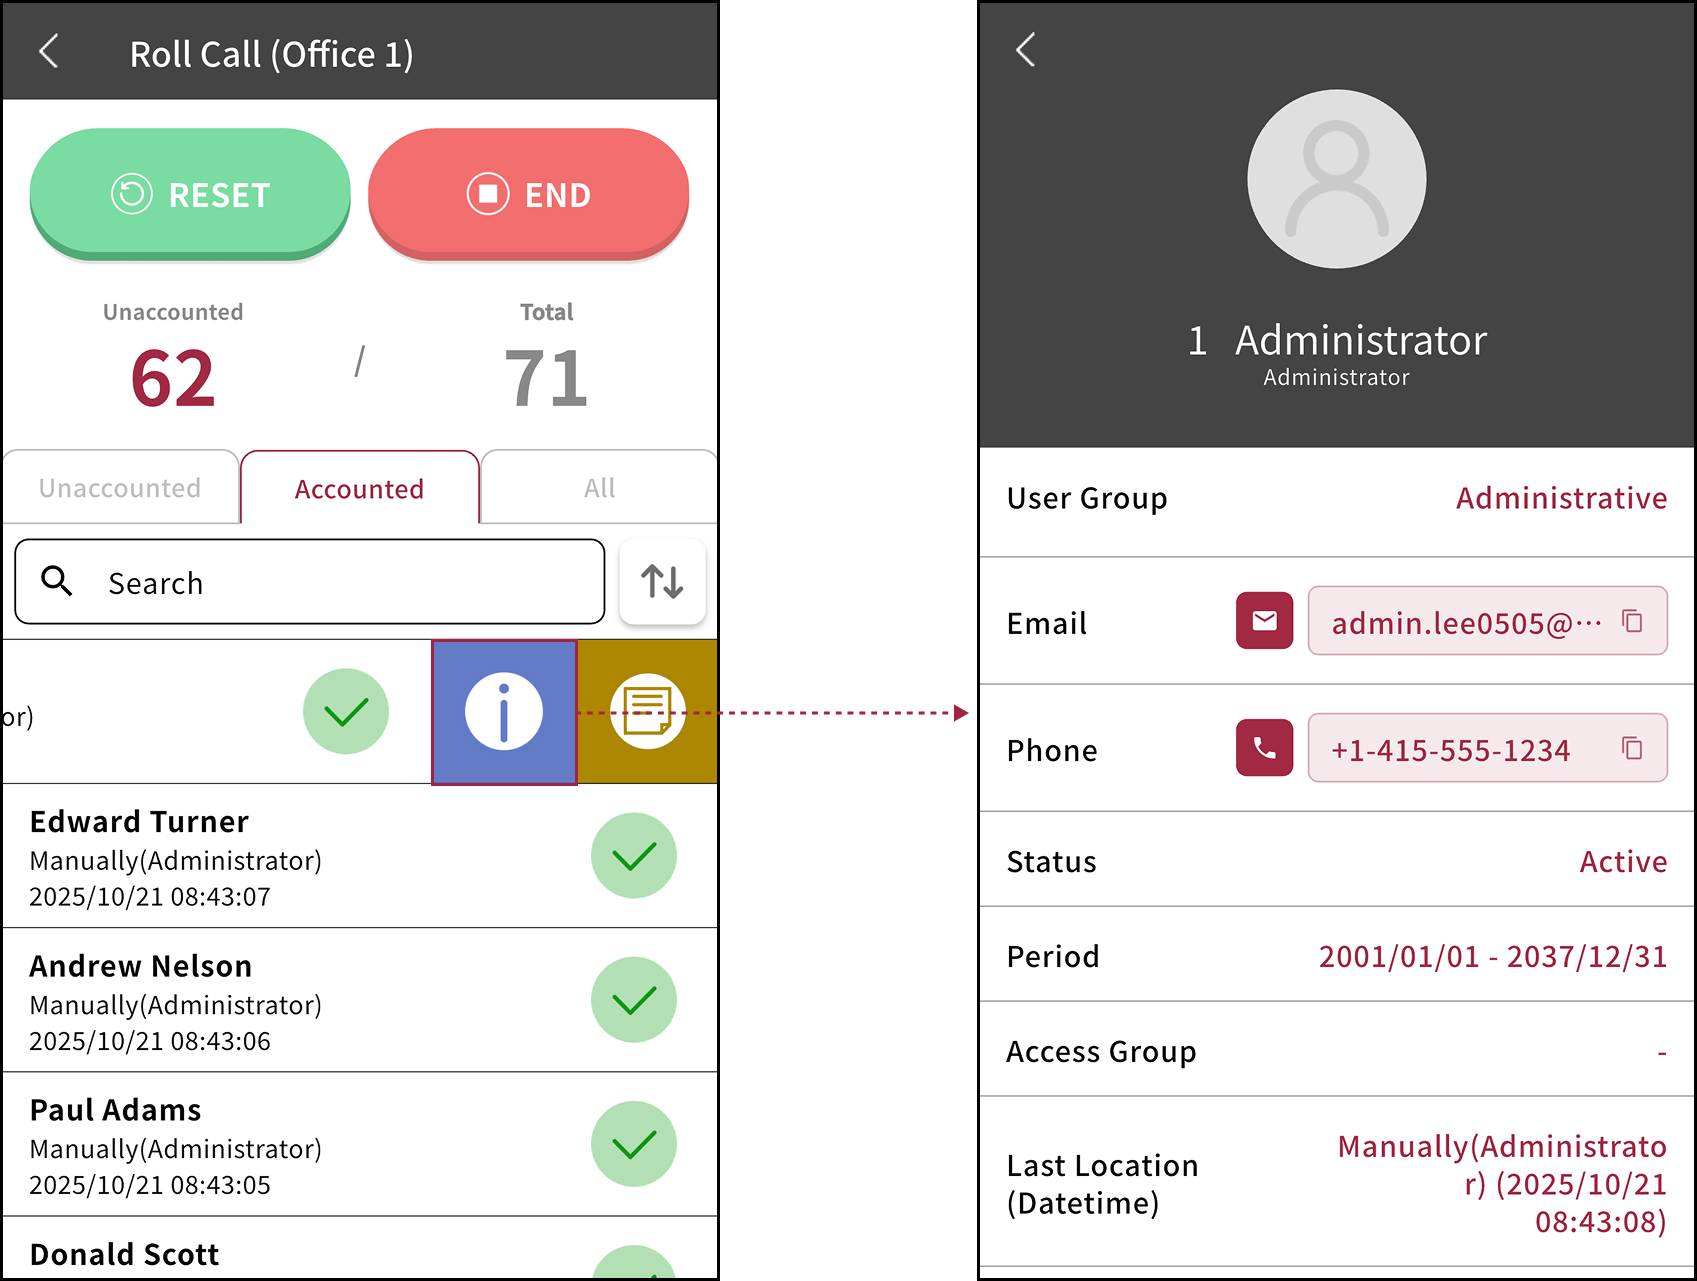
User information during roll call
During roll call in the mobile app, you can check each user's information. View details such as contact information for emergency contact and the user's last known location.
Swipe left on the user item for which you want to check details during roll call. Then tap .
Leave a note for users during roll call
If a specific user has not entered during roll call in the mobile app, you can leave a note for that user.
Swipe left on the user item where you want to input a note during roll call. Then tap . On the note input screen, enter the content and tap Save.
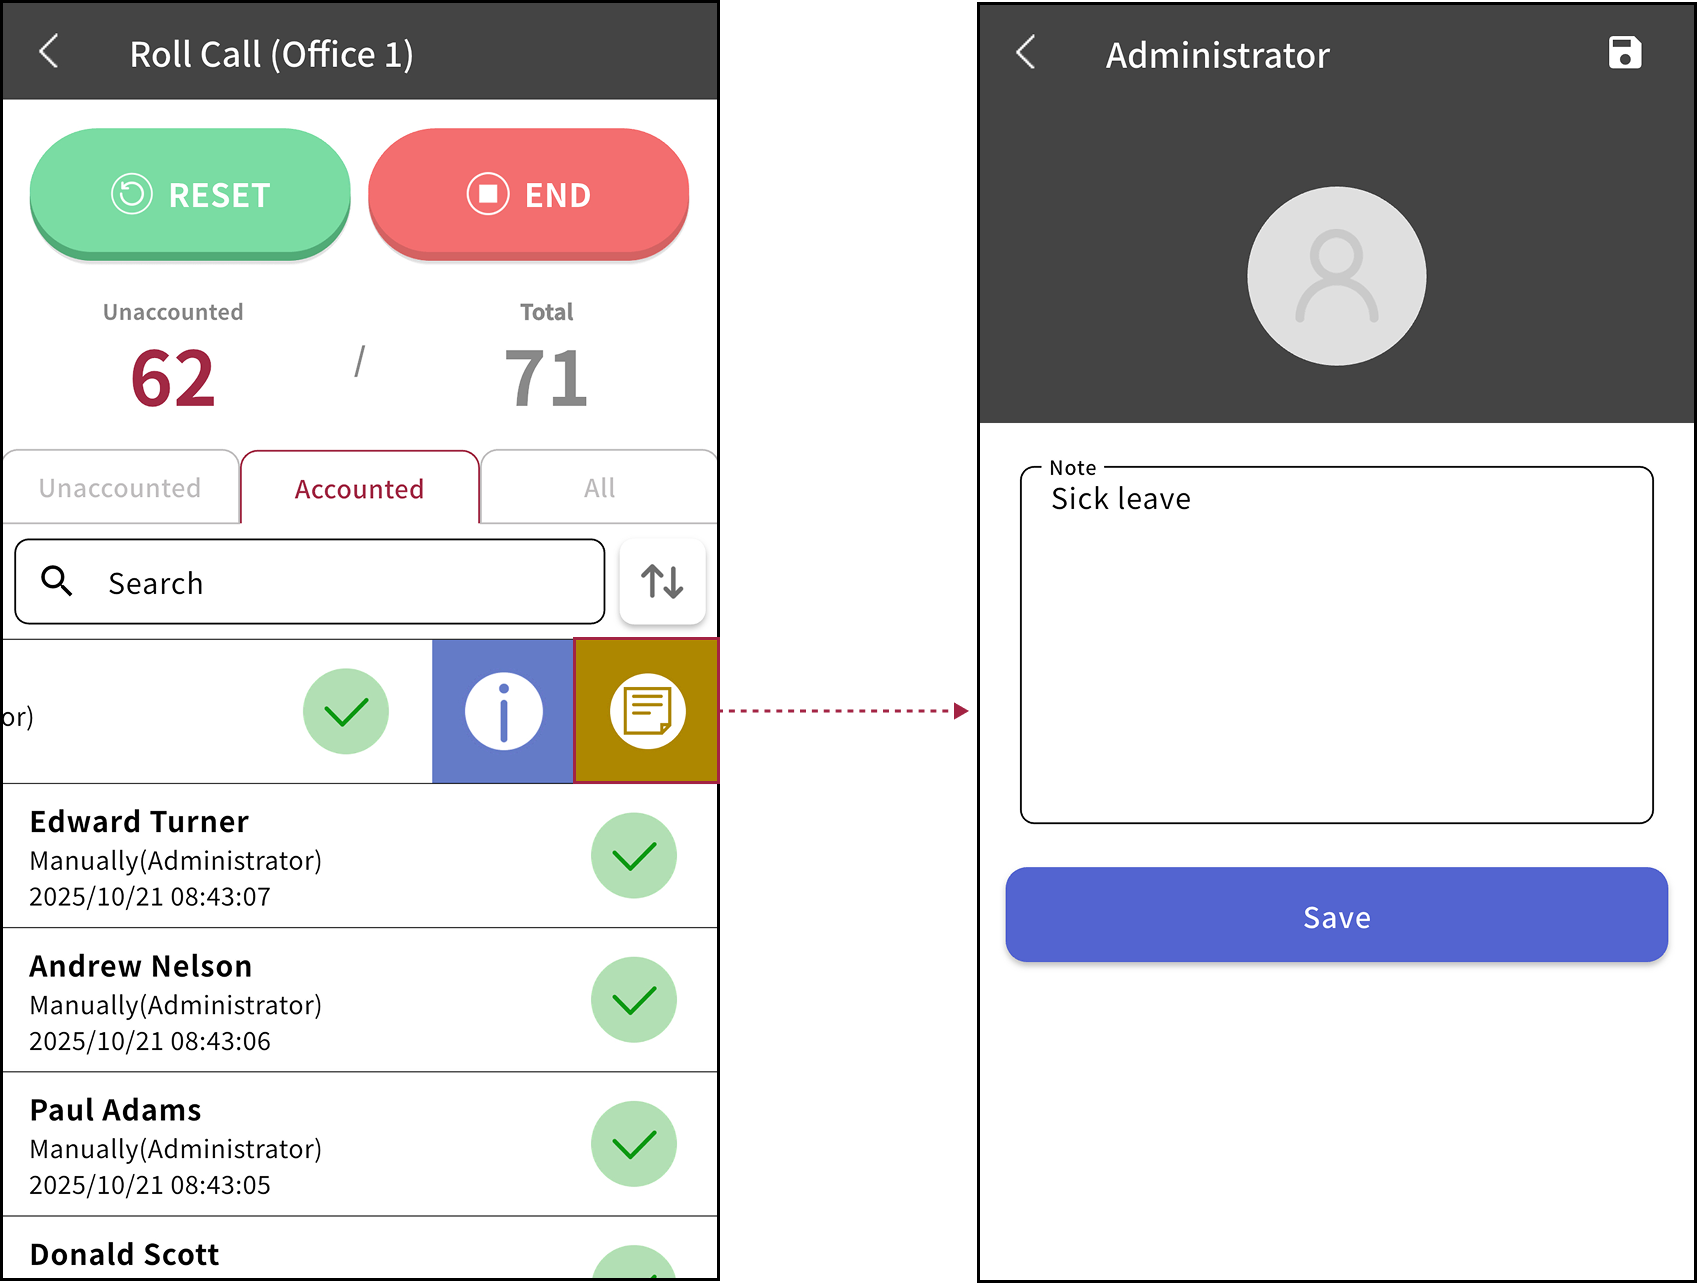
Users who have entered notes will be marked with the icon in the roll call list.
Check roll call details
You can check the details of the roll call settings in the mobile app.
-
Launch the BioStar X mobile app on your mobile device.
-
From the app home screen, tap ROLL CALL.
You can also access it through the side menu. Tap → Monitoring → Roll Call.
-
Swipe left on the item to check details from the list, then tap .

View roll call reports
To check the roll call report, follow these steps.
-
Click Launcher on the page of Data.
-
On the left sidebar of the screen, click Events → Roll Call.
-
When the Select Roll Call window appears, select the roll call item you want to check in the report, then click the Next button.
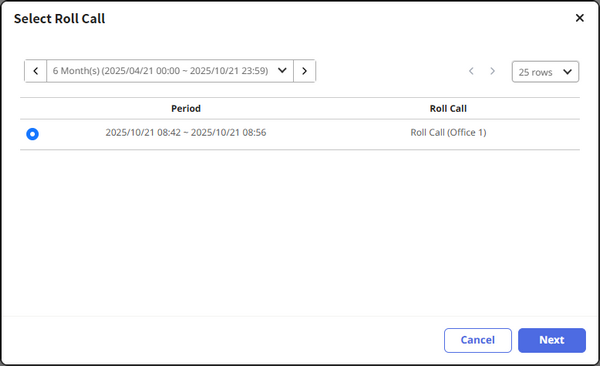
If you do not see the desired roll call item, adjust the period at the top of the screen.
-
In the option settings window, select the data to include in the report, then click the Generate button.
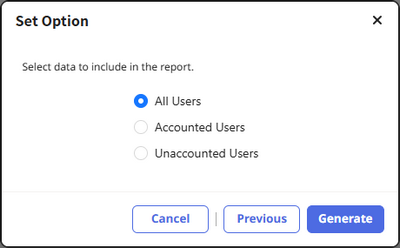
Generating the report. The report provides information on each user, including their entry time, exit time, last location, and notes.