Card Printer
You can print cards with the desired design by integrating BioStar X and cardPresso. cardPresso is professional software for card design and printing. Using cardPresso, you can create various card templates and arrange user information accordingly.
Before you start
To use the card printer feature of BioStar X, install the cardPresso program and connect it to BioStar X. To use the web printing server function of the cardPresso program, a cardPresso XXL edition license is required.
-
For more information on the license types of the cardPresso program, refer to the following link.
-
The web printing server function is supported only on Windows operating systems.
Installing and configuring the cardPresso
Follow the steps below to install the cardPresso program and set up the web printing server.
The menu path or screen may vary depending on the installation version.
-
Download the latest version of cardPresso compatible with the operating system of the PC to be operated as a web printing server from cardPresso Download.
-
Install the program and activate the license issued by cardPresso.
-
After running cardPresso, create a card template.
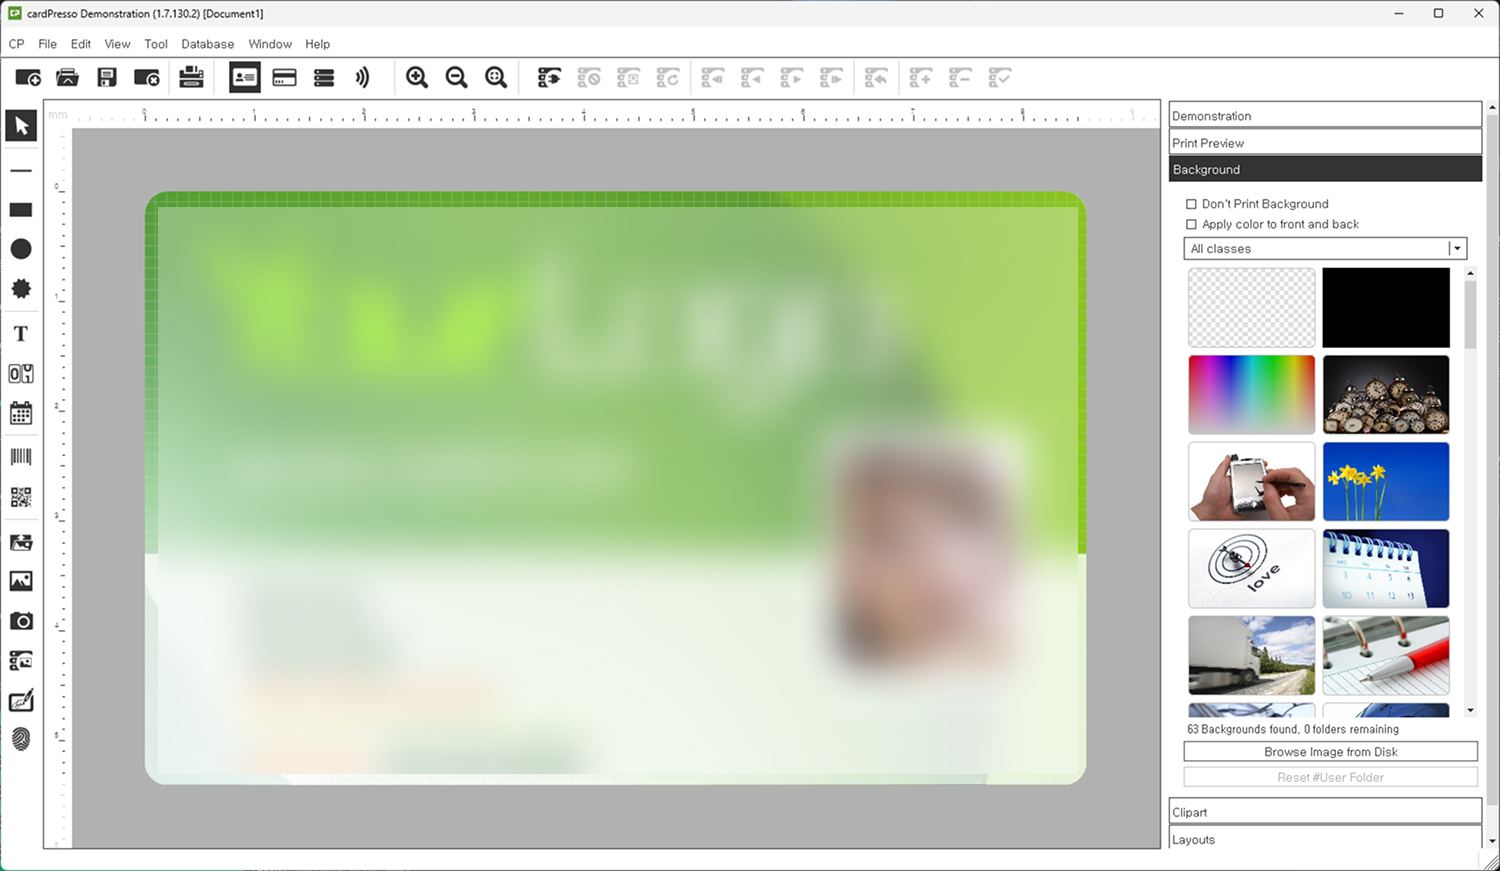
The image above is an example screen and may differ from the actual screen. -
Save the created card template to a desired location on the server where BioStar X is installed. (ex. C:\template\example.card)
-
Right-click on the desktop of the PC where cardPresso is installed, then click New → Shortcut from the popup menu.
-
Enter the following in the Item Location field, then click the Next button.
"C:\Program Files (x86)\cardPresso\cardPresso.exe" /PRINTSERVER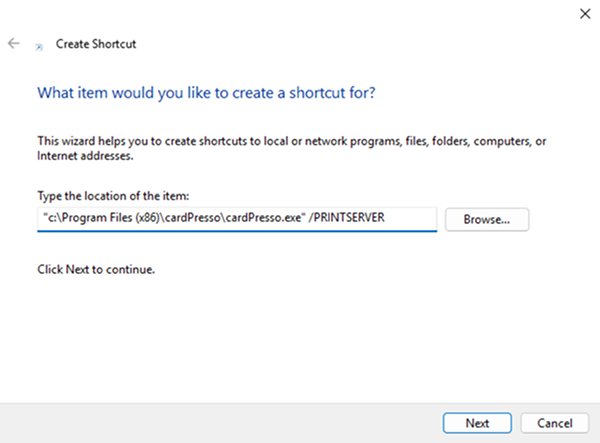
The path where cardPresso is installed may differ based on the installation environment. After confirming the path where cardPresso is installed, modify it appropriately according to the above path.
-
Enter a name for the shortcut, then click the Finish button.
-
Double-click the cardPresso web printing server shortcut icon created on the desktop to run it.
-
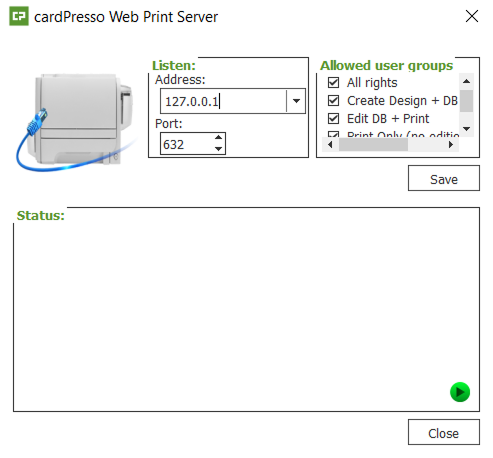
When the cardPresso web printing server window appears, click the Settings icon.
-
Address: Enter the IP address of the computer acting as the Web Print Server.
-
Port: Port number on which cardPresso receive print operations.
-
Allowed user groups: Select a user group that has access to the Web Print Server.
-
-
Click Save when the configuration is complete.
-
Click the
 in the bottom right corner to start the service. If properly set, the icon changes to
  and a listen OK message appears.
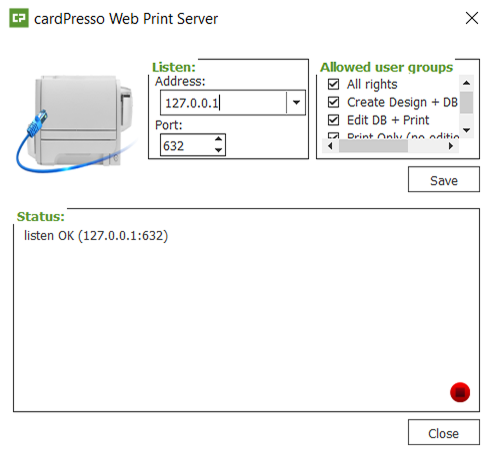
Do not close the window until card printing is complete.
Connecting cardPresso to BioStar X
To connect cardPresso to BioStar X, set it up as shown below.
-
Click Settings on the Launcher page.
-
In the left sidebar, click Card Printer.
-
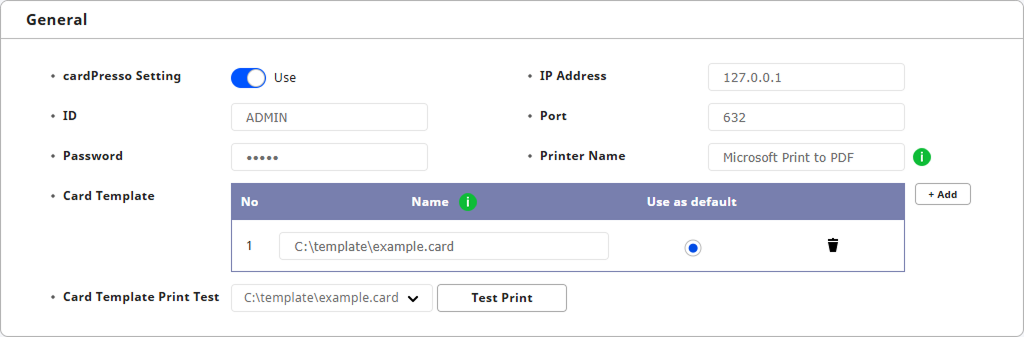
Activate the cardPresso Setting to Use, then enter each item.
-
ID: Enter your cardPresso login ID. (default: ADMIN)
-
Password: Enter your cardPresso login password. (default: admin)
-
IP Address: Enter the IP address of the PC that runs the cardPresso web print server.
-
Port: Enter the port number used by cardPresso to receive print operations.
-
Printer Name: Enter the name of the printer to be used as a card printer. It can be found in the Windows Control Panel → Devices and printers.
-
Card Template: Click + Add to add a Card Template. In the Name item, enter the full path including the filename and extension of the card template.
-
The file name of the card template can be entered using alphanumeric, and special characters.
-
Up to 20 card templates are supported.
-
Example path: C:\template\example.card
-
-
Card Template Print Test: Test print the card template.
-
-
Once you complete the settings, click Apply.
Test printing the card template
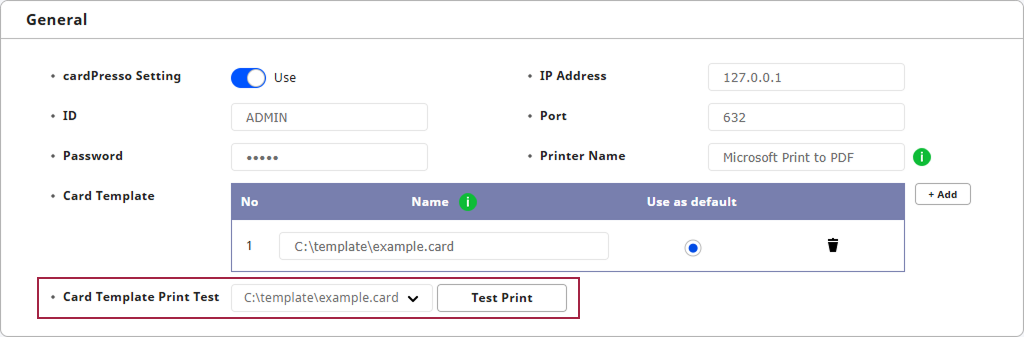
Test print a card template with Administrator information.
-
Click Settings on the Launcher page.
-
In the left sidebar, click Card Printer.
-
Select the card template you want to print, then click the Test Print button.
-
Card template with Administrator information is printed.
Print card templates by user
Print cards with per-user card templates.
-
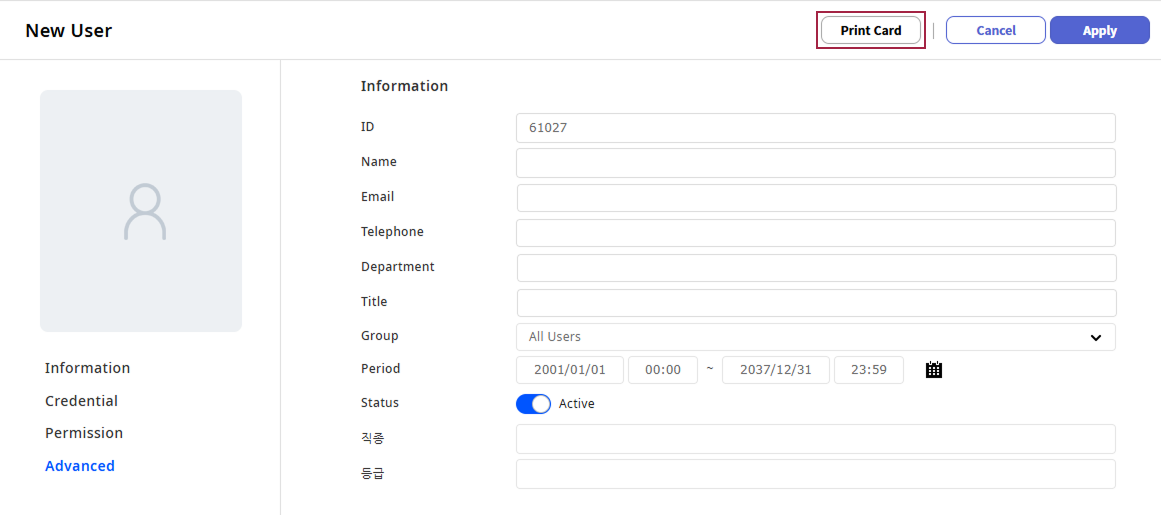
Click User on the Launcher page.
-
Click the New User button at the top right of the screen. The New User window appears.
-
Fill out the form and click the Print Card button.
- Each item can be entered with alphanumeric and special characters.
-
Select the card template you want to print and click the Print button.

-
When the popup window asking whether to print the card appears, click the OK button.
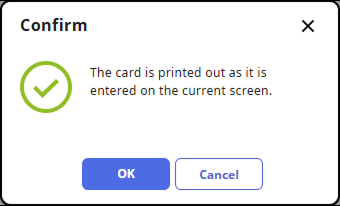
New user will be created and a card is printed as a card template with user information.
Add custom user fields
Print a card with a card template with custom user field added.
-
Click Settings on the Launcher page.
-
Click Server → Server in the left sidebar.
-
In the User/Device Management section, click + Add in Custom User Field to enter a Name and select a Type. The order of the Custom User Field adds decides the element ID of the card template.

Based on the BioStar X element ID, Order 1 is the same as CUSTOM1. For more information on BioStar X attribute IDs, see #card-template-attribute-ids.
-
Once you complete the settings, click the Apply button at the very bottom of the screen.
-
Open the card template file by clicking File → Open Template in the cardPresso program. Add a new element and enter the ID as the XML item ID name in the BioStar X element ID order.
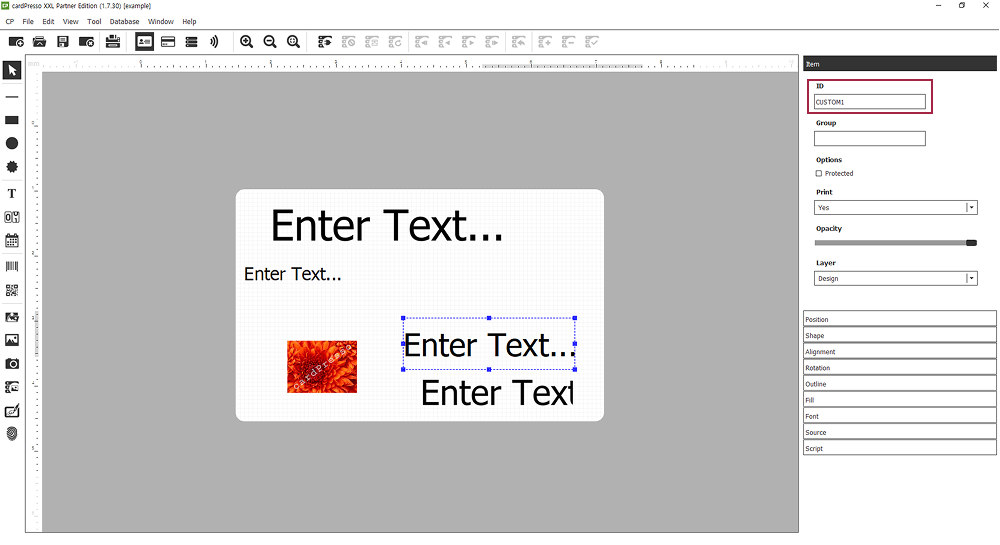
-
Click File → Save when the configuration is complete.
-
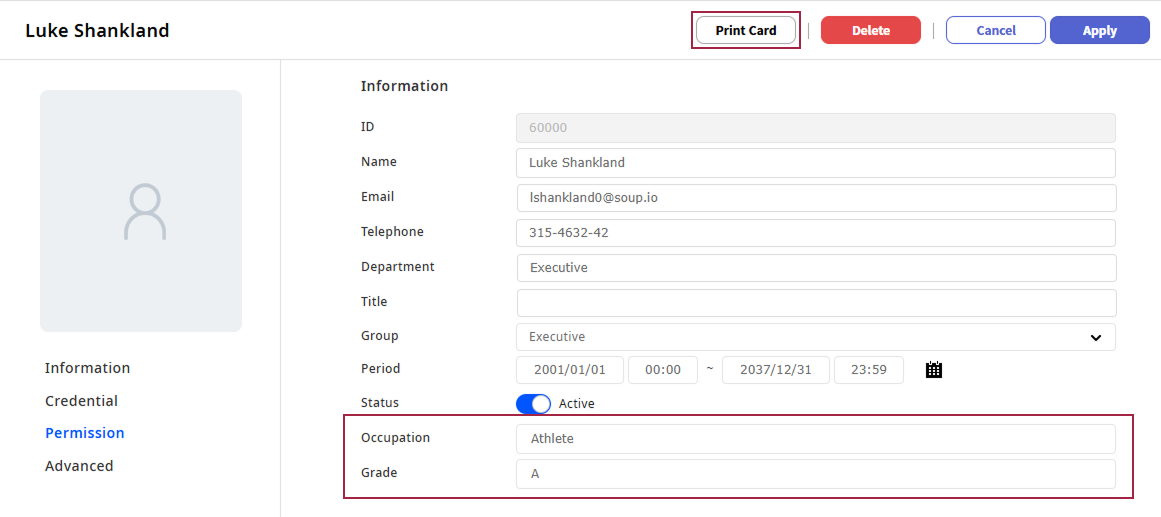
Return to BioStar X and select the user to apply the card template on the User page.
-
You can check the custom user fields you added. Fill in accordance with the form and click the Print Card button.
-
Select the card template you want to print and click the Print button.
-
When the popup window asking whether to print the card appears, click the OK button.
User information is saved and the card is printed as a card template with custom user fields added.
Card template attribute ID
The supported attribute IDs in BioStar X are as follows. Make sure to enter XML item ID name as element ID when creating a card template.
| Index | BioStar X User Data | XML item ID name |
|---|---|---|
| 1 | User ID | ID |
| 2 | User Name | NAME |
| 3 | ||
| 4 | Department | DEPARTMENT |
| 5 | Telephone | TELEPHONE |
| 6 | User Group | GROUP |
| 7 | Profile Photo | PHOTO |
| 8 | Custom Field 1 | CUSTOM1 |
| 9 | Custom Field 2 | CUSTOM2 |
| 10 | Custom Field 3 | CUSTOM3 |
| 11 | Custom Field 4 | CUSTOM4 |
| 12 | Custom Field 5 | CUSTOM5 |
| 13 | Custom Field 6 | CUSTOM6 |
| 14 | Custom Field 7 | CUSTOM7 |
| 15 | Custom Field 8 | CUSTOM8 |
| 16 | Custom Field 9 | CUSTOM9 |
| 17 | Custom Field 10 | CUSTOM10 |