Authentication Settings
Instructions for various settings related to user authentication on the device are provided. Authentication section provides step-by-step information on authentication methods and key authentication options supported by the device. Note that changes to settings will be applied to the actual device, and configure the authentication policy according to your environment by referring to the features and precautions of each option.
-
The available network options may differ depending on the device type.
-
If the user has made any arbitrary changes, click the Apply button. Changes will not be applied to the device if not saved.
Authentication method settings
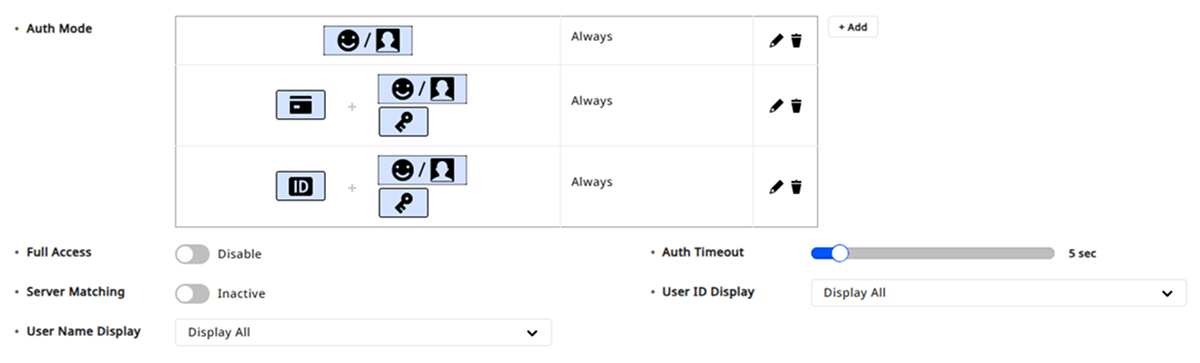
You can set the device's authentication mode, permissions, server matching, and authentication timeout.
-
Auth Mode: Set the authentication mode of the device by combining one or more credentials. For more information, see #added-auth-mode.
-
Click the button to modify the added authentication mode.
-
Click the button to delete the added authentication mode.
-
-
Full Access: Users registered on the device can be granted all access permissions without defining access group settings.
InfoWhen this option is set to Use, the device cannot be registered in Access Level and Floor Level.
-
Auth Timeout: This is the timeout for authenticating the second credential when multiple credentials are used in Auth Mode option. If the credential is not authenticated within the specified time, authentication will fail.
-
Server Matching
-
Active: Activates server matching. Configure the server matching feature to authenticate using user information stored on the server where BioStar X is installed.
-
Inactive: Deactivates server matching. In this case, authentication is performed using the user information registered on the device.
View devices and firmware versions supporting Server Matching feature
-
BioStation 3 Max firmware 1.0.0 or later
-
XPass Q2 firmware 1.0.0 or later
-
BioEntry W3 firmware version 1.0.0 or higher
-
BioStation 3 firmware 1.0.0 or higher
-
X-Station 2 firmware 1.0.0 or higher
-
FaceStation F2 firmware 1.0.0 or higher
-
XPass 2 firmware 1.0.0 or higher
-
BioLite N2 firmware 1.0.0 or higher
-
XPass D2 firmware version 1.0.0 or higher
-
BioEntry P2 firmware 1.0.0 or higher
-
FaceStation 2 firmware version 1.4.0 or higher
-
BioEntry W2 firmware 1.0.0 or higher
-
BioStation L2 firmware 1.0.0 or higher
-
BioStation A2 firmware 1.0.0 or higher
-
BioStation 2 firmware 1.2.0 or higher
-
CoreStation firmware version 1.0.0 or higher
-
FaceLite does not support server matching feature.
-
The BioStation 3, BioEntry W3, and FaceStation F2 devices cannot use server-based matching for facial authentication.
-
-
Face Detection Level: Set the algorithm steps for recognizing faces using the built-in camera when the user authenticates.
-
Normal: Detects faces at a distance equivalent to the length of a person's arm.
-
High: Requires the user to be closer than the length of a person's arm to detect a face.
-
Not Use: Does not use facial recognition functionality.
InfoThis option is supported on the BioStation A2.
-
-
User ID Display: Control whether to display or hide the user ID shown on the device when authentication is successful.
- Display All / Mask All but First Letter / Hide All
-
User Name Display: Control whether to display or hide the user name shown on the device when authentication is successful.
- Display All / Mask All but First Letter / Hide All
Add authentication mode
Set the device's authentication mode in the Auth Mode option. You can configure the authentication mode by combining credentials such as fingerprint, ID, card, PIN, and face.
-
In the Auth Mode option, click the Add button.
-
When the Add New Auth Mode window appears, drag the desired authentication mode to the center area.
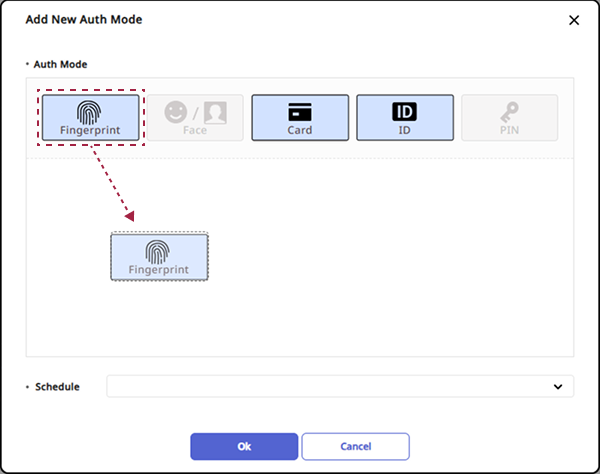
You can add up to five desired authentication modes.
-
Select the desired item in the Schedule option.
-
Once all settings are completed, click the Apply button.
If the desired schedule is not available in the Schedule option, click Add New Schedule to add a new schedule. You can add a new schedule. For more information on schedule settings, see Schedule Settings.
Fingerprint authentication settings
In the Fingerprint group, you can configure details related to the device's fingerprint authentication.

-
1:N Security Level: Set the security level used for authenticating fingerprints. Higher security levels increase the False Rejection Rate (FRR) but decrease the False Acceptance Rate (FAR).
-
Scan Timeout: Set the timeout for fingerprint scanning. Failure to scan within the time set will result in authentication failure.
-
Sensor Sensitivity: Set the sensitivity of the fingerprint recognition sensor. Set the sensitivity higher to obtain precise fingerprint information.
-
1:N Fast Mode: Set the speed of fingerprint authentication. When Automatic is selected, it sets the authentication performance according to the total fingerprint templates registered on the device.
-
Template Format: View the configured fingerprint template format.
-
Matching Timeout: Set the timeout for fingerprint matching. If authentication is not completed within the specified time, it will fail.
-
View Image: Display fingerprint images on the screen during authentication.
-
Sensor Mode: Set the operating mode of the fingerprint sensor.
-
Auto On: The fingerprint sensor turns on by recognizing the user's finger.
-
Always On: The fingerprint sensor remains always on.
-
-
Advanced Enrollment: Assess the quality of scanned fingerprints to save high-quality fingerprint information. Set to Use to notify the user if the fingerprint quality is low, helping to scan fingerprints correctly.
-
Fingerprint LFD: Set the level for fake fingerprint detection. Higher levels for fake fingerprint detection may also increase rejection rates for actual people’s fingerprints.
-
Duplicate Check: Check for duplicate registrations when enrolling fingerprints.
-
The options available for configuration may vary depending on the type of device.
-
Changing the Template Format option in fingerprint authentication settings will render all previously stored fingerprints unusable. Make sure to select a template in the Template Format option before enrolling users' fingerprints.
-
View Image option is supported on BioStation 3 Max (BS3M-ODB, BS3M-OAPB), X-Station 2 (XS2-ODPB, XS2-OAPB), FaceStation F2 (FSF2-ODB), BioLite N2, BioStation L2, BioStation A2, and BioStation 2.
-
Fingerprint LFD option is supported on BioStation 3 Max (BS3M-ODB, BS3M-OAPB), X-Station 2 (XS2-ODPB, XS2-OAPB), FaceStation F2 (FSF2-ODB), BioLite N2, BioStation L2, BioStation A2, and BioEntry W2.
Facial authentication settings
In the IR Face / Face or Face group, you can configure the device's facial authentication settings.
-
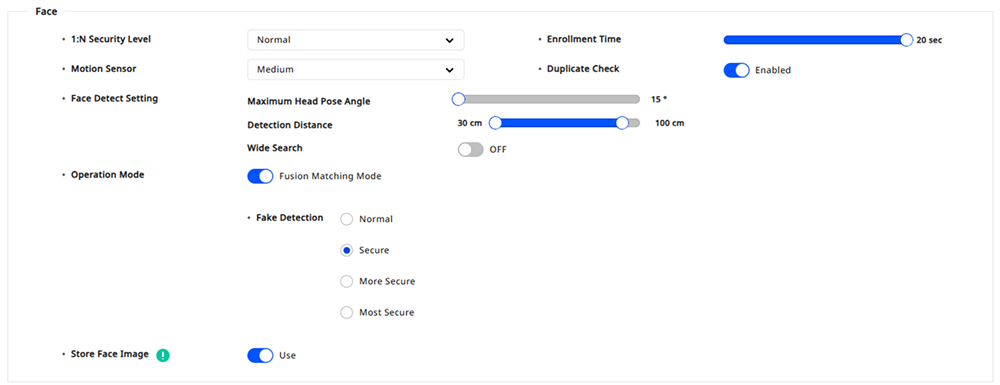
1:N Security Level: Set the security level used for authenticating faces. Higher security levels increase the False Rejection Rate (FRR) but decrease the False Acceptance Rate (FAR).
-
Enrollment Time: If the user's face is not enrolled within the set time when registering, the face enrollment will be canceled.
-
Motion Sensor: Set the sensitivity for detecting movement around the device.
-
Ambient Brightness: The device can detect ambient brightness and adjust the intensity of the IR LED.
-
Enhanced fake face enrollment block: Set the level for fake face detection. Increasing the level for detecting fake face registrations may heighten the rejection rates for actual faces.
-
Light Brightness: Manually adjust the brightness of the device's light. Set brightness by choosing Normal or High, or select Not Use to turn off the light.
-
Quick Enrollment: Set whether to enable quick face enrollment.
-
Enable: Configures the face enrollment procedure to one step.
-
Disabled: Sets the face enrollment procedure to 3 steps. Set to Disabled for high-quality face template enrollment.
-
-
Duplicate Check: Check for duplicate registrations when enrolling faces.
-
Face Detect Setting: Configure the environmental settings for recognizing the user's face during authentication.
-
Maximum Head Pose Angle: Set the maximum rotation angle permitted for the face.
-
Detection Distance: Set the minimum and maximum distances for recognizing the face.
-
Wide Search: Set to ON to allow facial recognition across the entire camera view.
-
-
Operation Mode: Set the operation mode of the device during facial authentication.
-
Fusion Matching Mode: Perform both visual and infrared matching to enhance the accuracy of facial authentication.
-
Fast Matching Mode: Allows for rapid authentication of users walking within the device's authentication range.
-
-
Fake Detection: Prevent user authentication using fake faces such as photos. This is activated when the Operation Mode option is set to Fusion Matching Mode.
-
Store Face Image: Stores both the actual facial image and a template containing only the extracted feature data. Disable this setting if you do not want to store the actual image.
-
The options available for configuration may vary depending on the type of device.
-
The Ambient Brightness, Enhanced fake face enrollment block, and Quick Enrollment options are supported in the FaceStation 2 and FaceLite models.
-
The Light Brightness option is supported on FaceStation F2 firmware version 1.1.0 or higher.
-
Face Detect Setting, Operation Mode options are supported on BioStation 3 Max, BioStation 3, and FaceStation F2 models.
QR/Barcode settings
In the QR/Barcode group, you can configure details for QR/barcode authentication on the device.

-
Use QR/Barcode through Camera / Use QR/Barcode: Set whether to use QR/barcode authentication through the device's camera.
-
Camera Timeout / Scan Timeout: Set the camera scan timeout. If a QR/barcode is not scanned within the specified time, authentication will fail.
-
Use QR as Card: Set to authenticate QR codes with the same data as CSN cards or Wiegand cards issued to users.
-
Motion Sensor: Set the sensitivity for detecting movement to initiate camera scanning.
-
Use QR/Barcode through Scanner: Set whether to use the device's scanner for QR/barcode authentication.
-
Scanner Timeout: Set the scanning timeout. If a QR/barcode is not scanned within the specified time, authentication will fail.
-
LED Light: Set whether to use the device's LED illumination when authenticating QR codes.
-
The Use QR/Barcode through Camera option requires a separate device license. For more information, see Device License.
-
The devices supporting Use QR/Barcode through Camera, Camera Timeout, Use QR as Card, and Motion Sensor options are as follows.
-
BioStation 3 Max firmware version 1.1.0 or higher
-
BioStation 3 firmware version 1.1.0 or later
-
X-Station 2 (XS2-ODPB, XS2-OAPB, XS2-DPB, XS2-APB) firmware version 1.2.0 or higher
-
-
The devices supporting Use QR/Barcode through Scanner and Scanner Timeout options are as follows.
- X-Station 2 (XS2-QDPB, XS2-QAPB)
-
Use QR/Barcode, Scan Timeout, LED Light options are supported on the following devices.
- XPass Q2 firmware 1.0.0 or later
Card authentication settings
In the Card Type group, you can set the types of cards to be used on the device.
Only card types supported by the device will be displayed in the Card Type group.
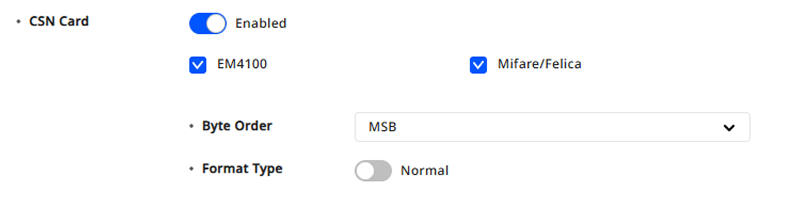
CSN Card
You can select the types of CSN cards and formats and set the byte order.
-
Byte Order
-
MSB: Processes card data in order from large byte units to small byte units, sequentially storing the card serial number (CSN) from left to right.
-
LSB: Processes card data in order from small byte units to large byte units, storing the card serial number (CSN).
-
-
Format Type
-
Normal: Reads and expresses the card's serial number (CSN) without separate conversion.
-
Wiegand: Transforms and expresses the card's serial number (CSN) according to user-defined Wiegand format. See Set Wiegand Card Format to set a new Wiegand format.
-
Wiegand Card
Select the types of Wiegand cards and set the Wiegand formats. Choose the Wiegand format to be used in the Wiegand Format option.
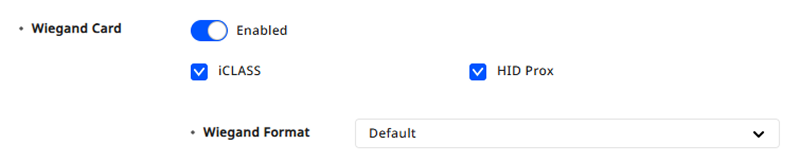
See Set Wiegand Card Format to set a new Wiegand format.
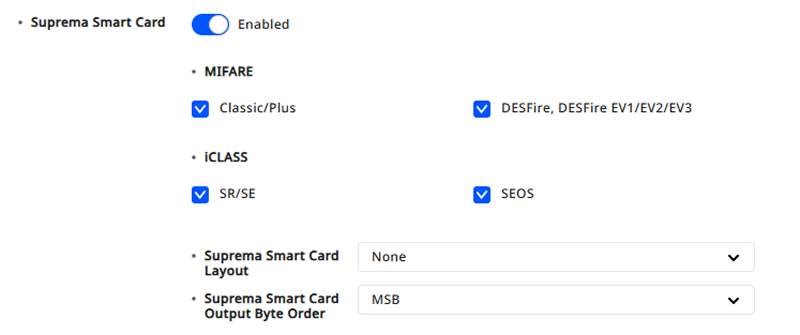
Suprema Smart Card
Select the types of Suprema smart cards and set the card layout and byte order.
-
Suprema Smart Card Layout: Choose the Suprema smart card layout. See Set Smart Card Format to set a new smart card layout.
-
Suprema Smart Card Output Byte Order
-
MSB: Processes card data in order from large byte units to small byte units.
-
LSB: Processes card data in order from small byte units to large byte units.
-
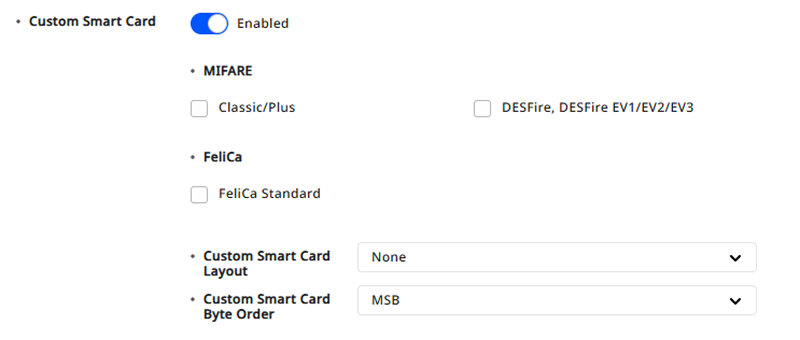
Custom Smart Card
Select types of custom smart cards issued by third parties and set the card layout and byte order.
-
Custom Smart Card Layout: Choose the custom smart card layout. See Set Smart Card Format to set a new smart card layout.
-
Custom Smart Card Byte Order
-
MSB: Processes card data in order from large byte units to small byte units.
-
LSB: Processes card data in order from small byte units to large byte units.
-
View devices and firmware versions supporting custom smart cards
-
BioStation 3 Max firmware version 1.3.0 or higher
-
XPass Q2 firmware 1.0.0 or later
-
BioEntry W3 firmware version 1.0.0 or higher
-
BioStation 2a firmware version 1.1.0 or higher
-
BioStation 3 firmware version 1.3.0 or higher
-
X-Station 2 firmware version 1.3.0 or higher
-
BioLite N2 firmware version 1.6.2 or higher
-
XPass D2 firmware version 1.7.1 or higher
-
BioEntry P2 firmware version 1.5.1 or higher
-
BioEntry W2 firmware version 1.8.0 or higher
CSN Mobile
You can set the method for recognizing mobile cards.

-
NFC: Recognizes mobile cards through NFC communication from mobile devices.
-
BLE: Recognizes mobile cards through Bluetooth Low Energy (BLE) communication.
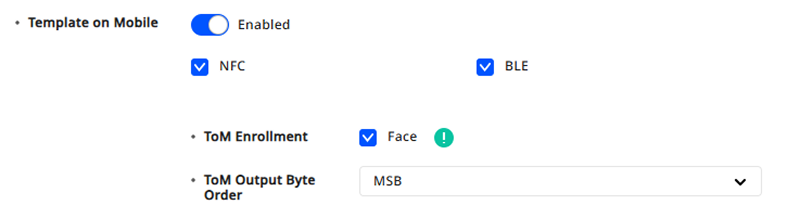
Template on Mobile
You can specify how recognition works on the Template on Mobile and set the byte order for biometrics enrolled directly by the user on the device.
-
ToM Output Byte Order
-
MSB: Processes card data in order from large byte units to small byte units.
-
LSB: Processes card data in order from small byte units to large byte units.
-
View devices and firmware versions supporting templates on mobile
-
BioStation 3 Max firmware 1.0.0 or later
-
BioEntry W3 firmware version 1.0.0 or higher
-
BioStation 3 firmware version 1.2.0 or higher
PIN authentication settings
In the PIN group, you can turn the Scramble Keypad option on or off for the device's PIN authentication.

The Scramble Keypad option is only available on Suprema products that support user interfaces through the LCD screen.