Use Device Management Feature
This guide explains how to use additional features of BioStar X. This section explains how to reconnect devices, synchronize, batch edit device information, delete devices, and export/import settings. It also explains how to delete secure communication certificates when deleting devices.
Manage a Single Device
Use the following steps to manage a single device.
-
Click Settings on the Launcher page.
-
Click Device → Device on the left sidebar.
-
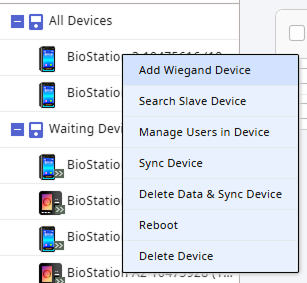
Select the device from the All Devices list and right-click. Or, click the checkbox for the device you want in the device list.
-
Select the desired action from the pop-up menu or from the top of the device list.
Refer to the features below. The features provided may vary depending on the device.
-
Reconnect: Reconnect the selected device. This option is available when one device is selected. In general, the device automatically returns online without user intervention after the network connection is restored. Use this feature when the device does not reconnect automatically after the network is restored.
InfoThis feature is not supported by devices connected with the Device ▶ Server Connection option. For more information on registering devices, see Register Device.
-
Sync Device: Synchronize all user information registered on the device with BioStar X. This synchronization is based on the BioStar X database, and user information registered only on the device will be deleted. Use the Manage Users in Device feature to upload user information to BioStar X.
-
Delete Data & Sync Device: Delete all setting information and user information stored on the device and resend it. This feature can also be accessed by selecting the device from the list and clicking the button.
-
Manage Users in Device: Upload or delete user information registered on the device in BioStar X. For more information, see Manage Users Registered on Device.
-
Firmware Upgrade: Easily upgrade the device firmware. For more information, see Upgrade Firmware.
-
Reboot: Restart the selected device. Use this feature when the device is not operating normally.
-
Delete Device: Delete the selected device from the list. Devices set as doors or zones cannot be deleted. For more information, see #deleteDevice.
-
For more information on the Add Wiegand Device feature, see Register Wiegand Credentials.
-
For more information on the Search Slave Device feature, see Register Slave.
Manage multiple devices
Use the following steps to manage one or more devices.
-
Click Settings on the Launcher page.
-
Click Device → Device on the left sidebar.
-
Click the checkbox for the device you want in the device list. You can select 1 or more devices.

-
Select the desired feature at the top of the device list.
Refer to the features below. The features provided may vary depending on the device.
-
Sync Device: Synchronize all user information registered on the device with BioStar X. This synchronization is based on the BioStar X database, and user information registered only on the device will be deleted.
-
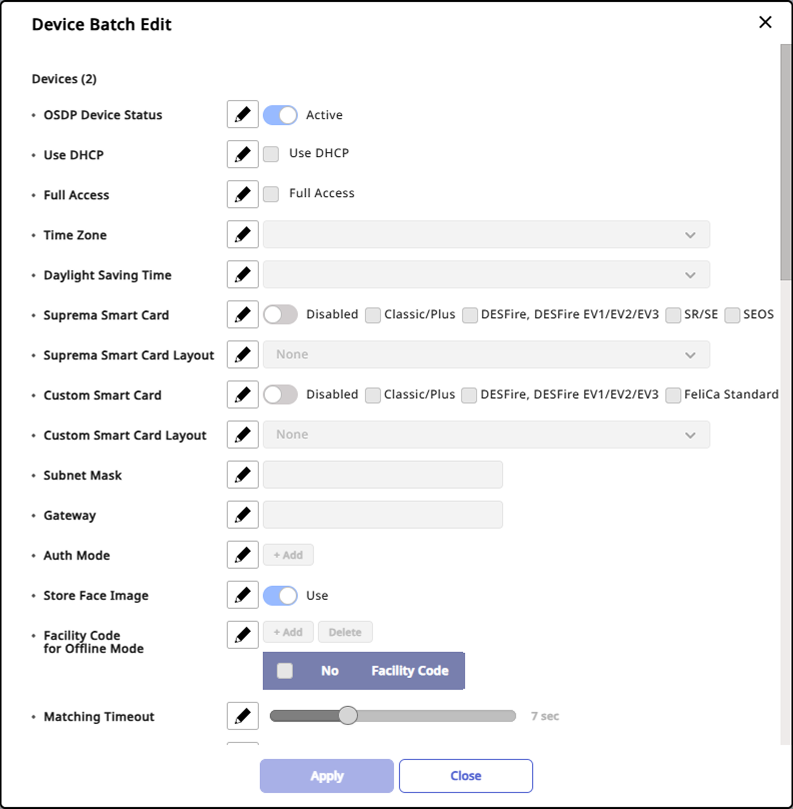
Batch Edit: Batch edit information for the selected devices. Click the button to open the Device Batch Edit window.
 Info
-
The details displayed in the Device Batch Edit window may vary depending on the selected device types.
-
When selecting a master device and slave devices simultaneously for batch editing, only certain items within Authentication and Display/Sound can be modified.
-
Auth Mode can only be batch edited when devices with the same model name are selected.
-
-
Firmware Upgrade: Easily upgrade the device firmware. For more information, see Upgrade Firmware.
-
Delete Device: Delete the selected device from the list. Devices set as doors or zones cannot be deleted. For more information, see #deleteDevice.
Delete devices
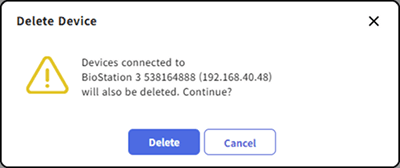
Use Delete Device to delete devices from the list. The options that appear during deletion depend on whether Secure communication with device is enabled.
When secure communication is disabled
When Secure communication with device is set to Not Use, delete the selected device without additional options.
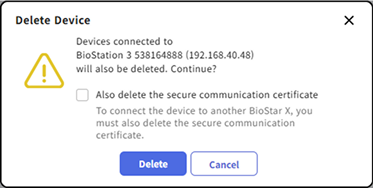
When secure communication is enabled
When Secure communication with device is set to Use, the Delete Device dialog shows the Also delete the secure communication certificate option.
-
If Also delete the secure communication certificate is cleared (default), delete only the device and keep the certificate.
-
If Also delete the secure communication certificate is selected, also delete the secure communication certificate stored on the device. Use this option to connect the device to another BioStar X server after deleting it.
If a device disconnects from BioStar X, it cannot delete its certificate. If Also delete the secure communication certificate is selected, device deletion fails. To delete the device, clear the option or reconnect the device, then try again.
-
If Secure communication with device is enabled, deleting the device without selecting Also delete the secure communication certificate leaves the certificate on the device. Then change the Secure communication with device option to Not Use, and enroll the device in BioStar X again. The device fails to connect because the certificate remains. If you use the default certificate, change the Secure communication with device option back to Use.
-
If all selected devices are slave devices or do not support secure communication, delete devices without the Also delete the secure communication certificate option.
-
The Also delete the secure communication certificate option appears only when Secure communication with device is enabled. For more information, see Enhance System Security.
Export/import device configuration
Export configurations from one device to a file, then import and apply them to another device of the same model. Instead of entering the same configurations on multiple devices, create a configuration file from a configured device and apply it to the others.
-
Same model means the detailed model name and part number match (for example, XXX in XPD2-XXX).
-
The export/import device configuration feature is available to administrators with full permissions for device settings. For more information about administrator permission settings, see Manage Operation Permissions.
Export device configuration
To download the configurations for a single device as a file, follow these steps.
-
Click Settings on the Launcher page.
-
Click Device → Device on the left sidebar.
-
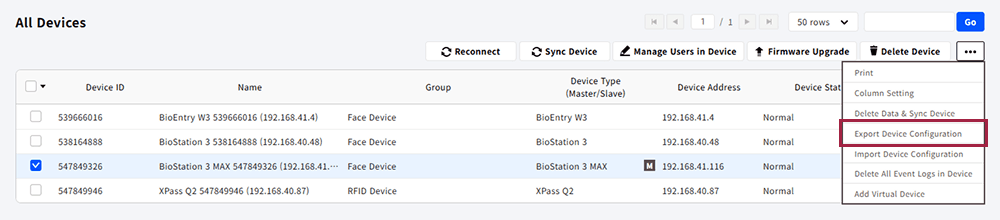
In the device list, click the checkbox for the device whose configurations to export. You can select only one device.
-
Click → Export Device Configuration at the top of the device list.
-
When the download window appears, save the configurations file locally.
Configurations export is unavailable for the following devices.
-
Devices disconnected from BioStar X or with a response timeout
-
Virtual device
-
Devices without RS-485 communication mode (for example, Wiegand devices, I/O modules, Door Interface, Door modules, Secure modules, and OSDP Antenna/Reader)
-
You cannot run this feature unless you select exactly one device.
-
The file name is set automatically in this order: model name, device ID, RS-485 communication mode (Master/Default/Slave), and export date. The date follows the date format set in Settings → System → Preferences.
For example, if the model name is BS3-DB, the device ID is 538001234, the serial communication mode is Master, and the export date is 6/23/2026, the file is saved as
BS3-DB_538001234_Master_20260623.json.
Configurations excluded from export
The following configurations are not included in the export file because they must be unique per device, are stored only on the device, or contain sensitive information such as credentials.
-
Device-specific configurations: Name, Group, wired and wireless network, server connection, OSDP identifier, and Trigger & Action
-
These configurations are stored only on the device. You cannot move them to another device: language resources, Home screen, and sound options in Display/Sound, the SCB key for serial communication, and video options added to BioStation 3 Max
-
Credentials and sensitive information: usernames and passwords for IP intercom and RTSP, Master Admin, and the Two-step Authentication option
Import device configuration
To apply the exported configurations file to one or more devices of the same model, follow these steps.
-
Click Settings on the Launcher page.
-
Click Device → Device on the left sidebar.
-
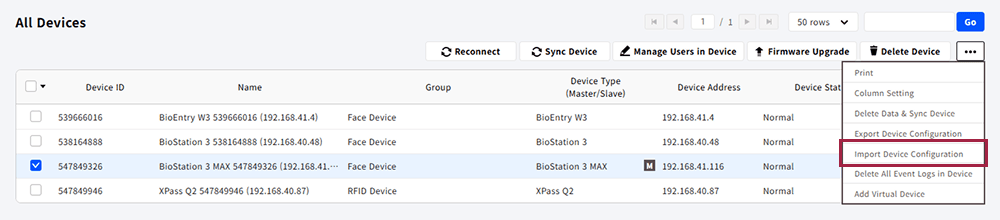
In the device list, click the checkbox for the device that will receive the configurations. You can select one or more devices.
-
Click → Import Device Configuration at the top of the device list.
-
When the Open window appears in the web browser, select the configurations file saved locally.
-
When the Import device configurations result message appears, review it and click Ok.
The system accepts configuration files created on other sites or servers as valid files without verifying the source or showing a warning. Verify that a trusted source created the file to import.
Select at least one device to run this feature.
When you run Import, the system checks the following in order before applying the configurations. If any check fails, the system does not apply the configurations and shows the reason.
-
Whether all selected devices have the same model name (including the part number)
-
Whether the RS-485 communication mode matches between the selected devices and the file
-
Whether the model name saved in the file (including the part number) matches the model names of the selected devices (including the part number)
-
Whether any of the selected devices is a virtual device (Virtual Device)
If the checks pass, the system applies all configurations except Configurations excluded from export to all selected devices.
-
Importing a file from an unsupported device sets the feature Off and turns off enabled options. Importing a file from a supported device into an unsupported device skips the feature and applies the remaining configurations. In both cases, the system does not mark the import as failed or add it to the failure list.
-
Configurations that require a device license do not apply to devices without that license. Importing a file from an unlicensed device sets the configuration Off and turns off enabled options. In both cases, the system does not mark the import as failed or add it to the failure list.
-
The system shows a success message after it applies the configurations to all devices. If configurations fail to apply, a message shows failed device count and a link to download the CSV failure list. The file lists each failed device ID, name, and reason (disconnected, or access groups block full access permissions).
For example, if an import run at 15:45:30 on 6/23/2026 fails, the file name is
Device_Template_Import_Error_20260623T154530.csv. -
CoreStation devices are also included.
-
View the export and import history for device configurations at Settings → Audit Trail → AC Audit Log.
Delete event logs from a device
You can delete event logs stored on the device.
-
Click Settings on the Launcher page.
-
Click Device → Device on the left sidebar.
-
Click the checkbox for the device you want in the device list. You can select 1 or more devices.
-
Click → Delete All Event Logs in Device at the top of the device list.

-
If a warning dialog appears, review the message and click Continue.
When the device event log deletion is complete, a pop-up message appears. View the number of target devices, successful devices, and failed devices.
Event logs deleted from a device cannot be recovered and cannot be resent from the server to the device. Before proceeding with deletion, confirm the device event logs are stored on the server. Also, if the selected devices include slave, virtual, or Wiegand devices, those devices do not store logs and are excluded from log deletion.
-
Only users with the Administrator Role permission can use this feature.
-
View the device event log deletion history at Settings → Audit Trail → AC Audit Log.
Additional features
Use additional features such as printing the device list or changing column settings.
Print device list
Save the device list as a PDF or SVG file for printing.
-
Click Settings on the Launcher page.
-
Click Device → Device on the left sidebar.
-
Click at the top of the device list.
-
Click Print in the popup menu.
-
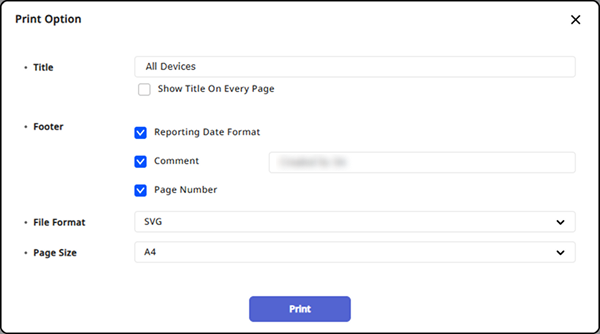
When the Print Option window appears, select your desired format in the File Format options and set the other options.
-
Click Print.
You can print the PDF or SVG file that opens through the browser.
Device List Column (Column) Settings
You can change the column (Column) settings displayed in the device list. Through column settings, you can select the columns to be displayed or change the order of the columns.
-
Click Settings on the Launcher page.
-
Click Device → Device on the left sidebar.
-
Click at the top of the device list.
-
Click Column Setting in the popup menu.
-
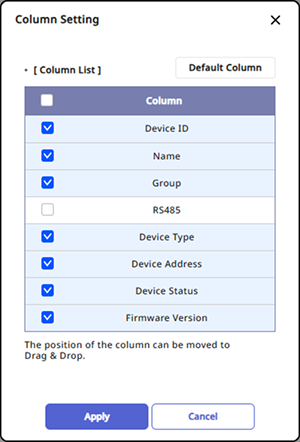
When the Column Setting window appears, select or deselect the desired columns.
-
To change the order of the columns, click and drag the desired column to change its position.
-
Click Apply to save the settings.
To initialize the column settings, click Default Column.