Register Door
This guide describes how to register and set up doors. Connect entry and exit devices for each door, and configure security features such as anti-passback and dual authentication to establish a systematic access management environment. Additionally, configure alarms based on the door status to prevent security incidents in advance.
Before you start
-
Set access levels, access groups, and floor levels for access control before registering doors. For more information, see Access Control Settings.
-
Register devices before registering doors. For more information about device registration, refer to the following.
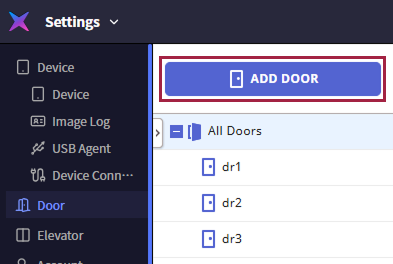
Register door
-
Click Settings on the Launcher page.
-
Click Door in the left sidebar.
-
Click ADD DOOR.
-
When the Add New Door screen appears, set each section item in order.
-
Information: Set the basic information of the door. For more information, see #info.
-
Configuration: Set devices connected to the door, and entry and exit buttons along with door sensors. For more information, see #configdoor.
-
Option: Set additional options. For more information, see #option.
-
Anti PassBack: Set the anti-passback feature to manage access history and enhance security. For more information, see #antipassback.
-
Timed Anti PassBack: Set the initialization time for the anti-passback feature. For more information, see #timed-apb.
-
Alarm: You can set the alarm to trigger or block device usage when an anti-passback violation occurs. For more information, see #alarm.
-
-
Once all configurations are complete, click the Apply button at the bottom of the screen.
Set basic information
In the Information section, you can input or change the door's name, group, and description.

-
Name: Enter the door name. Enter a name that can be specified for convenient management.
-
Group: Select the door group.
-
Description: Enter a brief description of the door.
-
The door name can be up to 48 characters long.
-
For more information on registering door groups, see Manage Door Group.
Set door configuration
In the Configuration section, you can set the devices connected to the door, exit buttons, and door sensors.

-
Entry Device: Select the device to be used for entry. If the device is not listed, register the device first.
-
Door Relay: Choose the relay that will function as the door lock mechanism.
-
Exit Button: Select the port to be used as the exit button.
-
Switch: Can be set to N/C (Normally Closed) or N/O (Normally Open).
-
Does not activate relay: Configure so that an exit button input generates a door open request log without triggering the relay.
-
-
Door Sensor: Choose the port to confirm the door's status. Setting it to None will disable the use of the Alarm section.
-
Switch: Can be set to N/C (Normally Closed) or N/O (Normally Open).
-
Use sensor when Entry Confirmed APB enabled: Set whether to use the door sensor when using the Entry Confirmed APB option.
If Timed Anti PassBack is enabled, the Use sensor when Entry Confirmed APB enabled option cannot be used.
-
-
Exit Device: Select the device to be used for exit.
-
If you selected a wireless door lock for Entry Device, you must also select a wireless door lock for Exit Device.
-
If you selected a wireless door lock for Entry Device, you cannot use the Door Relay option.
-
CoreStation models cannot be used as entry or exit devices.
Set additional options
In the Option section, you can set additional options for the door.

-
Open: Set options for door opening.
-
Open Time: Set the duration for which the door remains open after authentication is complete. The door will automatically lock after this time.
-
Lock when door is closed: The door will lock when the door sensor detects it has closed. If set to On, the option Use Automatic Door cannot be used.
-
Use Automatic Door: If using an automatic door as the door, the relay can operate regardless of the door sensor's status. If set to On, the Lock when door is closed option cannot be used.
InfoThe Open Time may vary depending on the type of door locking device being used.
-
-
Dual Authentication: Set to require two people (a regular user and an administrator) to authenticate credentials to open the door.
-
Device: Select the device to use for dual authentication. To disable dual authentication, select None.
-
Schedule: Select the schedule for using dual authentication. If the desired schedule is not available, click + Add Schedule to add one.
-
Approval Type: Set the order of administrator authentication.
-
None: Two authentications are required regardless of the authentication group.
-
Last: The general user must authenticate first, followed by an authenticated user included in the set authentication group.
-
-
Approval Group: Set the group to which the administrator belongs. This option can be used when Approval Type is set to Last.
-
Timeout: Set the waiting time between the first and second authentications. If the second authentication is not completed within the set time, the door will not open.
Info-
To change the dual authentication of the device configured with the occupant limit setting, modify the settings in the following menu. Settings → Advanced AC → Occupancy Limit
For more information on the Occupancy Limit settings, see Advanced Access Control Settings.
-
For more information on schedule settings, see Schedule Settings.
-
-
Anti-Tailgating: Set to detect tailgating where an unauthorized person follows an authorized person to enter.
- Sensor: Select a sensor to detect tailgating.
Set anti-passback
Anti-passback is used to manage access history and enhance security. It can prevent cases where a user hands over their entry card to another user after entering and stop outsiders from entering when they follow users with access privileges.
Refer below to complete the settings in the Anti PassBack section.
-
Type: Choose the type of anti-passback.
-
None: Does not utilize the anti-passback feature.
-
Soft APB: During an anti-passback violation, entry is allowed but will trigger an alarm or create a log in BioStar X.
-
Hard APB: During an anti-passback violation, entry is not allowed, and an alarm will sound or a log will be created in BioStar X.
-
-
Reset Time: Set the time until the anti-passback feature resets. This can be set for up to 7 days (10080 minutes), and if set to 0, it will not reset.
-
This can be used when both entry and exit devices are installed, and setting Exit Device option to None in the Configuration section will render it unusable. For more information on setting up the exit device, see #configdoor.
-
The Anti PassBack section requires a master device configured via RS-485 and a slave device.
-
If Timed Anti PassBack section is enabled, Anti PassBack cannot be used.
Set timed anti-passback
When a user attempts to re-authenticate on the same device after entry authentication, the anti-passback feature will prevent immediate re-authentication. The Timed Anti PassBack section sets the initialization time for the anti-passback feature to effectively limit frequent entries by users.

-
Timed APB: Select the device to use the timed anti-passback feature.
-
Reset Time: Set the time until the anti-passback feature resets. The input unit is minutes (min), with a default of 10 minutes. It can be set for a maximum of 60 minutes.
-
Bypass Group: Select access groups that can always pass without being subject to timed anti-passback.
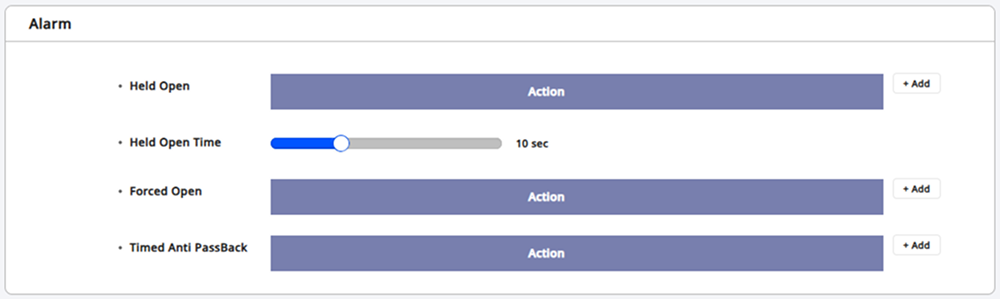
Set alarms
In the Alarm section, you can configure to sound an alarm or block device usage when the door is forcibly opened, left open, or when an anti-passback violation occurs. Click the + Add button for the item to add an alarm.
-
Held Open: Configure alarm actions when the door is left open.
-
Held Open Time: Set the time for the alarm to sound when the door has been open for an extended period. Determine the maximum time the door may remain open.
-
Forced Open: Configure alarm actions when the door is forcibly opened.
-
Anti PassBack / Timed Anti PassBack: Set alarm actions for anti-passback or timed anti-passback violations.
The Anti PassBack option can only be set if the exit device is registered.