Server Detailed Settings
You can change the basic information settings of the BioStar X server, user and device management, server matching, system log levels, and settings for saving facial images.
-
Click Settings on the Launcher page.
-
Click Server → Server in the left sidebar.
-
Set the desired items in each section.
-
General: You can set the IP address, port number, session expiration time, event log upload method, and log retention period.
-
User/Device Management: You can change user and device management settings.
-
System Log Level Settings: You can change system log level settings.
-
Expert Settings: You can set it to save both the actual image and the template of the face or save only the template without storing the actual image.
-
-
Click Apply at the bottom right of the screen to save the settings.
Basic information settings
You can check or set basic information for BioStar X in the General section.

-
BioStar X IP Address: You can check the server IP address.
-
Log Upload: Select an event log upload method. If real-time communication with the server is difficult, set this to Manual.
-
BioStar X Port: You can change the server port. Enter the desired port number.
-
System log storage duration: The log retention period can be set from 1 to 120 days.
-
Session Timeout: Set a session timeout period. If there is no operation after logging into BioStar X for the configured time, you will be automatically logged out.
User and device management
In the User/Device Management section, you can set the synchronization and authentication methods between users and devices.
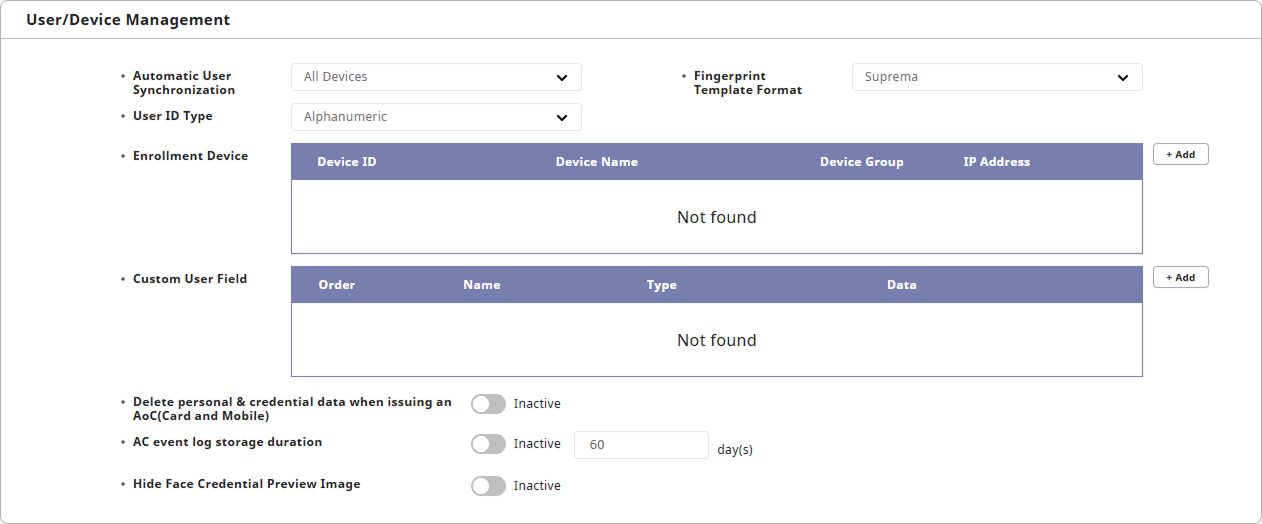
Automatic User Synchronization
In the Automatic User Synchronization option, you can choose how to synchronize user information between the server and devices.
-
All Devices: User information is synchronized automatically between the server and all registered devices.
-
All Devices(Including user update from device): User information from the server is synchronized with all devices registered on the server. However, user information modified on the device is not synchronized to the server, and only user information added on the device is synchronized to the server.
-
Specific Devices(Only devices belonging to the access group): Only devices belonging to an access group with changes are automatically synchronized with the server.
-
If you select the Specific Devices(Only devices belonging to the access group) option, users saved on devices that do not belong to the access group cannot be managed by the server. To use this option, go to Settings → Device to select each device, and then click Delete Data & Sync Device to proceed with synchronization. For more information on the Delete Data & Sync Device feature, see Use Device Management Feature.
-
Even if you select the Specific Devices(Only devices belonging to the access group) option, special access groups designated for specific purposes will synchronize regardless of the device access group.
-
Dual authentication access group set up in the Devices and Elevators.
-
Always pass group for anti-passback setting
-
Always pass group for schedule lock setting
-
Open authentication access group for schedule open setting
-
Access/Deactivate group for guard setting
-
-
Even if you select the Specific Devices(Only devices belonging to the access group) option, users designated as device administrators will synchronize regardless of the access group.
Fingerprint Template Format
In the Fingerprint Template Format option, you can choose the fingerprint template format. Select from the following items.
-
SUPREMA: Suprema fingerprint template format. Used when enrolling fingerprints on Suprema devices.
-
ISO: ISO international fingerprint template format.
-
ANSI378: Fingerprint template format defined by the American National Standards Institute (ANSI).
If there are existing user fingerprint templates on the device, they cannot be changed to another format.
User ID Type
In the User ID Type option, you can select the user ID type as Number or Alphanumeric. Check the list of devices registered in the BioStar X server and select compatible settings.
View devices and firmware versions that can change User ID Type
-
BioStation 3 Max firmware 1.0.0 or later
-
XPass Q2 firmware 1.0.0 or later
-
BioStation 3 firmware 1.0.0 or higher
-
X-Station 2 firmware 1.0.0 or higher
-
XPass 2 firmware 1.0.0 or higher
-
FaceLite firmware 1.0.0 or higher
-
BioLite N2 firmware 1.0.0 or higher
-
XPass D2 firmware version 1.0.0 or higher
-
BioEntry R2 FW 1.0.0 or later
-
BioEntry P2 firmware 1.0.0 or higher
-
FaceStation 2 firmware 1.0.0 or higher
-
BioEntry W2 FW 1.1.0 or later
-
BioStation L2 FW 1.2.0 or later
-
BioStation A2 FW 1.3.0 or later
-
BioStation 2 FW 1.4.0 or later
-
CoreStation firmware version 1.0.0 or higher
Changing from Alphanumeric to Number requires deleting all user information registered in BioStar X.
Enrollment Device
You can add frequently used devices for enrolling fingerprints, faces, or cards in the Enrollment Device option for convenience.
-
Click the + Add button to add a device.
-
When the Enrollment Device window appears, click the checkbox of the desired device from the list.
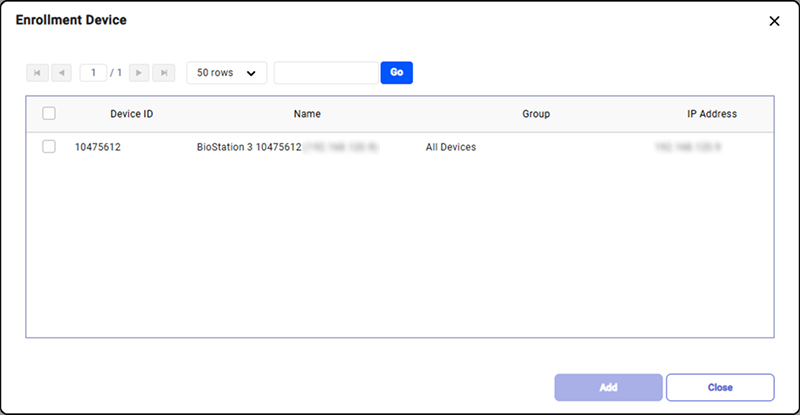
-
Click the Add button to add the selected device.
-
Click Apply at the bottom right of the screen to save the added device settings.
-
If you find it difficult to locate a registered device from the list due to the large number, enter keywords in the search input field to find devices. You can enter the device ID, device name, device group, and IP address.
-
For more information on enrolling fingerprints or face, card credentials, refer to the followings:
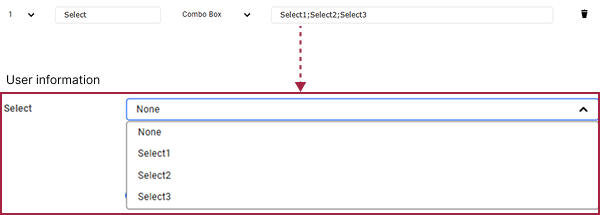
Custom User Field
In the Custom User Field option, you can add fields to input additional information about the user. The added fields will be displayed on the user information screen.
-
To add a custom user field, click the + Add button.
-
Enter the name of the custom user field and select the desired item type.

-
Number Input Box: Allows entry of values from 0 to 4294962795; characters cannot be entered.
-
Text Input Box: Allows entry of up to 32 characters of numbers and letters.
-
Combo Box: Allows addition of up to 20 items of 32 characters; each item is separated by a semicolon (;). (e.g., Select1;Select2;Select3)
-
File Upload: You can add a field for file uploads.
-
The maximum file size is 1MB.
-
The file name can be a minimum of 1 character and a maximum of 120 characters.
-
File name requirements: The file name must use alphanumeric characters, underscores (
_), and hyphens (-), and use a period (.) to separate the extension. -
There are no restrictions on file extensions, and uploaded files are encrypted and stored in the database.
-
-
-
Click the Apply button at the bottom right of the screen to save the added custom user field.
-
To change the order of the custom user fields, change the numbers in the Order column. The position of that field will change.
-
After modifying the custom user fields, click the Apply button at the bottom right of the screen.
-
Click the button to delete a custom user field. Deleted fields cannot be recovered.
-
For more information on registering and editing user information, see User.
-
User information with added custom user fields can be printed on a card. For more information on adding custom user fields, see Card Printer.
AoC card settings
To issue an Access on Card (AoC) credential that stores user credentials on a card, enable the Delete personal & credential data when issuing an AoC(Card and Mobile) option to delete personal information and credential data from the BioStar X server.
View devices and firmware versions that support NFC mobile cards
-
Mobile device OS: Android 5.0 Lollipop or later, Android 10 or earlier
-
BioStar X Mobile 1.0.0 or higher
-
BioStation 3 Max firmware 1.0.0 or later
-
XPass Q2 firmware 1.0.0 or later
-
XPass 2: XP2-MDPB, XP2-GDPB, XP2-GKDPB, XP2-MAPB FW 1.0 or later
-
FaceLite: FL-DB FW 1.1 or earlier
-
BioLite N2: BLN2-ODB, BLN2-OAB, BLN2-PAB FW 1.2 or earlier
-
XPass D2: XPD2-MDB, XPD2-GDB, XPD2-GKDB FW 1.3 or earlier
-
BioEntry R2: BER2-OD FW v1.1.0 or later
-
BioEntry P2: BEP2-OD, BEP2-OA FW 1.0 or later
-
FaceStation 2: FS2-D, FS2-AWB FW 1.3.1 or earlier
-
BioEntry W2: BEW2-OAP, BEW2-ODP FW 1.1 or later, FW 1.5 or earlier
-
BioStation L2: BSL2-OM FW 1.2 or later
-
BioStation A2: BSA2-OMPW, BSA2-OIPW FW 1.3 or later, FW 1.7.1 or earlier
-
BioStation 2: BS2-OMPW, BS2-OIPW FW 1.4 or later, FW 1.8 or earlier
View devices and firmware versions that support BLE mobile cards
-
Mobile device OS: Android 5.0 Lollipop or later, Android 10 or earlier / iOS 9.0 or later
-
BioStar X Mobile 1.0.0 or higher
-
FaceStation 2: FS2-AWB FW 1.3.1 or earlier
-
BioLite N2: BLN2-ODB, BLN2-OAB, BLN2-PAB FW 1.2 or earlier
-
XPass D2: XPD2-MDB, XPD2-GDB, XPD2-GKDB FW 1.3 or earlier
-
FaceLite: FL-DB FW 1.1 or earlier
-
XPass 2: XP2-MDPB, XP2-GDPB, XP2-GKDPB, XP2-MAPB FW 1.0 or later
-
BioStation 3 Max firmware 1.0.0 or later
-
XPass Q2 firmware 1.0.0 or later
- Mobile Access Card and Mobile Access features cannot be used at the same time.
Other settings
-
AC event log storage duration: Set the retention period for access control event logs.
-
Hide Face Credential Preview Image: To protect users' personal information, the preview image can be hidden during the registration of face credentials. When this option is enabled, the preview screen will not be provided when enrolling users' face credentials.
Server matching
In the Server Matching section, you can set up the server matching feature to authenticate user information on BioStar X without authenticating on the device.

-
Use Server Matching: Activates/Deactivates server matching.
-
Max. Simultaneous Server Matching Count: You can configure how many matchings can be done simultaneously.
This option may vary depending on the CPU performance of the server PC where BioStar X is installed.
-
Fingerprint
-
Fast Mode: You can configure the fingerprint matching speed.
-
Security Level: Configure the server matching security level for fingerprints. The higher the security level is set, the more the false rejection rate (FRR) can occur.
-
-
IR Face
- Security Level: Configure the server matching security level for IR faces. The higher the security level is set, the more the false rejection rate (FRR) can occur.
Server Matching is available when feature add-ons are enabled with an Advanced or higher license. For more information on the licensing policy, see License Policy.
System log level settings
In the System Log Level Settings section, you can set the level of system logs stored in the database.

System logs are managed according to predefined categories, and the log levels are classified into Trace, Debug, Info, Warning, and Error. The high level contains all lower level logs. For example, if you select Trace, it will include and save all lower levels of Debug, Info, Warning, and Error logs.
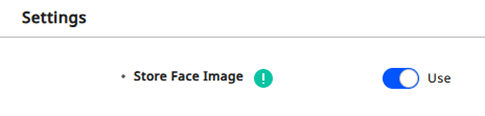
Saving facial images
When enrolling a face as a credential, you can set it to save both the actual image and template, or to save only the template without the actual image.
Before using
Before activating the Display expert settings option, if any changes have been made in the Server menu, be sure to save those changes first. Click Apply at the bottom right of the screen.
-
In the Expert Settings section, set the Display expert settings option to Use.

-
Click the Expert Settings button.
-
When you enter the Expert Settings screen, set the Store Face Image option.
-
Use: This is the default setting. Saves both the actual image and the template of the face credential.
-
Not Use: Does not save the actual image of the face credential and saves only the template. Read the warning popup that appears when you select this option carefully before setting it.
-
-
Click Apply to save the settings.
Precautions when disabling the Store Face Image option
-
If you disable this feature, all stored facial images will be deleted, and future enrolled facial images will only save the templates excluding the images.
-
This feature cannot be disabled if the enrolled facial images do not have both types of templates. For more information on the Face Migration feature, see Face Migration.
-
After disabling this feature, if you include invalid face image templates in the Data File Import, you will not be able to import the data file. To resolve this issue, temporarily enable this feature before importing the data file.