Enhance System Security
Configure the security settings of BioStar X according to your organization's security policy. You can selectively set password policy, personal data encryption, communication security between devices, and concurrent access control.
Check your organization's security policy and regulations before enhancing system security.
Use system security
-
Click Settings on the Launcher page.
-
Click System → Security on the left sidebar.
-
Set each item related to security.
-
Login Password: Set the security level related to login password. For more information, see #password-policy-configuration.
-
Advanced Security Settings: Enhance communication security between personal information and devices. For more information, see #advanced-security-configuration.
-
Session Security: Enhance session security. For more information, see #session-security-configuration.
-
-
Click Apply at the bottom right of the screen to save your settings.
Only the first administrator account with ID 1 can use the Advanced Security Settings menu.
Set password policy
The Login Password section sets the security level related to the login password. Set the password policy according to your organization's security requirements.

Set password complexity
You can set the complexity of user passwords. Adjust the slider for the Password Level option to set the security level.
-
Low: You can enter up to 32 characters.
-
Medium: When setting a password, a combination of 8 to 32 alphabetic characters (uppercase or lowercase) and numbers is required.
-
Strong: When setting a password, a combination of 10 to 32 alphabetic characters (uppercase and lowercase, including at least one uppercase letter), numbers, and special characters is required.
Set password change cycle
To limit the usage period of passwords, toggle the button in the Maximum Password Age option to Active state. Users must change their password periodically as set. If the password change cycle is exceeded, a password change request message will appear during login.
It can be set from 1 to 180 days.
Set login failure limit
You can set the number of allowed password input failures and the login restriction time. If you exceed the number of attempts set in the Maximum Invalid Attempts option, you cannot log in for a limited time after incorrectly entering the password.
This option is activated by default, and login is restricted for 10 minutes after 100 failures. You can adjust the values or disable them as needed.
Set password change limit
To limit the number of password changes a user can make in a day, toggle the button in the Maximum Password Change Limit option to Active state. Users can change the password up to the specified number of times.
It can be set to a maximum of 10 times.
Advanced security settings
In the Advanced Security Settings section, you can enhance personal information and communication security between devices.

The Advanced Security Settings section activates only when you log in with the initial administrator account.
Enhance personal data protection
To minimize the risk of data breaches, set the options below to encrypt sensitive personal information.
-
Encrypt Personal Data on Database
-
Use: Encrypt and store user personal data, including credential data.
-
Not Use: Store user personal information without encryption. Data that is already encrypted will be stored decrypted, and new data will not be encrypted.
-
-
Personal Data Encryption Key: Used to encrypt or decrypt information stored in the database to securely protect user personal information. Click Change and set a new encryption key value. Changing the encryption key re-encrypts the data that was previously encrypted.
-
Do not forcefully start the server during the personal data DB encryption or decryption process. Errors such as login failure or data corruption may occur. It may take some time depending on the size of the database and the performance of the server.
View personal data encryption items
-
Profile image
-
User ID
-
Name
-
Phone number
-
User IP
-
Email information for sender ans recipients
-
Login ID
-
Login password
-
Face template
-
Fingerprint template
-
Card ID
-
Smart card layout key
-
Custom information for user and visitor
-
Image log files
-
-
Personal Data Encryption Key can be entered using alphanumeric characters and symbols for a total of 32 characters.
-
After upgrading to version 1.0.3, the system encrypts new audit logs regardless of the Encrypt Personal Data on Database option.
Set secure communication between devices
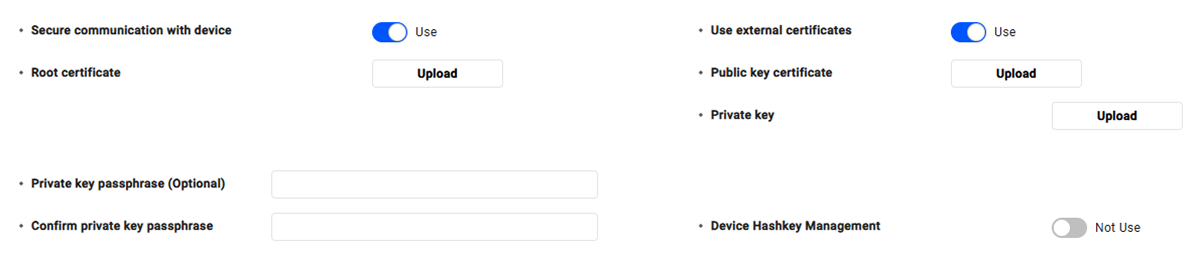
Protect communication between the BioStar X server and access control devices with certificates to enhance security. A newly installed BioStar X system sets the Secure communication with device option to Use by default, so no additional activation steps are required. When you upgrade an existing system, it keeps previous settings, reuses the security certificate, and reconnects registered devices.
-
Secure communication with device: Protect communication between the BioStar X server and access control devices with certificates. When this option is set to Use, the server automatically generates a certificate, sends it to devices, and encrypts all communication thereafter. Devices use this certificate to establish a secure channel when exchanging data with the BioStar X server.
To use an external certificate, set the Use external certificates option to Use, and register the following.
-
Upload the Root certificate, Public key certificate, and Private key files separately.
-
If a passphrase is set for the private key, enter the same value in Private key passphrase (Optional) and Confirm private key passphrase. (Optional)
To restore the security certificate backed up during server removal, copy it directly to the BioStar X installation path. For instructions on backing up and restoring security certificates, see Uninstall BioStar X Server and Restore Security Certificates.
-
-
Device Hashkey Management: Manually manage the hash key applied to devices. Set this option to Use to check and change the Device Hashkey value. Click Change and set a new hash key value.
Before enabling the Device Hashkey Management option, check the following.
-
When enabled, the device is set to delete user data, logs, and encryption key values together when a tamper (Tamper) event occurs to enhance security, so use caution.
-
If a user other than the Administrator Role account has a password or PIN, the system cannot apply the hash key. Delete the login password or PIN, then try again. The system encrypts passwords and PINs in a non-decryptable way to meet security requirements.
-
Changing the device hash key deletes the master administrator PIN information stored on the device. Use extra caution because deleting credentials may prevent access to the Device Manager menu.
-
Encrypt Personal Data on Database and Device Hashkey Management settings cannot be enabled at the same time. Disable one of the two options, then set the other.
-
BioStar X keeps the server-generated default certificate after setting Secure communication with device to Not Use. Changing the option back to Use reuses the existing certificate. It creates a new one only if none exists. Changing Use → Not Use → Use keeps the same certificate. Previously added devices reconnect without extra steps. Switching to Not Use while using an external certificate deletes the external certificate (root certificate, public key certificate, private key) from the server. It also deletes the private key password from the server.
-
Change Secure communication with device and Use external certificates only when all added devices and the multi-communication server are connected to the server. If any device disconnects or the multi-communication server is not connected, the system rejects the change and shows an error message. Reconnect the device or the multi-communication server, then try again. If you no longer use the device, delete it from the device list, then try again.
-
If a previously connected device fails to connect due to a certificate mismatch, BioStar X records it in the system log. If the device suddenly fails to connect, check the system log. Then initialize the device or re-enroll the exported certificate set with Use external certificates. If you remove and reinstall the server, see Uninstall BioStar X Server and Restore Security Certificates.
-
For instructions on backing up certificates when removing a server, see Uninstall BioStar X Server and Restore Security Certificates.
View supported devices and firmware versions for Secure communication with device feature
-
BioStation 3 Max firmware 1.0.0 or later
-
XPass Q2 firmware 1.0.0 or later
-
BioStation 3 firmware 1.0.0 or higher
-
BioStation 2a Firmware 1.0.0 or higher
-
X-Station 2 firmware 1.0.0 or higher
-
XPass 2 firmware 1.0.0 or higher
-
FaceLite firmware 1.0.0 or higher
-
BioLite N2 firmware 1.0.0 or higher
-
BioEntry P2 FW 1.1.0 or later
-
FaceStation 2 FW 1.1.0 or later
-
BioEntry W2 FW 1.2.0 or later
-
BioStation L2 FW 1.3.0 or later
-
BioStation A2 FW 1.5.0 or later
-
BioStation 2 FW 1.6.0 or later
-
CoreStation FW 1.1.0 or later
Concurrent access control
In the Session Security section, you can limit duplicate logins for the same account to enhance security. Set the Simultaneous Connection Allow option to Inactive. When there are concurrent login attempts for the same account, existing users logged in will be logged out.
