Integrate VMS
The Video Management System (VMS) is a video management system that integrates and manages video from multiple cameras, allowing for recording and playback. Integrating BioStar X with VMS allows you to manage access control and video security on a single platform.
You can use the following features through VMS integration.
-
Real-time monitoring: You can view real-time video from cameras connected to doors.
-
Integrated event management: You can understand security situations by linking access events with video.
-
Efficient evidence collection: You can quickly search and replay recorded video from specific points in time.
-
Bookmark function: You can add video tags to important event moments for easy retrieval and review.
Before you start
To integrate with the Video Management System (VMS), please check the following items.
-
The VMS integration feature is available through additional options for licenses above Advanced. For more information on licensing policies, see License Policy.
-
Make sure that the VMS server is correctly installed and configured. The VMS server must be in a state that can connect online with BioStar X.
- Use a VMS that is compatible with BioStar X. You can use the Nx Witness v5.1.5 or v6.x.x VMS.
- Prepare the IP address, port number, and administrator account information of the VMS server. This information is needed to connect the VMS server with BioStar X.
VMS server integration settings
Follow the steps below to integrate the VMS server with BioStar X.
Install the certificate on the VMS server
To play back recorded video from the VMS server, you must use HTTPS protocol. Standard SSL certificates are issued for domain names, so they aren't valid when accessing the VMS server by its IP address. Therefore, you need to create a separate certificate that includes the VMS server's IP address.
-
Before installing the certificate, ensure that Open JDK 21 or higher is installed on the PC where VMS is installed.
-
You must install a certificate whether the VMS server and BioStar X are installed on the same server or on separate servers.
-
Navigate to the C:\Program Files\BioStar X\third path and run the command prompt.
If VMS is installed on a different server than BioStar X, copy the scaleUtil-1.0-all.jar file to the VMS server and follow the next steps.
-
Execute the following command.
- Windows
- Linux
Windows
java -Xverify:none -jar scaleUtil-1.0-obfuscated.jar vmsCertCreate "C:\Windows\System32\config\systemprofile\AppData\Local\<%VENDOR.NAME%>\<%VENDOR.NAME%> Media Server\ssl" {VMS_IP_ADDRESS}Linux
java -Xverify:none -jar scaleUtil-1.0-obfuscated.jar vmsCertCreate "/opt/<%VENDOR.NAME%>/mediaserver/var/ssl" {VMS_IP_ADDRESS}-
Replace
<%VENDOR.NAME%>section with the product name of your VMS. -
Replace
{VMS_IP_ADDRESS}section with the IP address of the VMS server. -
The ssl path may vary depending on the installed VMS product.
-
Check whether the certificate file (*.pem) was created in the path where VMS is installed.
-
Reboot the VMS server.
The installation path of the certificate may vary depending on the VMS. Refer to the examples below.
-
BioStar 2 VMS: C:\Windows\System32\config\systemprofile\AppData\Local\Suprema Inc\Suprema Inc. Media Server\ssl
-
Digital Watchdog: C:\Windows\System32\config\systemprofile\AppData\Local\Digital Watchdog\Digital Watchdog Media Server\ssl
-
Hanwha Wave: C:\Windows\System32\config\systemprofile\AppData\Local\Hanwha\Hanwha Media Server\ssl
-
NX: C:\Windows\System32\config\systemprofile\AppData\Local\Network Optix\Network Optix Media Server\ssl
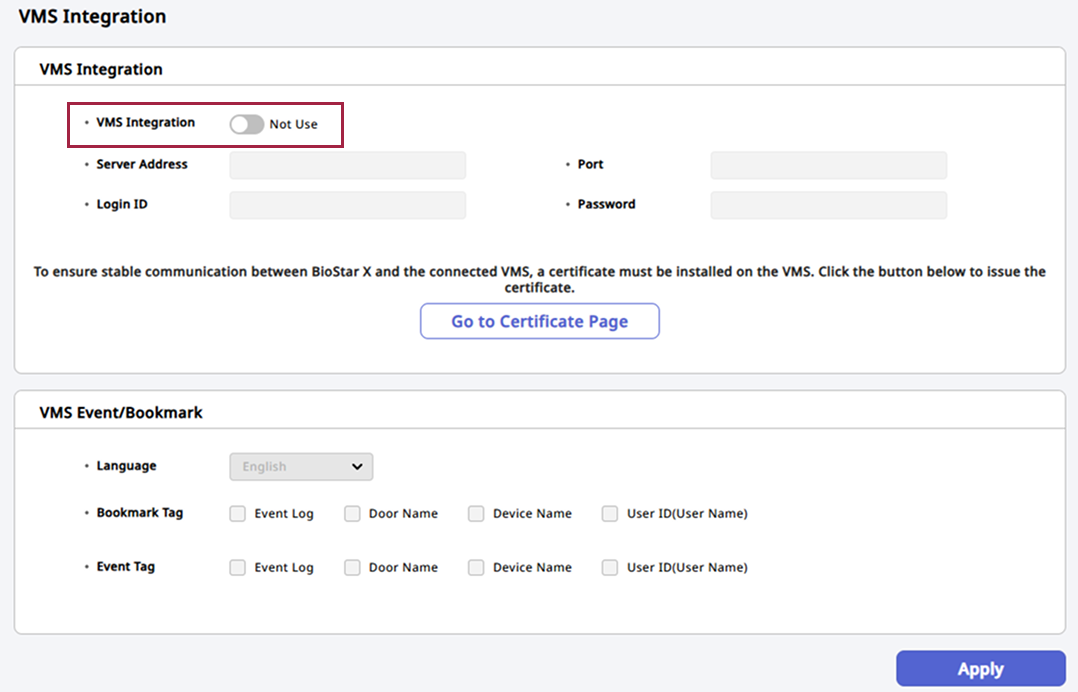
Activate VMS integration
-
Click Settings on the Launcher page.
-
On the left sidebar, click Video → VMS Integration.
-
If this is your first time accessing, log in with the BioStar X administrator account.

-
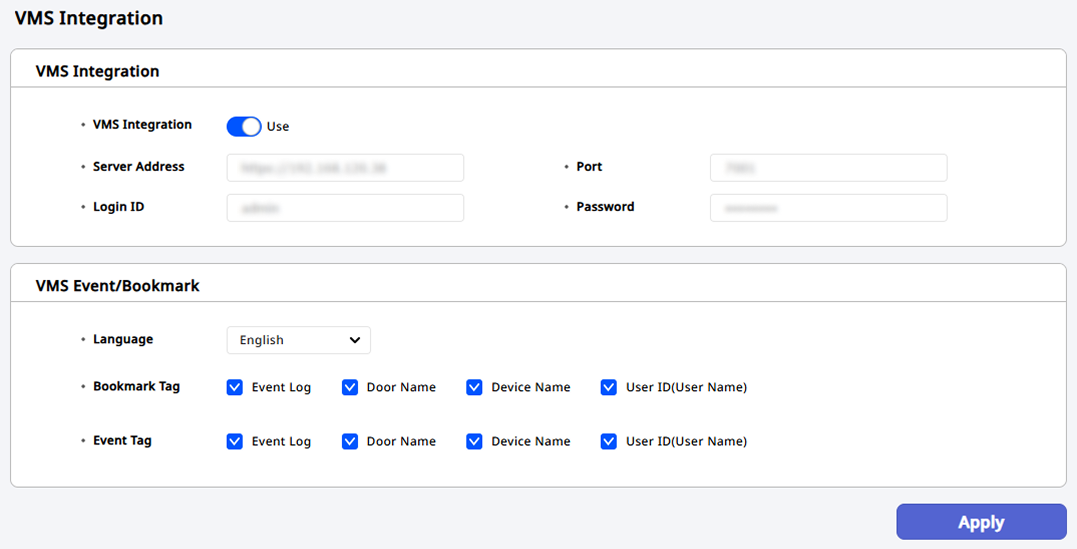
Set the VMS Integration option to Use.
-
Enter the VMS server information.
-
Server Address: Enter the IP address of the VMS server.
-
Port: Enter the port number of the VMS server.
-
Login ID: Enter the administrator account ID of the VMS server.
-
Password: Enter the administrator account password of the VMS server.
-
-
Once you have entered all the VMS server information, click the Apply button at the bottom right of the screen.
-
If the integration with the VMS server fails and an error message appears, check the server address and administrator account information again. It is also necessary to check whether the VMS server is online and if network connections are blocked due to firewall settings.
-
For more information on the settings in the VMS Event/Bookmark section, see #vms-event-bookmark.
Restart service
The first time you integrate with the VMS server, BioStar X will automatically restart the service. If it does not automatically restart, follow the instructions below to manually restart the service.
-
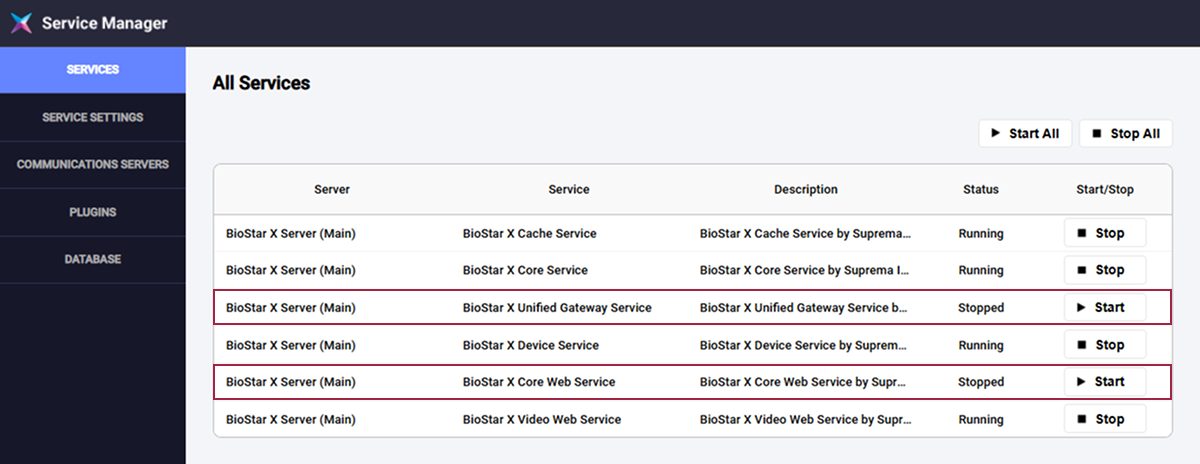
Click Start → BioStar X → BioStar X Service Manager on Windows.
-
In the All Services list, click the Stop button for the services below to stop them.

-
BioStar X Unified Gateway Service
-
BioStar X Core Web Service
-
-
When the status of the requested service changes from Pending to Stopped, click the Start button to restart the service.
Check and configure cameras
If the VMS server is integrated normally, you can check the connected cameras in the Video → Video menu. For more information, see Set Up the Camera.
Troubleshooting
If the following situations occur, you can install the certificate from the VMS server onto the client PC to resolve the issue.
-
When accessing Video Management System (VMS) through the browser, and a 'Not secure' warning appears
-
When real-time video plays on the Monitoring page but recorded video does not play
Certificate installation on client PC
-
Access BioStar X through your web browser.
-
Download the HTTPS certificate installer (cert-register.zip) from the login screen or Settings → Server → HTTPS.
-
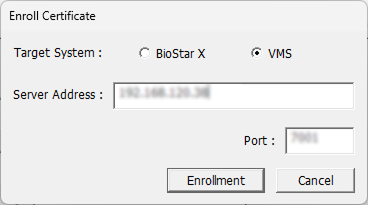
Unzip the downloaded file and run cert-register.exe file. Enrollment Certification window will appears.
-
Select VMS for Target System and enter the following information.
-
Server Address: IP address of the VMS server
-
Port: Port number of the VMS server
-
-
Click the Enrollment button.
-
Check the security warning message and click Yes.
Restart the web browser and check if the recorded video from the VMS server plays normally on the Monitoring page.
VMS event and bookmark settings
You can transmit bookmark tags and event tag information to the integrated VMS server. At this point, you can choose to transmit event logs, door names, device names, and user IDs together. Select the desired options and click the Apply button at the bottom right of the screen.
-
Language: Choose the language for the event and bookmark tags transmitted to the VMS server. You can select either Korean or English.
-
Bookmark Tag: Bookmark tags allow you to easily locate and review videos stored on the VMS server with designations and names for quick identification. Select the information to send with the bookmark tag.
-
Event Tag: You can transmit events that occurred at specific moments to the VMS server for logging. Select the information to send with the event tag.
-
For more information on the bookmark function in VMS, refer to the following link.
-
For more information on the event function in VMS, refer to the following link.
Disconnect VMS server integration
To disconnect the integrated VMS server, follow the steps below. Disconnecting VMS integration will delete all video settings, registered cameras, and rules.
-
Click Settings on the Launcher page.
-
On the left sidebar, click Video → VMS Integration.
-
Set the VMS Integration option to Not Use.
-
Click the Apply button at the bottom right of the screen.
-
Check the contents of the message window and click the Yes button.