Set Up the Camera
After completing the VMS integration, select and set up the cameras to be used in BioStar X. Appropriate camera configurations enable the use of the following security management features.
-
Optional Monitoring: You can add only the necessary cameras from all the cameras of VMS to BioStar X.
-
Efficient Management: Cameras can be systematically managed by grouping them according to location or purpose.
-
For more information on how to integrate with the VMS server, refer to Integrate VMS.
-
The camera group permission is required to add cameras or configure groups. For more information on camera group permissions, see #addCameraPermission.
Camera settings and management
After VMS integration, you can set up and manage cameras in the menu Settings → Video → Video.
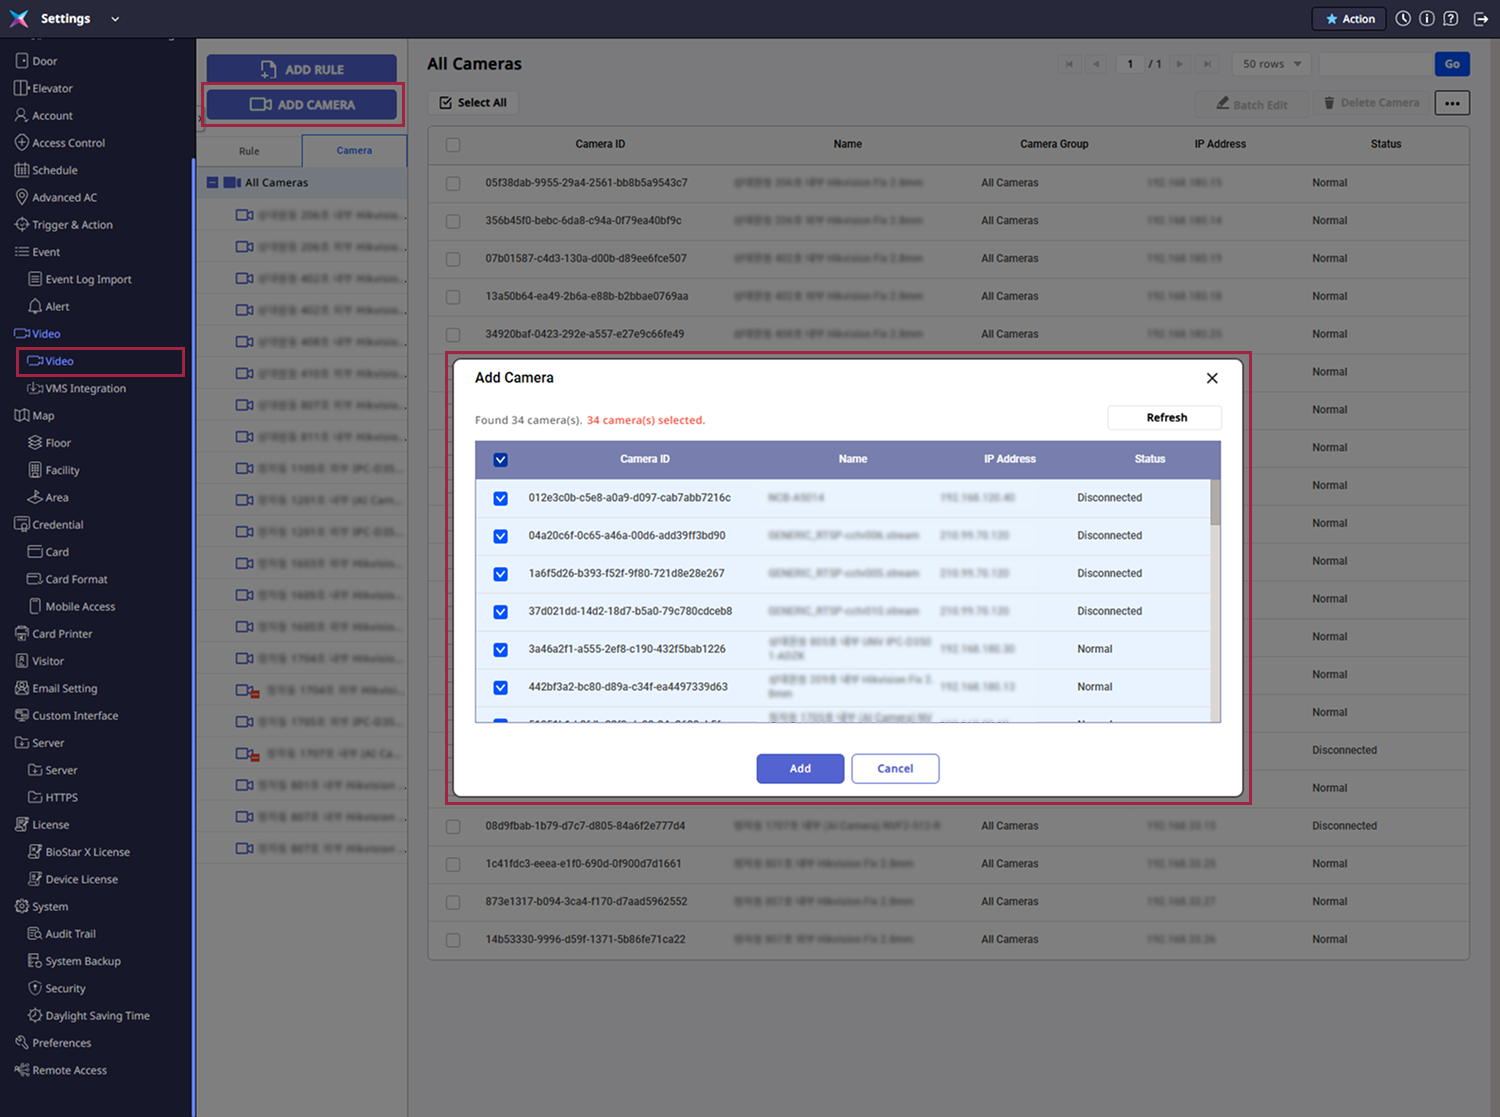
Add camera
If integrated with VMS, you can add cameras connected to the VMS server to BioStar X and play live video and recorded footage on the Monitoring page.
-
Click Settings on the Launcher page.
-
Click Video → Video in the left sidebar.
-
Click ADD CAMERA.
-
When the Add Camera window appears, select the cameras to exclude from the list.
If your desired camera is not displayed, click the Refresh button to refresh the camera list.
-
Once you have selected the cameras, click the Add button in the bottom right corner of the screen.
You can check the added cameras in the camera list.
Edit camera information
You can edit the information of the added cameras. You can change the camera name, group, description, etc.
-
Click Settings on the Launcher page.
-
Click Video → Video in the left sidebar.
-
Click the Camera tab in the upper left corner of the screen.
-
Click the camera you want to edit in the camera list.
-
When the screen showing the camera information appears, edit your desired items.

-
After editing all the camera information, click the Apply button in the bottom right corner of the screen.
The camera ID and IP address cannot be modified.
Delete camera
You can delete the added cameras.
-
Click Settings on the Launcher page.
-
Click Video → Video in the left sidebar.
-
Click the checkbox on the far left of the camera you want to delete from the camera list. You can select more than one camera.
-
Click Delete Camera in the upper right corner of the screen.
-
Check the message and click the Yes button.
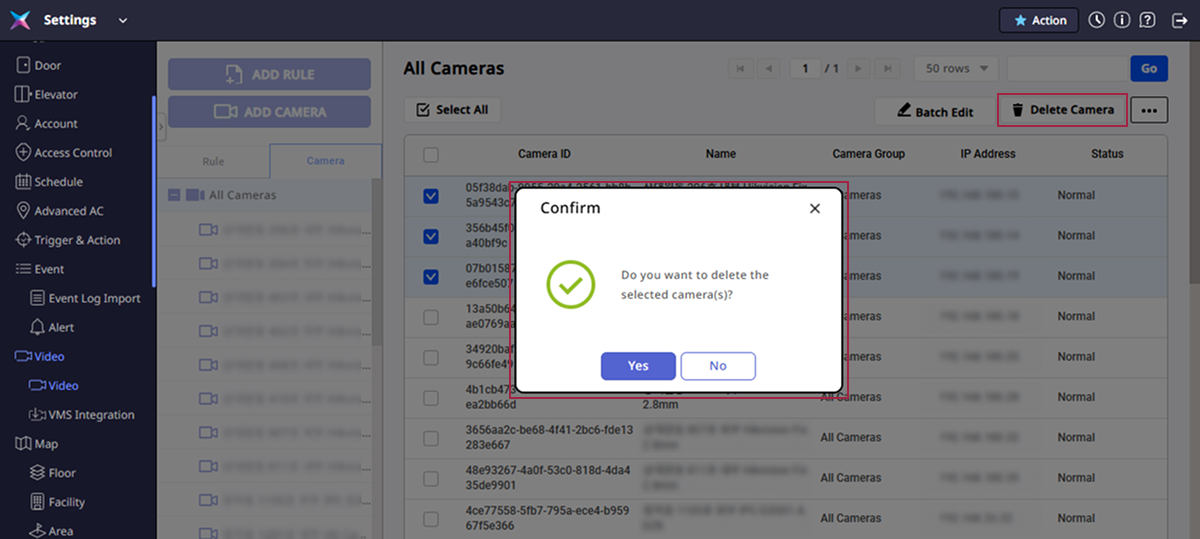
If the camera you want to delete is included in a rule, you cannot delete the camera. Remove the camera from the rule and try again. For more information on creating and managing rules, see Set Video Rules.
Camera group settings and management
You can group multiple cameras to manage them systematically by location or purpose. Follow the steps below to create and manage camera groups.
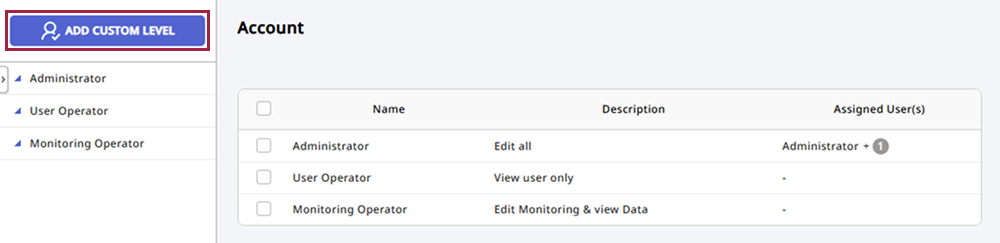
Camera group permission settings
Administrators need the camera group permission to add cameras or configure groups. System administrators, user administrators, and monitoring administrators have access to all camera groups. If you need different permission settings, add a custom permission to configure camera group access.
-
Click Settings on the Launcher page.
-
Click Account in the left sidebar.
-
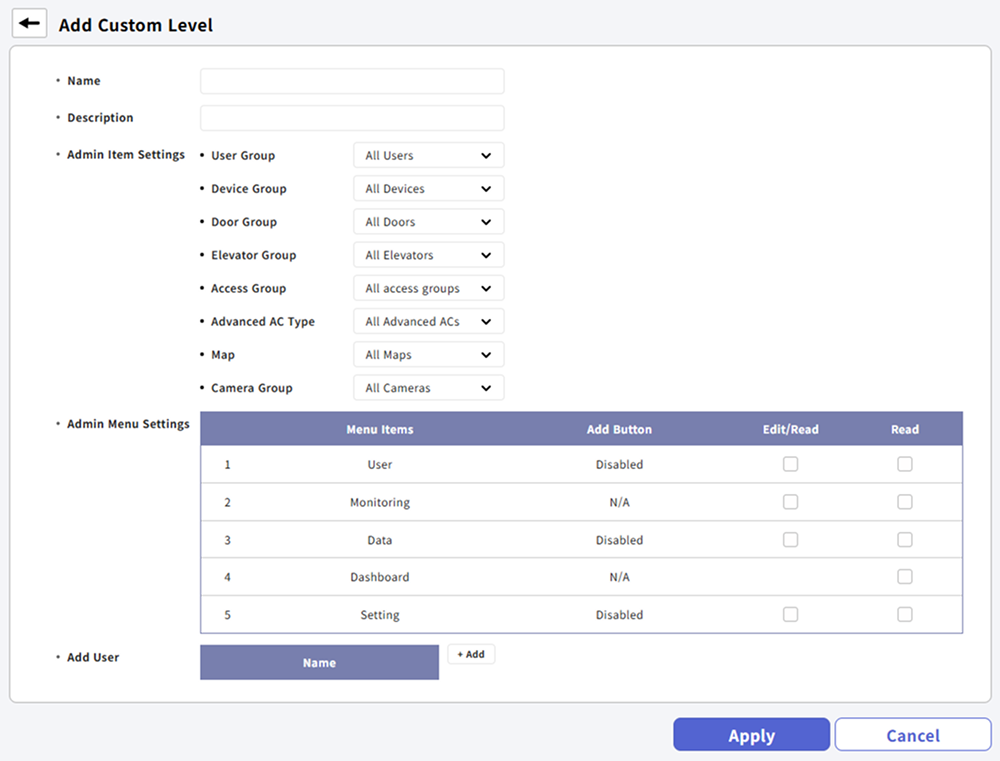
Click Add Custom Level.
-
Enter a name and description for the newly created permission.
-
In Admin Item Settings, under Camera Group, select the camera group to assign permissions to.

-
Select All Cameras to grant permissions for all camera groups.
-
To grant permissions for an individual camera group, select the desired group from the camera group list. You can select one or more groups.
-
-
In Add User, click + Add and select the users to assign permissions to.
-
Click Apply at the bottom of the screen to save the settings.
If you do not have permission for a specific camera group, you cannot view the cameras in that group.
Add camera group
You can group multiple cameras for management by adding a camera group.
-
Click Settings on the Launcher page.
-
Click Video → Video in the left sidebar.
-
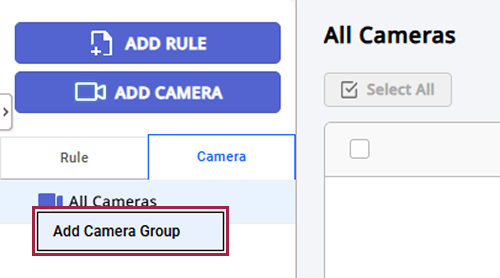
Click the Camera tab in the upper left corner of the screen.
-
Select All Cameras and right-click.
-
Click Add Camera Group from the popup menu.
-
Enter the desired group name and press the Enter key.
-
You can create camera groups with up to 8 subgroups.
-
Camera group names can be entered up to 48 characters long.
-
When you select a camera group from the camera list, only the cameras belonging to that group will be displayed in the list.
Add multiple cameras to the group
You can add more than one camera to the added group.
-
Click Settings on the Launcher page.
-
Click Video → Video in the left sidebar.
-
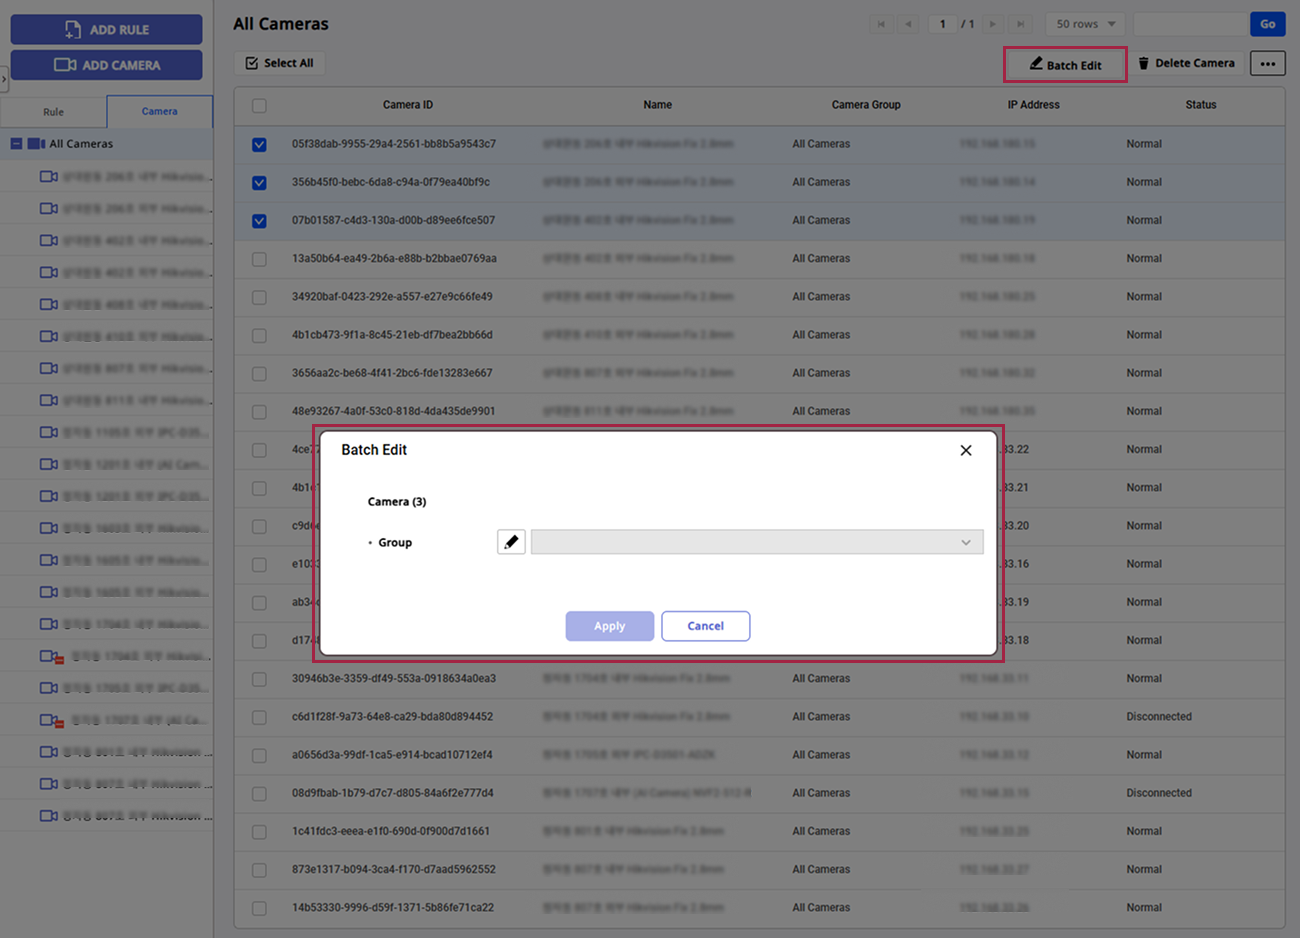
Click the checkbox on the far left of the cameras to be added to the group in the camera list. You can select more than one camera.
-
If you select more than one camera, the Batch Edit button will be activated in the upper right corner of the screen. Click the Batch Edit button.
-
When the Batch Edit window appears, click the Group button of the item.
-
Select the desired group from the group list.
-
Click the Apply button.
From the camera list in the Camera tab, you can also add cameras to the group by drag and drop.

Edit camera group name
-
Click Settings on the Launcher page.
-
Click Video → Video in the left sidebar.
-
Click the Camera tab.
-
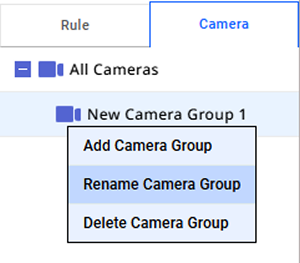
Select the group you want to rename and right-click.
-
Click Rename Camera Group from the popup menu.
-
Enter the desired group name and press the Enter key.
Delete camera group
-
Click Settings on the Launcher page.
-
Click Video → Video in the left sidebar.
-
Click the Camera tab.
-
Select the group you want to rename and right-click.
-
Click Delete Camera Group from the popup menu.
-
Check the warning message and click the Yes button.
If the camera group contains cameras, you cannot delete the group. Move the cameras belonging to the group to another group or remove them from the group and try again.
Column settings
You can add or change the order of columns to display in the list, or set them to be hidden.
-
Click Settings on the Launcher page.
-
Click Video → Video in the left sidebar.
-
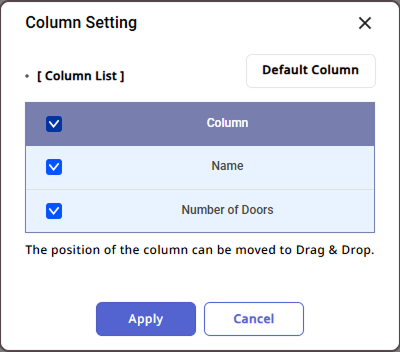
In the upper right corner of the All Cameras list, click → Column Setting.
-
When the Column Setting window appears, you can click the checkboxes of the columns you want to display to add or set them to be hidden. You can also change the order of columns via drag and drop.
-
Once you have changed all column settings, click the Ok button.
To initialize the column settings, click the Default Column button.