Register Users
When you need to register a new user or a temporary visitor to the system, enroll basic information, permissions, and authentication methods together.
-
On the app home screen, tap USER.
You can also access it through the side menu. Tap → User.
-
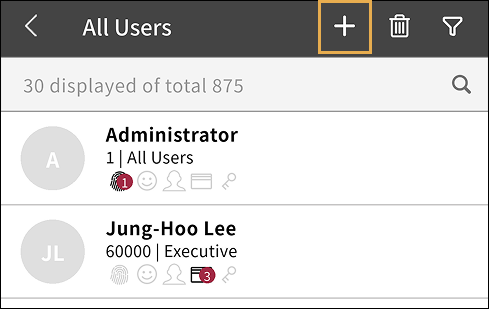
Tap at the top right of the screen.
-
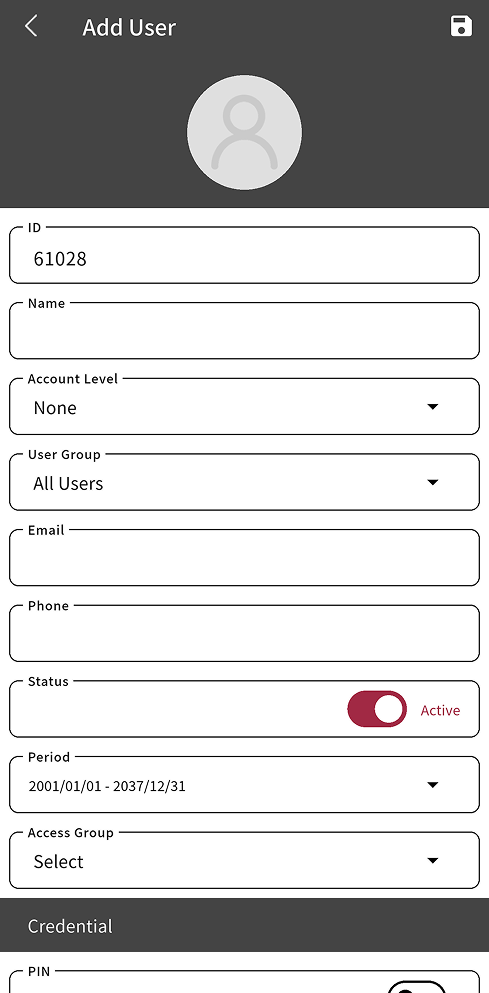
Enter the user's basic information and set up credentials.
Enroll profile image
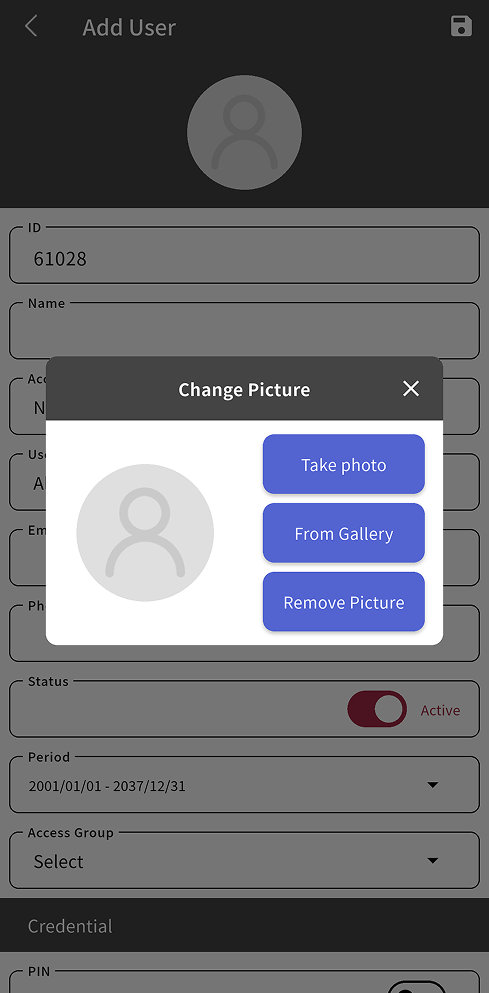
To enroll a user's profile image, tap the profile icon at the top of the screen.
-
Take photo: Take a photo with your mobile device's camera and use it as the profile image.
-
From Gallery: Select a saved photo on your mobile device and use it as the profile image.
To delete an enrolled profile image, tap Remove Picture.
Enter user information and set permissions
-
ID: The unique ID assigned to the user. The value generated automatically by the system is prefilled. You can also enter it manually.
-
Name: Enter the user's name.
-
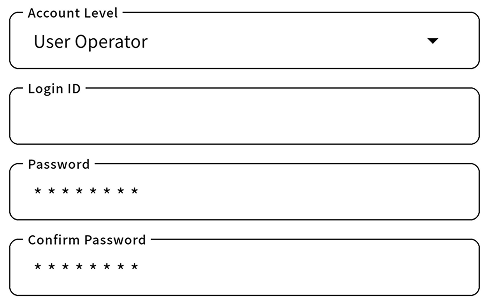
Account Level: Select the user's account level.
Account level Permissions by menu None - None Administrator All menus All permissions User Operator User Read, Write Monitoring Operator Monitoring, Data, Dashboard Read, Write T&A Operator TIME ATTENDANCE Read, Write Visitor Operator VISITOR Read, Write When you set an administrator level, you can set a login ID and password so the user can log in to the BioStar X server.
-
User Group: Select the group the user belongs to.
-
Email: Enter the user's email address.
-
Phone: Enter the user's phone number.
-
Status: Activate or deactivate the user account.
-
Period: Set the period for using the user account. Set the start and end dates to use the user account only during that period.
-
Access Group: Select the user's access group.
-
The available user ID values may vary depending on the Settings → Server menu's User ID Type option. For more information, refer to Server Detailed Settings.
-
The T&A Operator and Visitor Operator levels require a separate license. For more information on licensing policies, see License Policy.
-
For more information about adding and setting up access groups, refer to Manage Access Groups.
Enroll credential
When you register a user, you can also enroll a credential so the user can access the access control system. Users can enroll their fingerprints, faces, card information, and PINs as credentials. Credentials can be added or modified when registering or updating a user.
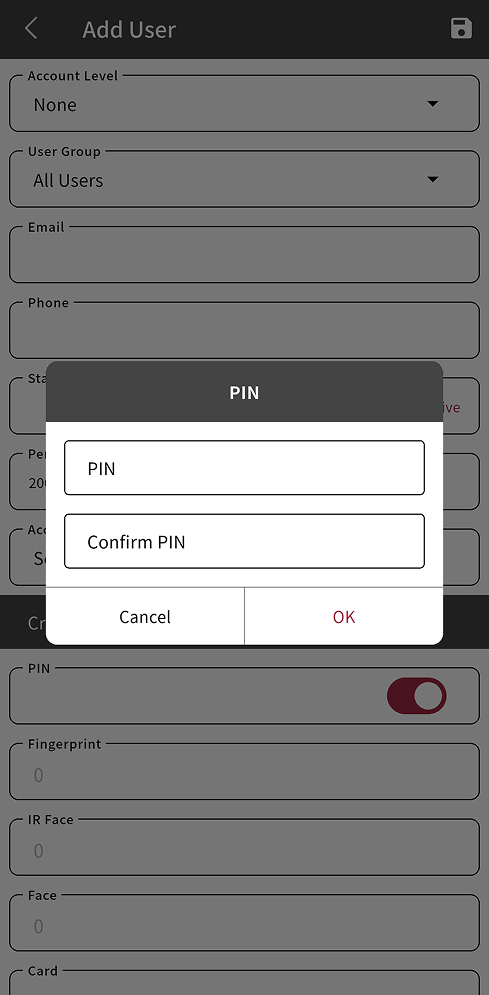
Enroll PIN
You can enroll a PIN credential so the user can gain access by entering a PIN on the device.
-
Tap Credential → PIN.
-
When the PIN entry window appears, enter the desired PIN one by one.
-
When you finish entering it, tap OK.
-
The PIN must be at least 8 characters long and can only contain numbers.
-
You can enroll a maximum of one PIN credential per user.
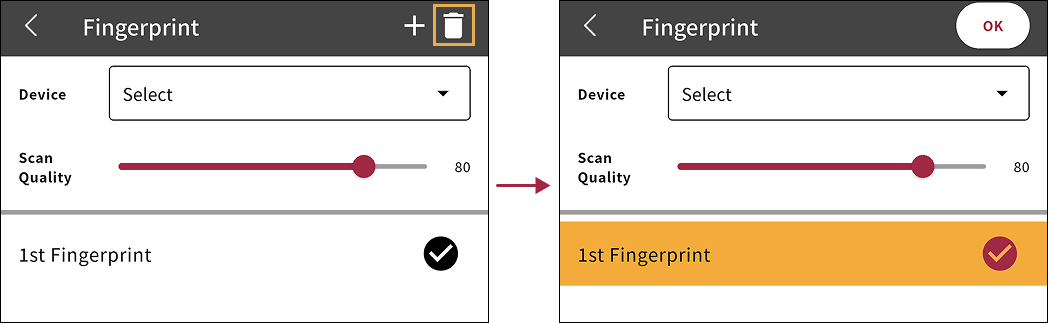
Enroll fingerprint
You can enroll the user's fingerprint as a means of authentication for access control. Enroll the user's fingerprint information through a device that supports fingerprint authentication.
Before enrolling fingerprints...
-
Ensure that the user's fingerprint is clean and dry.
-
Do not enroll fingerprints that are injured or blurry.
-
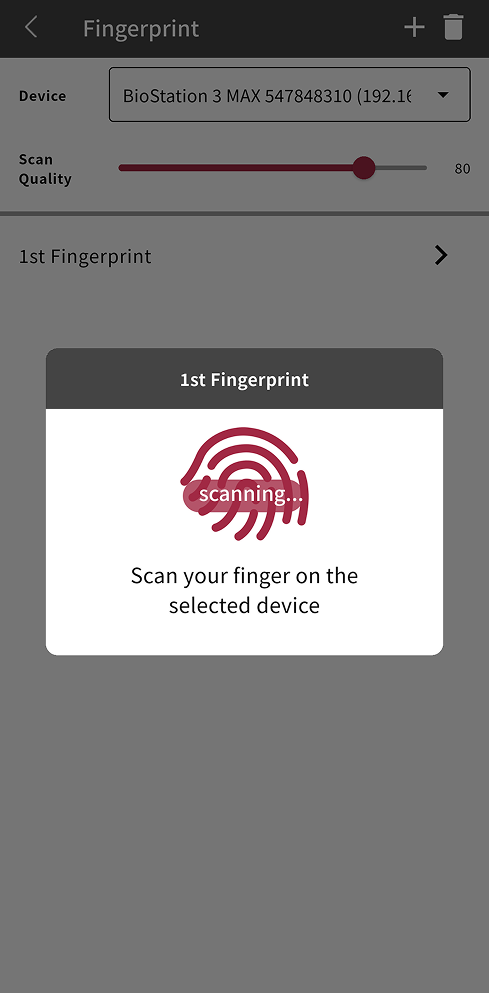
Tap Credential → Fingerprint.
-
Tap Device to select a device to enroll the fingerprint.
-
In the Add Device pop-up, select a device for fingerprint enrollment and tap Yes.
-
Use Scan Quality to adjust fingerprint quality. The default is 80. Cannot enroll fingerprint information if it does not meet the configured quality level.
-
Tap at the top right of the screen.
-
When 1st Fingerprint appears in the list, tap it.
-
scanning... When the pop-up appears, scan the fingerprint on the selected device.
-
To verify the fingerprint, scan the same fingerprint again.
-
When fingerprint scanning is complete, tap OK.

-
The device list shows only fingerprint devices registered on the BioStar X server that support fingerprint enrollment.
-
Repeat steps 5–9 to enroll additional fingerprints. You can enroll up to 10 fingerprints per user.
-
To edit an enrolled fingerprint, tap the fingerprint credential and repeat the previous steps.
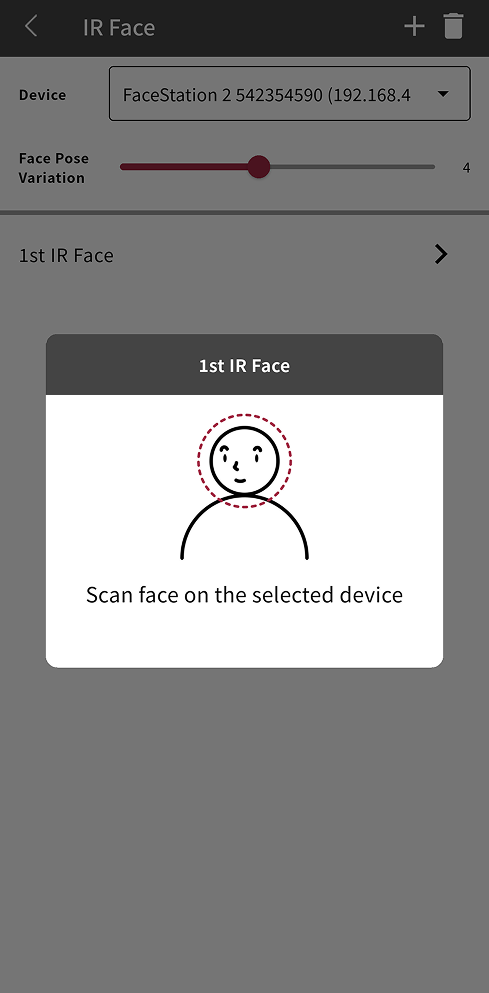
Enroll IR face
You can enroll the user's face as a means of authentication for access control. IR face enrollment is an authentication method that captures the user's face using an infrared camera.
-
Tap Credential → IR Face.
-
Tap Device, select a device that supports IR face enrollment, and then tap Yes.
-
Adjust Face Pose Variation to set sensitivity for face position, angle, and distance. The default is 4. Set it high to obtain a precise IR face template.
-
Tap at the top right of the screen.
-
When 1st IR Face appears in the list, tap it.
-
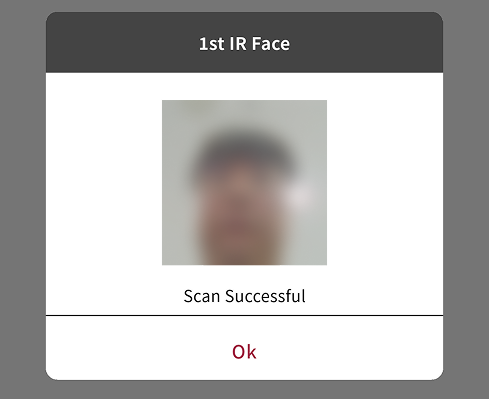
When the face enrollment pop-up appears, scan the face on the selected device. When the face is recognized, the face image appears in the pop-up.
-
To complete IR face enrollment, tap OK.
-
Devices that can enroll IR face are as follows:
-
FaceStation 2
-
FaceLite
-
-
You can enroll up to 5 IR faces.
-
If the face authentication rate is low, delete face information and enroll a new face.
-
To edit an enrolled IR face, tap the IR face credential and repeat the previous steps.
Face enrollment
You can enroll the user's face as a means of authentication for access control. Facial enrollment is an authentication method that captures the user's face with a camera. In the BioStar X mobile app, you can also import a face image saved on your mobile device or take a photo with the camera to enroll a face. You can also scan a face on a device that supports face recognition and enroll it.
-
Tap Credential → Face.
-
Tap Device, select a device that supports face enrollment, and then tap Yes.
-
If you do not select a device, you can import a photo from your mobile device or take a photo with the camera to enroll a face.
-
If you select a device, you can scan a face on that device and enroll it.
-
-
Tap at the top right of the screen.
-
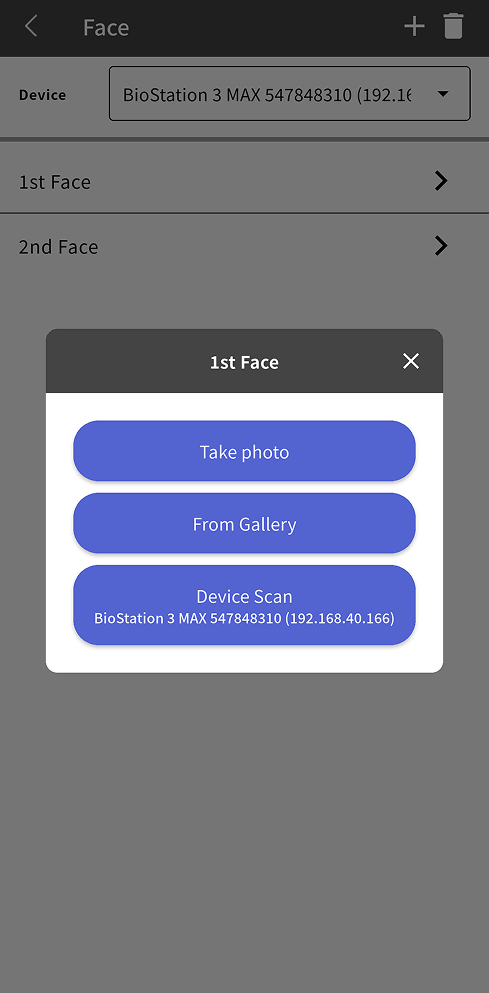
When 1st Face appears in the list, tap it.
-
In the pop-up, select the face enrollment method you want.
-
Take photo: Take a photo with your mobile device's camera and enroll the face.
-
From Gallery: Select a photo saved on your mobile device and enroll the face.
-
Device Scan: Scan the face with the device selected in Device.
-
-
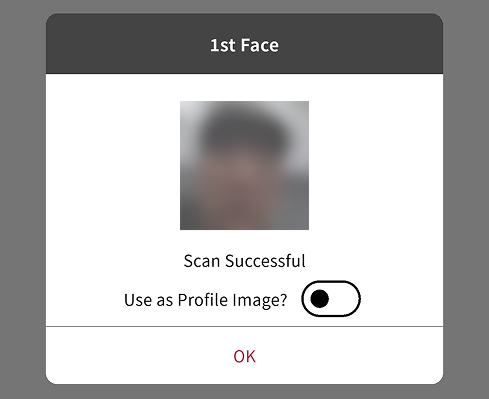
When the face is recognized, the face image appears in the pop-up.
-
To complete face enrollment, tap OK.
-
To use the enrolled face image as the profile image, enable Use as Profile Image? option.
-
When you take a face photo with your mobile device's camera or import a saved photo, access permission is required. Select Allow in the permission request pop-up to enroll the face photo.
-
To edit an enrolled face, tap the face credential and repeat the previous steps.
Register access card
You can register a new access card or assign an registered access card as an authentication method for access. There are ways to register an access card: scan the card on a card reader, assign an already enrolled card, or enter the card number manually.
CSN card
-
Tap Credential → Card.
-
Tap at the top right of the screen.
-
In Card Type, select CSN and tap Yes.
-
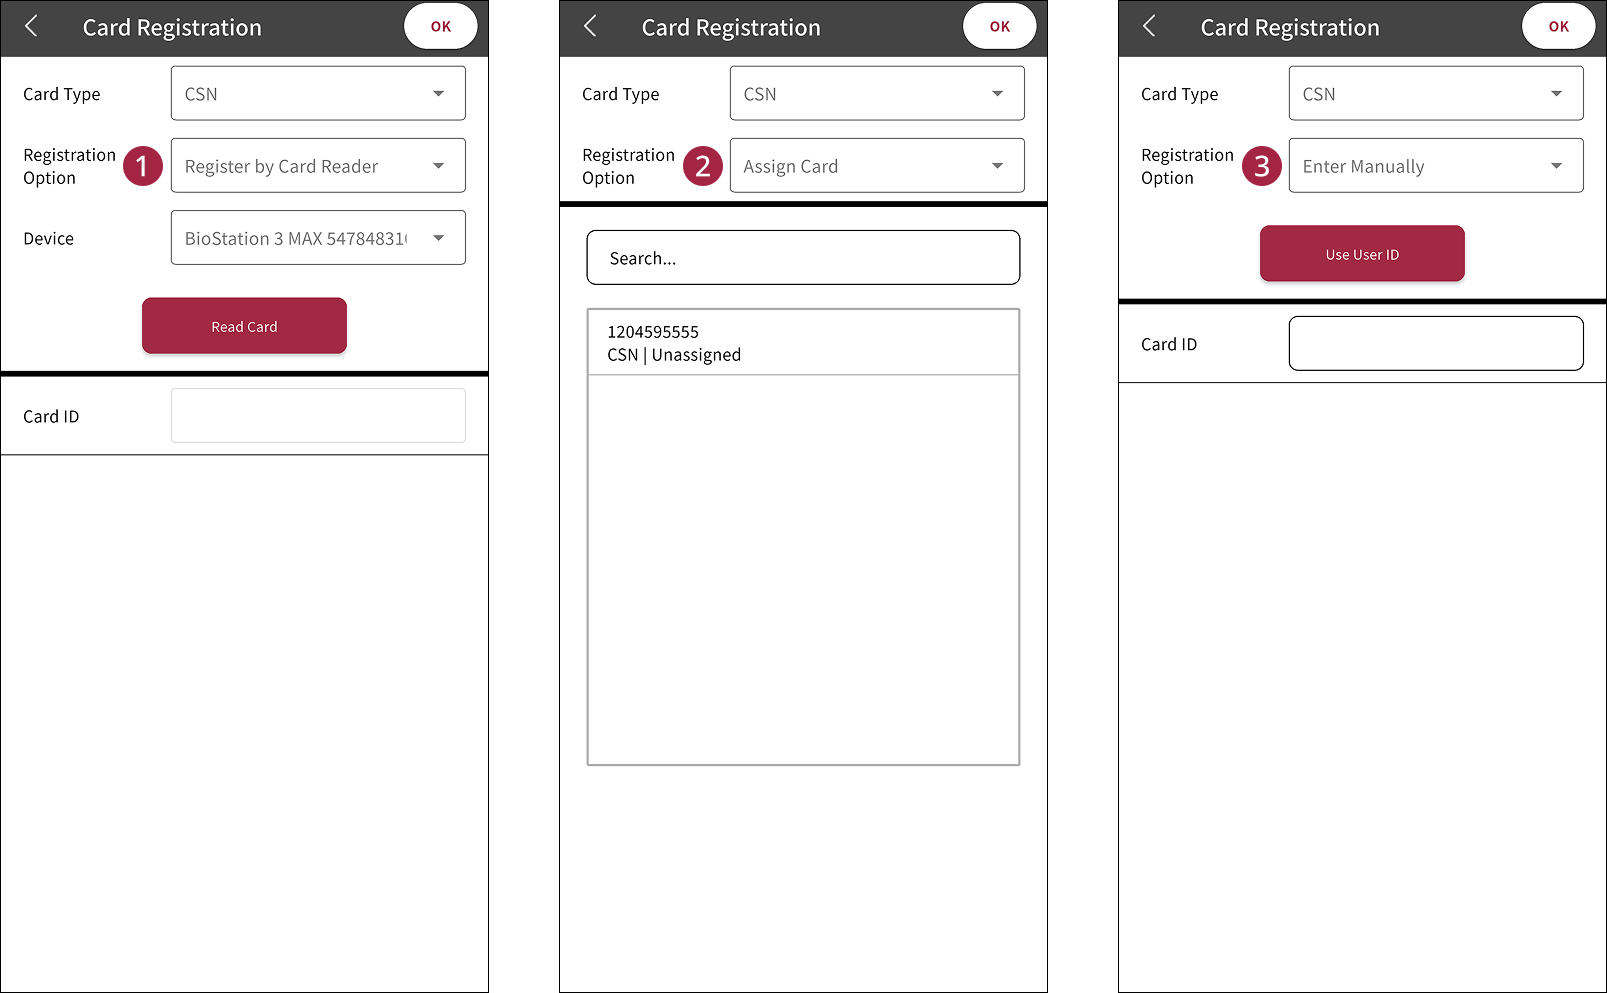
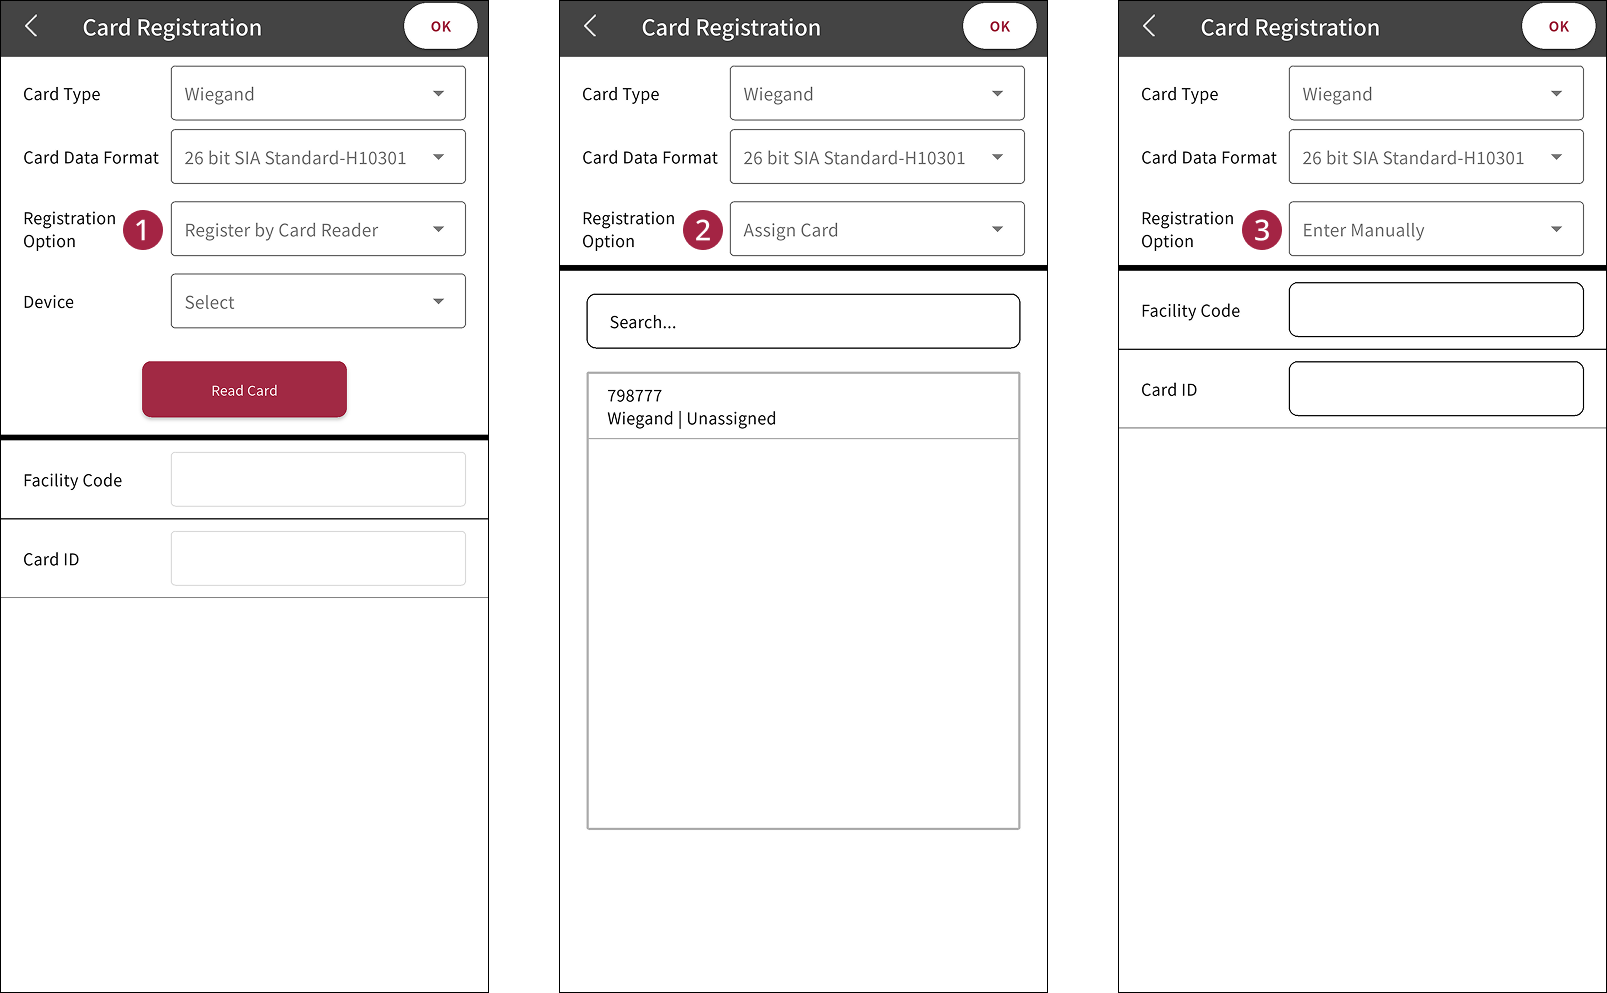
In Registration Option, select the registration method you want.
-
Register by Card Reader: Scan the card on a card reader to register it. In Device, select the device to read the card, and then tap Read Card. Hold the card up to the card reader to scan it. When the card is scanned successfully, the card number appears in Card ID.
-
Assign Card: Assign an registered access card to a user. Select one of the registered card numbers from the list.
-
Enter Manually: Enter the card number manually. Enter the card number in the Card ID input field. To use the user's ID as the card number, tap Use User ID.
-
-
To complete card registration, tap OK at the top right of the screen.
-
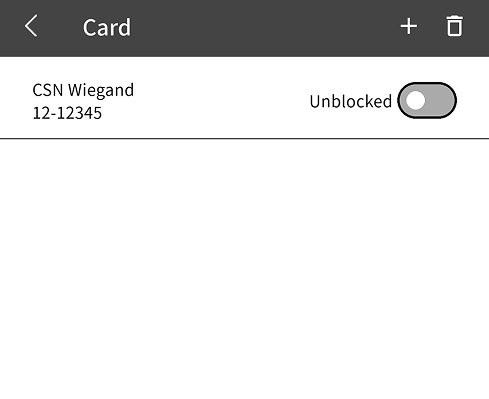
When you return to the card list, the registered card number appears.
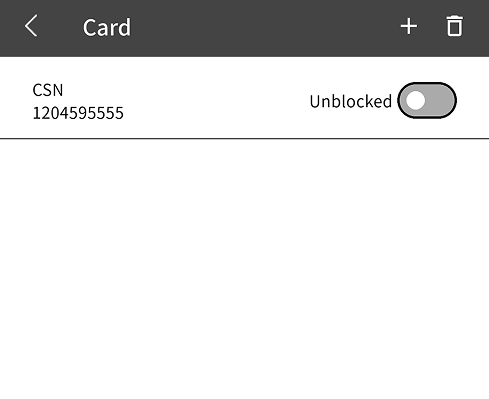
To stop using an registered card, tap the card's toggle switch to set it to Blocked.
Wiegand card
-
Tap Credential → Card.
-
Tap at the top right of the screen.
-
In Card Type, select Wiegand and tap Yes.
-
In Card Data Format, select the card format you want.
-
In Registration Option, select the registration method you want.
-
Register by Card Reader: Scan the card on a card reader to register it. In Device, select the device to read the card, and then tap Read Card. Hold the card up to the card reader to scan it. When the card is scanned successfully, the card number appears in Facility Code and Card ID.
-
Assign Card: Assign an registered access card to a user. Select one of the registered card numbers from the list.
-
Enter Manually: Enter the card number manually. Enter the card number in the Facility Code and Card ID input fields.
-
-
To complete card registration, tap OK at the top right of the screen.
-
When you return to the card list, the registered card number appears.
To stop using an registered card, tap the card's toggle switch to set it to Blocked.
Smart Card
-
To issue a smart card, the correct card type must be set. For more information on card formats, refer to Set Smart Card Format.
-
The user information stored on the smart card uses information stored in BioStar X. Failure to store updated user information may result in incorrect information being stored on the smart card. Additionally, if the updated user information is not synchronized with the device, the device may fail to perform authentication.
-
To add PIN authentication information, enroll a PIN first. For more information on enrolling a PIN, refer to #enrollPin.
-
To add fingerprint credential information, enroll a fingerprint first. For more information on fingerprint enrollment, refer to #enrollFingerprint.
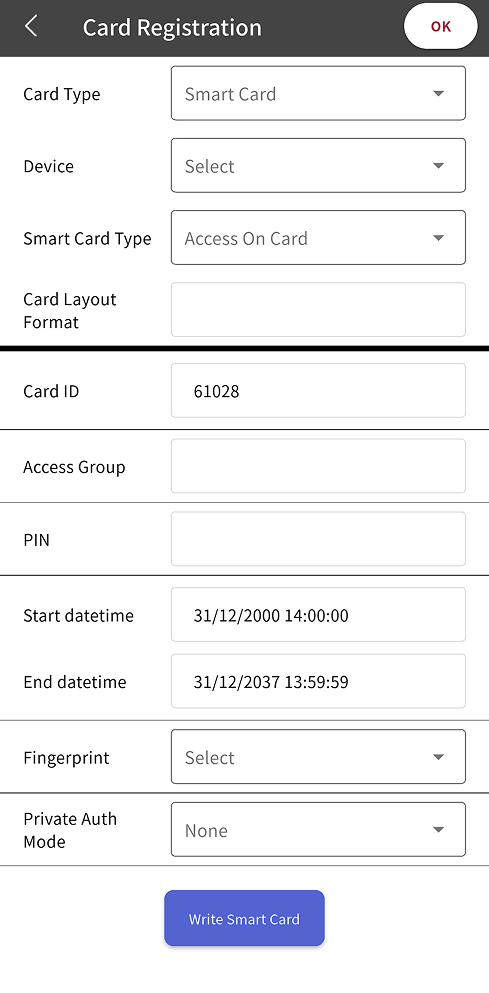
Access on Card
User information (card ID, PIN, access group, period, fingerprint template, face template, and private authentication mode) can be stored on the card.
-
Tap Credential → Card.
-
Tap at the top right of the screen.
-
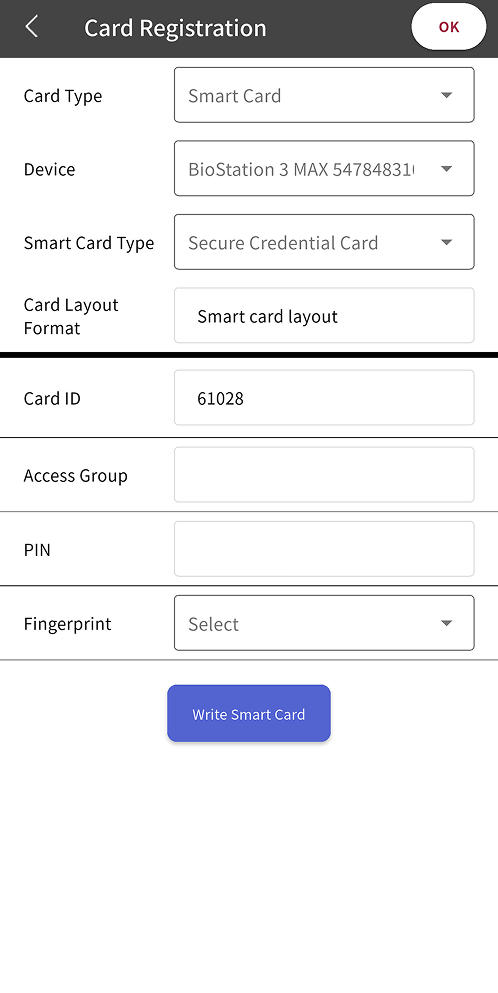
In Card Type, select Smart Card and tap Yes.
-
In Device, select the device to register the card, and then tap Yes.
The card layout set on the selected device appears in Card Layout Format.
-
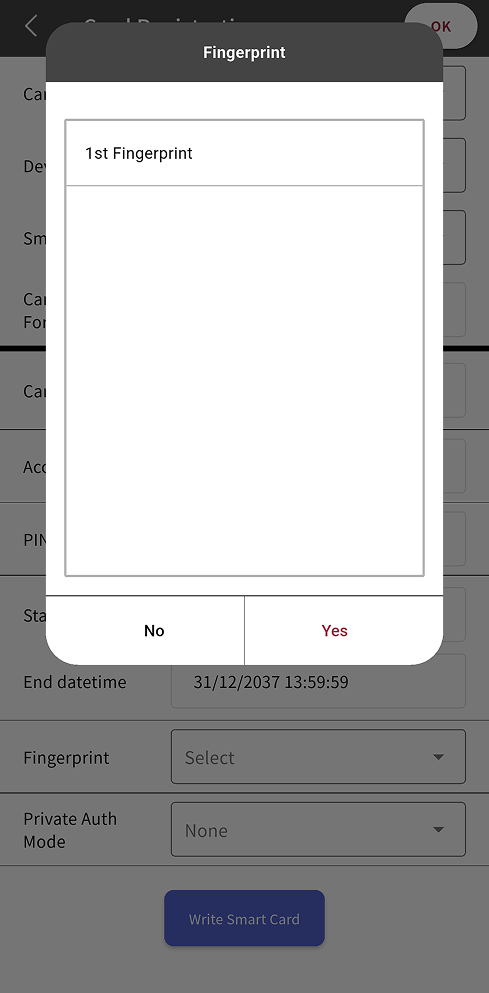
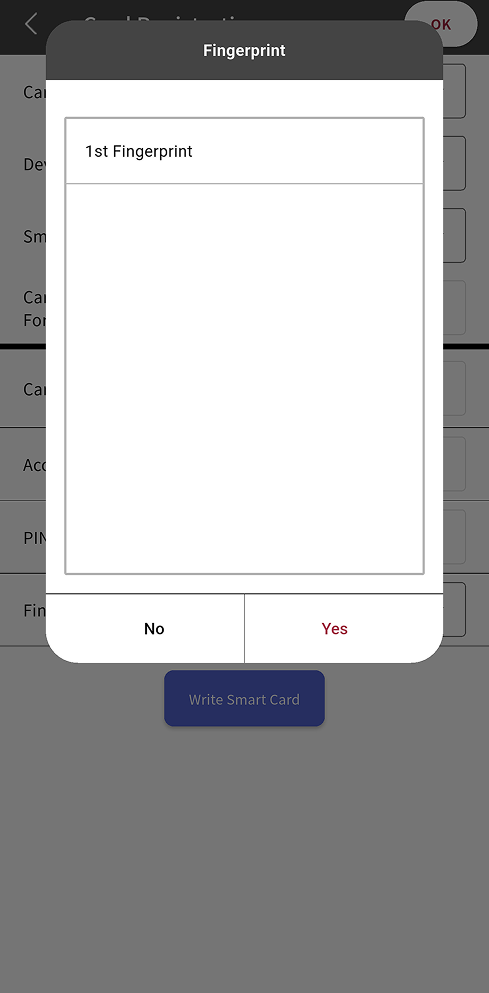
(Optional) To add fingerprint authentication, tap Figerprint and select an enrolled fingerprint.
-
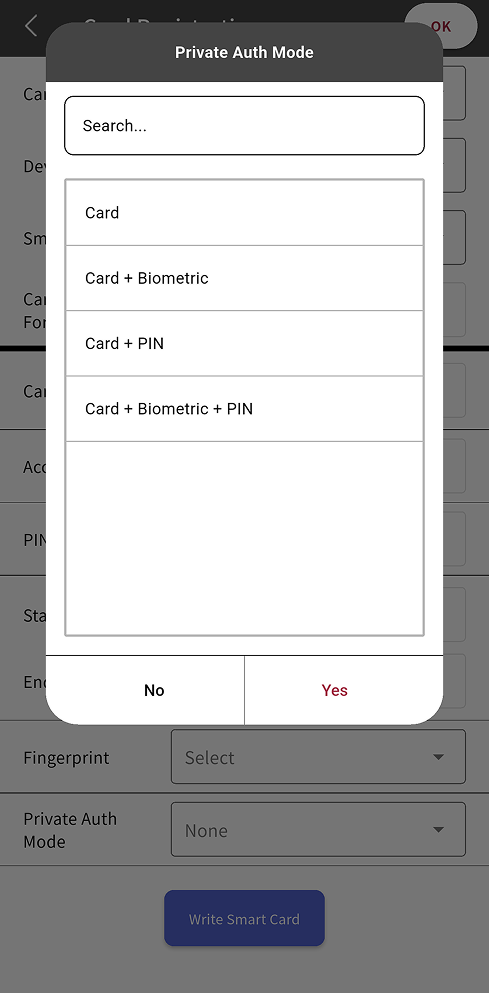
(Optional) To add private authentication mode, tap Private Auth Mode and select the authentication method you want.
-
To register the card, tap Writes Smart Card.
-
Hold the card up to the selected device to register the user information on it.
-
When card registration is complete, tap OK at the top right of the screen.
Secure Credential Card
User information (card ID, PIN, fingerprint template, and face template) can be stored on the card.
-
Tap Credential → Card.
-
Tap at the top right of the screen.
-
In Card Type, select Smart Card and tap Yes.
-
In Device, select the device to register the card, and then tap Yes.
The card layout set on the selected device appears in Card Layout Format.
-
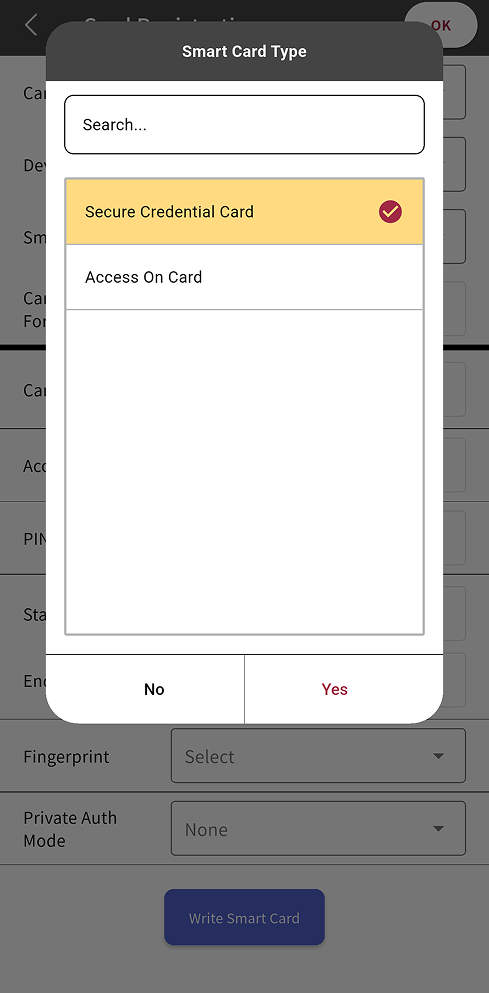
Tap Smart Card Type, select Secure Credential Card, and then tap Yes.
-
(Optional) To add fingerprint authentication, tap Figerprint and select an enrolled fingerprint.
-
To register the card, tap Writes Smart Card.
-
Hold the card up to the selected device to register the user information on it.
-
When card registration is complete, tap OK at the top right of the screen.
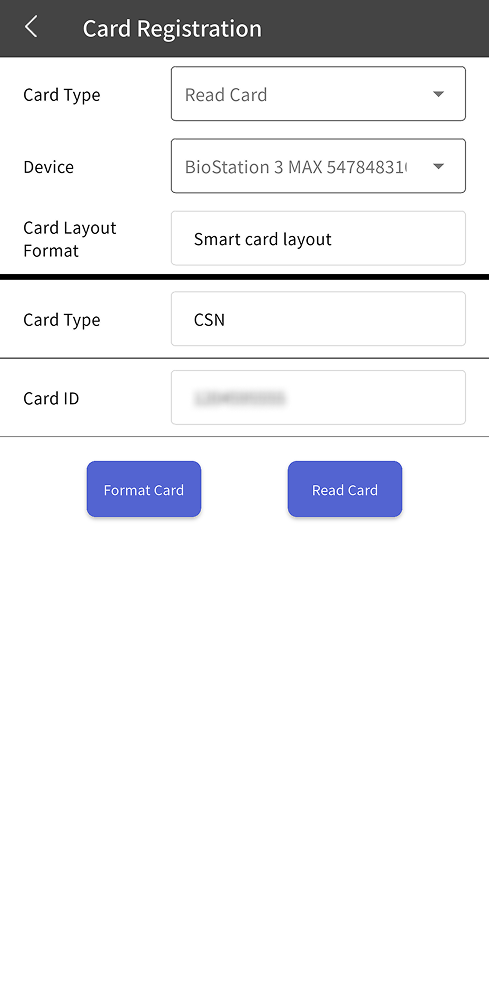
Read Card / Format
You can format smart cards and rewrite information.
-
Tap Credential → Card.
-
Tap at the top right of the screen.
-
In Card Type, select Read Card and tap Yes.

-
In Device, select the device to read the card, and then tap Yes.
The card layout set on the selected device appears in Card Layout Format.
-
Tap Read Card and hold the card up to the device to scan it.
-
After you check the card information, tap Format Card to format the card.
Custom smart cards cannot be formatted.
Complete user registratioin
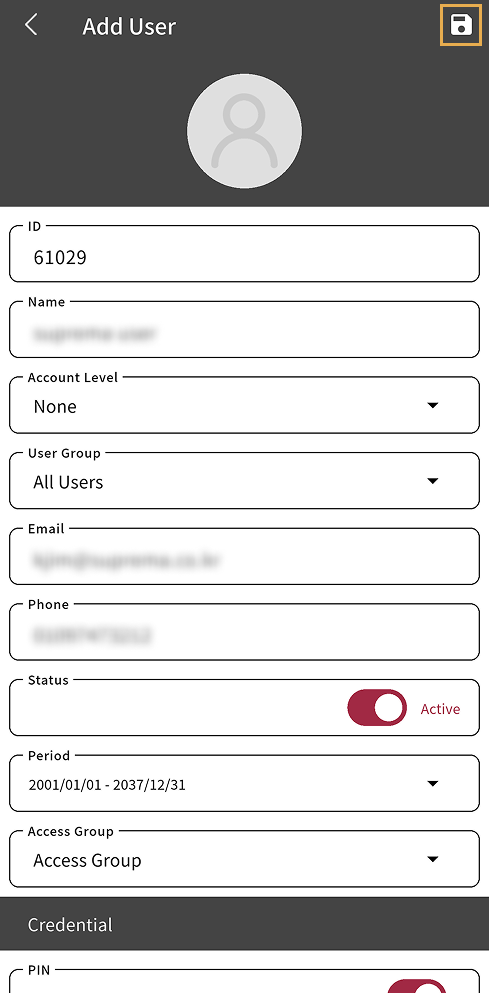
After you set the user's basic information, permissions, and credentials, tap at the top right of the screen to complete user registration.
-
In the Credential section, you can check the number of enrolled credentials for each credential.
-
To delete a enrolled credential, tap the credential to delete, then tap at the top right of the screen. Select the credential to delete, then tap OK.
For more information about registering and managing users in BioStar X, refer to User.
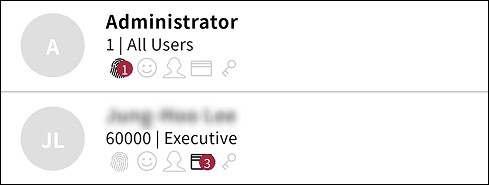
Check user information
You can check registered users in the user list. Each user includes the following information.
-
User name
-
User ID | User group
-
Enrolled credential information: Fingerprint / IR face / Face / Card / PIN