Getting Started
The BioStar X mobile app is available on iOS and Android. Install the app by following the instructions, then connect to the BioStar X server.
Download the BioStar X Mobile app
Download the app using the links or QR codes below.
| Platforms | Download link | QR code |
|---|---|---|
| iOS | App Store |  |
| Android | Google Play |  |
App permissions
The BioStar X mobile app requests the following permissions when certain features are used. It does not request permissions during initial installation.
| Permission | Required | Purpose |
|---|---|---|
| Storage | Optional | Required to manage and upload user images, such as gallery or device storage images. |
| Camera | Optional | Used to capture images for facial credential enrollment and video recording. |
| Biometric | Optional | Required for secure login using fingerprint or facial authentication on a mobile device. |
All permissions are optional, and users can deny them without affecting the app's basic features.
Starting the app and initial setup
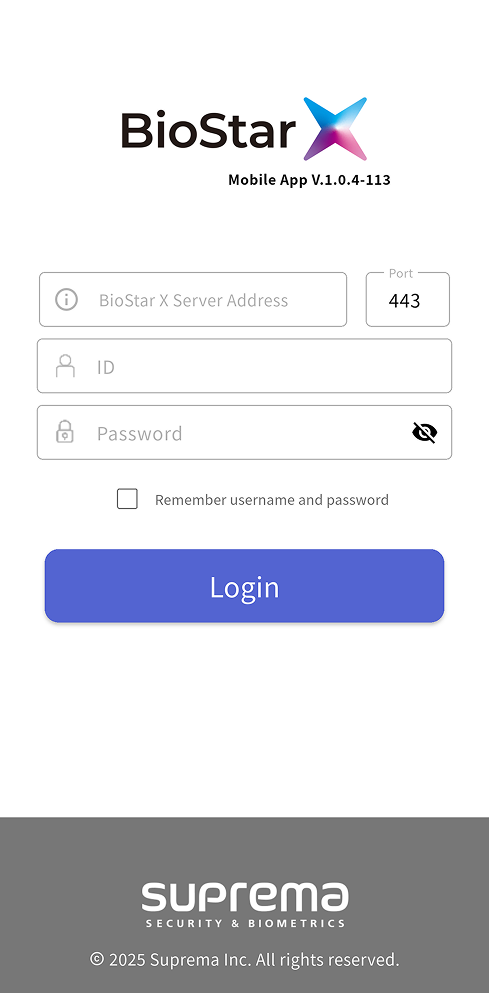
When the app starts, a screen appears where you enter information to connect to the BioStar X server.
-
BioStar X Server Address: Enter the IP address or domain address of the BioStar X server.
-
Port: Enter the port number of the BioStar X server. The default is
443. -
ID / Password: Enter your ID and password to log in to the BioStar X server.
After entering all required information, tap Login to sign in.
-
To save the account ID and password in the input fields, select the Remember username and password checkbox. The entered ID and password are automatically filled in on the next login.
-
For information on the BioStar X server IP address and port number, see Server Detailed Settings.
Connection troubleshooting
If login fails, check the following:
-
Check that the BioStar X server address and port number are correct.
-
Check that the account ID and password are correct.
-
Check whether the mobile device and BioStar X are connected to the network.
Access from an external network requires a public IP address. Otherwise, purchase an additional Remote Access license. For more information, see Before You Start.
Using the app
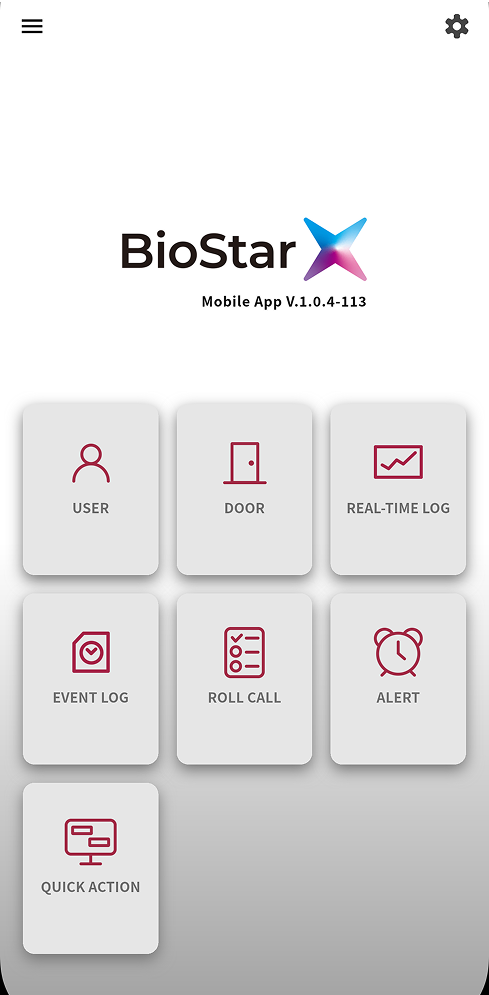
After login succeeds, the BioStar X mobile app home screen appears. On the home screen, view registered users, doors, real-time logs, event logs, and alerts. You can also access the side menu and settings menu.
-
: Opens the side menu. In the side menu, change the password or log out, and access the main menus.
-
: Opens the settings menu. For more information on app settings, see Set Up the App.
-
USER: View the list of registered users and manage users. For more information on user management, see Manage Users.
-
DOOR: View the list of registered doors and control them remotely. For more information on door management, see Manage Doors.
-
REAL-TIME LOG: View real-time access event logs. For more information on real-time log monitoring, see Real-time Log Monitoring.
-
EVENT LOG: View all event logs stored on the BioStar X server. For more information on log lookup, see View Past Event Logs.
-
ROLL CALL: In the event of an emergency, the user can determine whether they have arrived at the roll call location by authenticating through entry or exit devices at a pre-designated location. The Roll Call feature is available through an add-on option with an Advanced license or higher. For more information on the Roll Call feature, see Getting Started with Roll Call.
-
ALERT: View alerts for doors, devices, and advanced access control. For more information on alerts, see Alert Settings.
-
Quick Action: This feature lets you easily control multiple door operations during an emergency. You must create Quick Actions in the BioStar X web interface before using them in the mobile app. For more information about the Quick Action feature, see Use Quick Actions.
All features are also accessible through the side menu ().