Integrate with a Customer API
Customer API integration is an access method where CLUe sends recognized credential data, such as a face, fingerprint, RF card, PIN, CLUe QR, or custom QR, to an external API operated by the customer. Access is then allowed or denied based on the response. This method lets you apply customer-specific policies, such as access permissions, attendance, and visitor management, directly to CLUe access control without extra development.
CLUe only identifies credentials and sends them to the customer API. The customer API response determines whether access is allowed.
Before you start
Audience
This document is for place group administrators and place administrators.
-
Place group administrator: Register, edit, and delete customer APIs, map credential types to APIs, and apply settings to sub-places.
-
Place administrator: Review settings inherited from the place group and apply place-specific overrides when needed.
This document is for IT administrators familiar with HTTPS, HTTP status codes, Webhooks (HTTP POST), JSON, and JSONPath. Coordinate the customer API spec, including the URL, authentication header, and request/response JSON structure, with the customer contact in advance.
Prerequisites
-
To access this menu, the target place group or place must invite you as an administrator.
-
Prepare the customer’s authentication Webhook URL in advance (HTTPS required, HTTP POST received) and the required authentication header values.
Key terms
| Term | Description |
|---|---|
| Customer API integration | An access method that sends credential data to an external API operated by the customer for validation when a user presents a credential to the device. |
| Credential | Face / Fingerprint / RF card / User PIN / CLUe QR / Custom QR |
| Webhook URL | An HTTPS endpoint that the customer server opens to receive authentication requests from CLUe via HTTP POST with Content-Type: application/json. |
| Request Header | A Key/Value pair sent with the request for authentication and authorization. (Example: Authorization token) |
| Auto Fields | A value the system fills into the request body automatically. Select only the required fields. |
| Manual Fields | A fixed value that the administrator enters directly into the request body. |
| Judgment Criteria | A set of rules that interprets the customer response as access allowed or denied, including statusCode, success result Key/Value, and success/failure message keys. The screen shows this as the Response Parsing section. |
| Judgment Mode | An element that configures the judgment criteria. Select one of these options: HTTP response code only, response body field only, or a combination of both. |
Customer API integration
Customer API integration is an access method that sends credential data recognized by the CLUe device to a customer-operated HTTPS API and decides whether to allow or deny access based on the response. This lets you directly apply customer-specific policies, such as access permissions, attendance, and visitor management, to CLUe access control.
-
You can connect a different customer API for each credential type, such as face, fingerprint, RF card, PIN, CLUe QR, and custom QR.
-
Before saving the registration, verify the integration with a test call.
-
CLUe only identifies and sends credentials. The customer API response determines the actual allow or deny decision.
Supported credentials
-
Face
-
Fingerprint
-
RF Card
-
User PIN
-
CLUe QR
-
Custom QR
Roles of place groups and places
| Level | roles | Responsibilities |
|---|---|---|
| Place group | Place group manager | Register, edit, and delete customer APIs, and connect APIs to credentials |
| Place | Place administrator | Review inherited settings and apply place-specific overrides when needed |
Application rules
-
Saved at the place group level: The same settings apply immediately to all sub-places in the place group. Existing place-specific overrides are overwritten by the place group values.
-
Saved at the place level: Applies only to that place. Does not affect other places or the parent place group.
Main workflow
Customer API integration has two main workflows. The setting workflow that administrators perform first, and the access event workflow that runs when a user actually tries to access.
Setting workflow overview
The steps that the administrator performs. Each step is described in detail starting in Chapter 4.
-
(Place group) Select the access method.
-
Vendor or Mixed / Advanced Method
-
The Customer API Integration entry becomes active in the left sidebar.
-
-
(Place group) Register the API in Customer API Integration.
Basic info → Custom header → Auto field → Manual field → Run test → Configure response parsing → Save
-
(Place group) Connect the registered API to each credential.
When you save, the same settings apply automatically to all sub-places.
-
(Optional) Set a place-specific override.
Applies only to the selected place. By default, the place group settings remain in effect.
Access event workflow overview
This is the sequence that runs after setup when a user actually tries to access.
-
The user presents a credential to the device. (Face / Fingerprint / RF card / PIN / CLUe QR / Custom QR)
-
The device sends a verification request to the CLUe server.
-
The CLUe server sends a verification request to the customer server.
Includes the registered Webhook URL, custom header, auto fields, and manual fields
-
The CLUe server decides access based on the customer response.
The configured judgment criteria determine whether access is allowed or denied.
-
The system returns the result to the device.
If the response includes a message, it appears on the device screen.
Setting workflow
Step 1 — Enable customer API integration
-
Log in to the CLUe web portal.
-
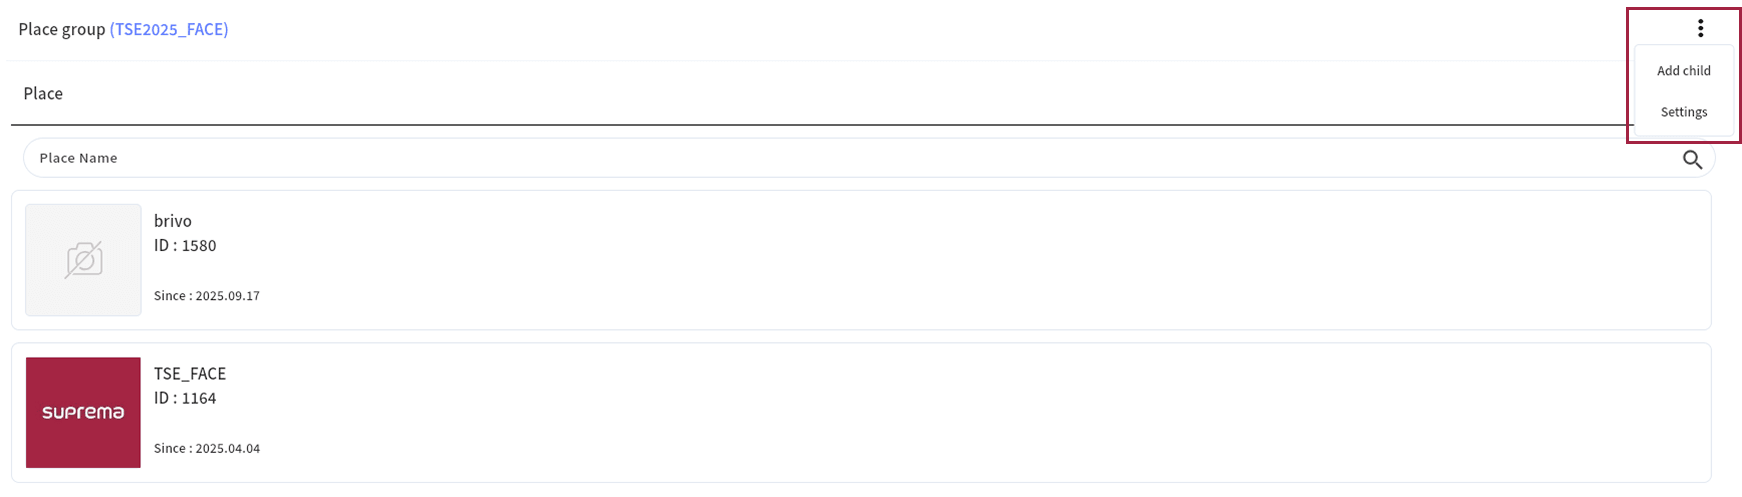
Select the place group.
-
Click → Settings in the upper right of the screen.
-
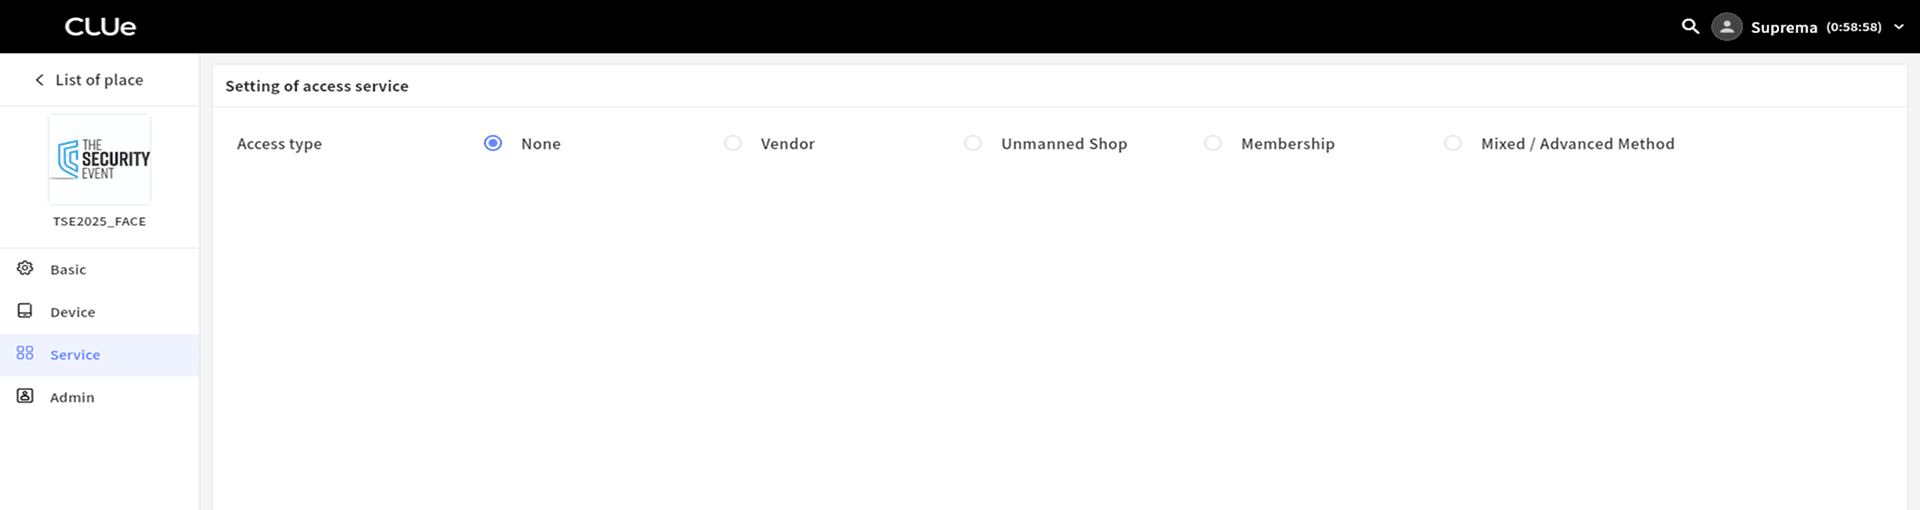
Click Service in the left sidebar of the screen.
Initially, Access type is set to None. In this state, no settings are active.
-
Under Access type, select Vendor.
-
The Verify vendor section appears.
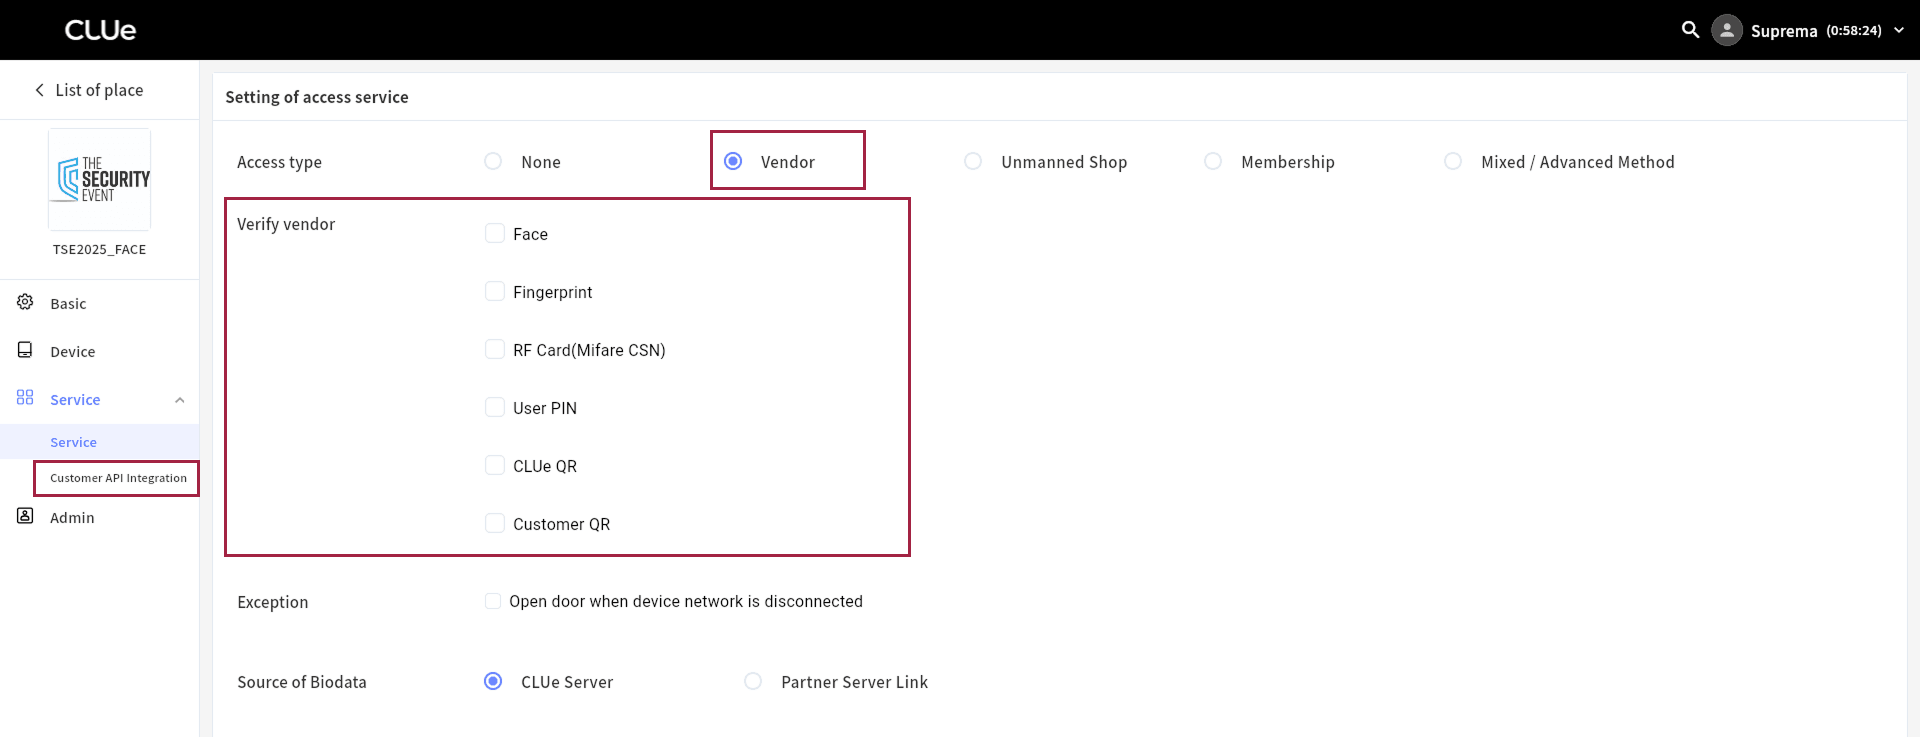
The Verify vendor section shows all six supported credentials. Then connect the customer API registered for each credential.
-
When Customer API Integration becomes active in the left sidebar, click it.
-
Customer API Integration becomes active when Access type is set to Vendor or Mixed / Advanced Method.
-
No save is required at this step. To register the API to connect, see #vendorApiregistration.
Step 2 — Register customer API
Add API
-
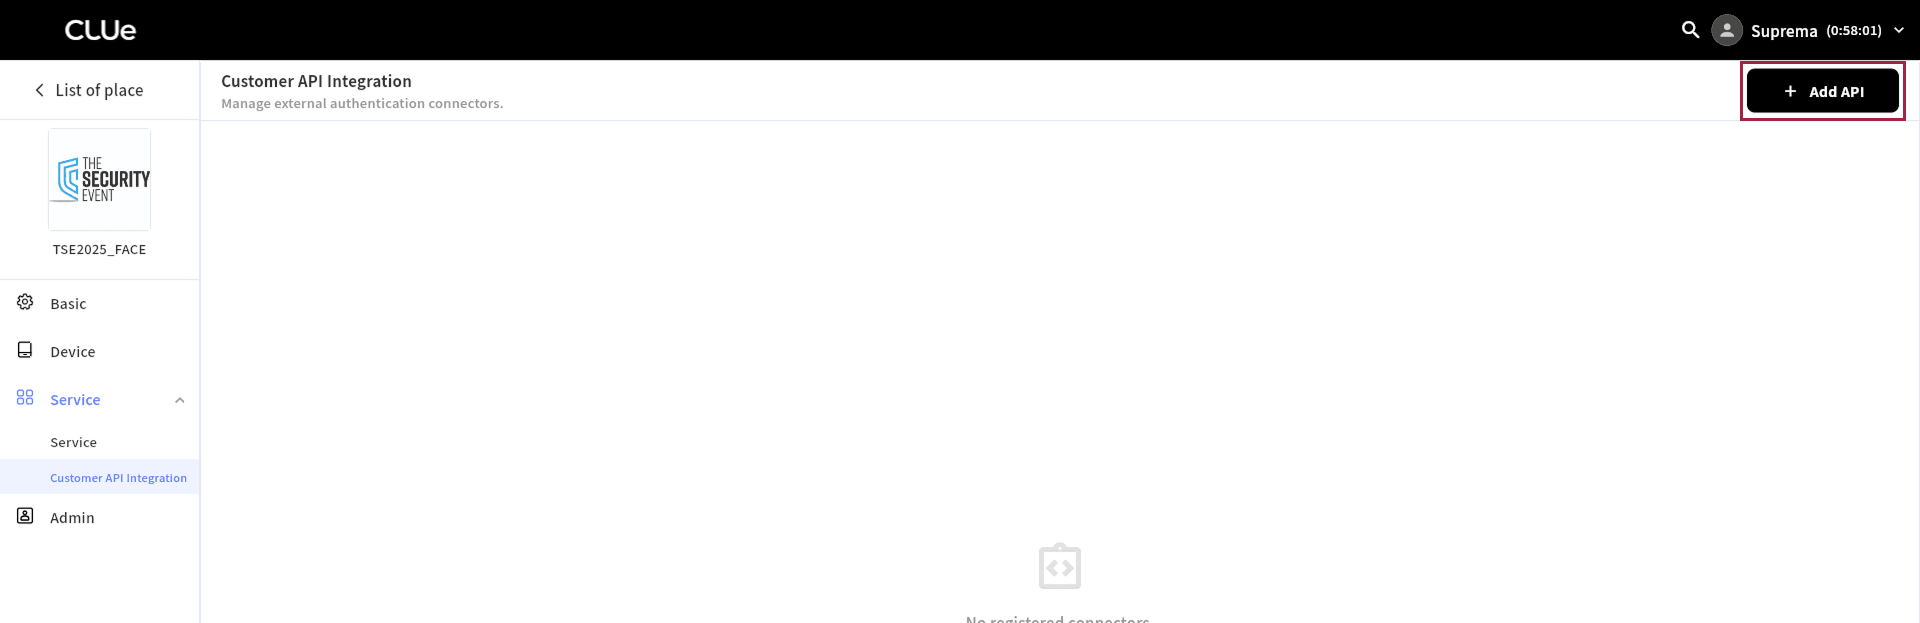
Click the Add API button at the top right of the screen.
-
When the Add API panel appears, enter the required information.
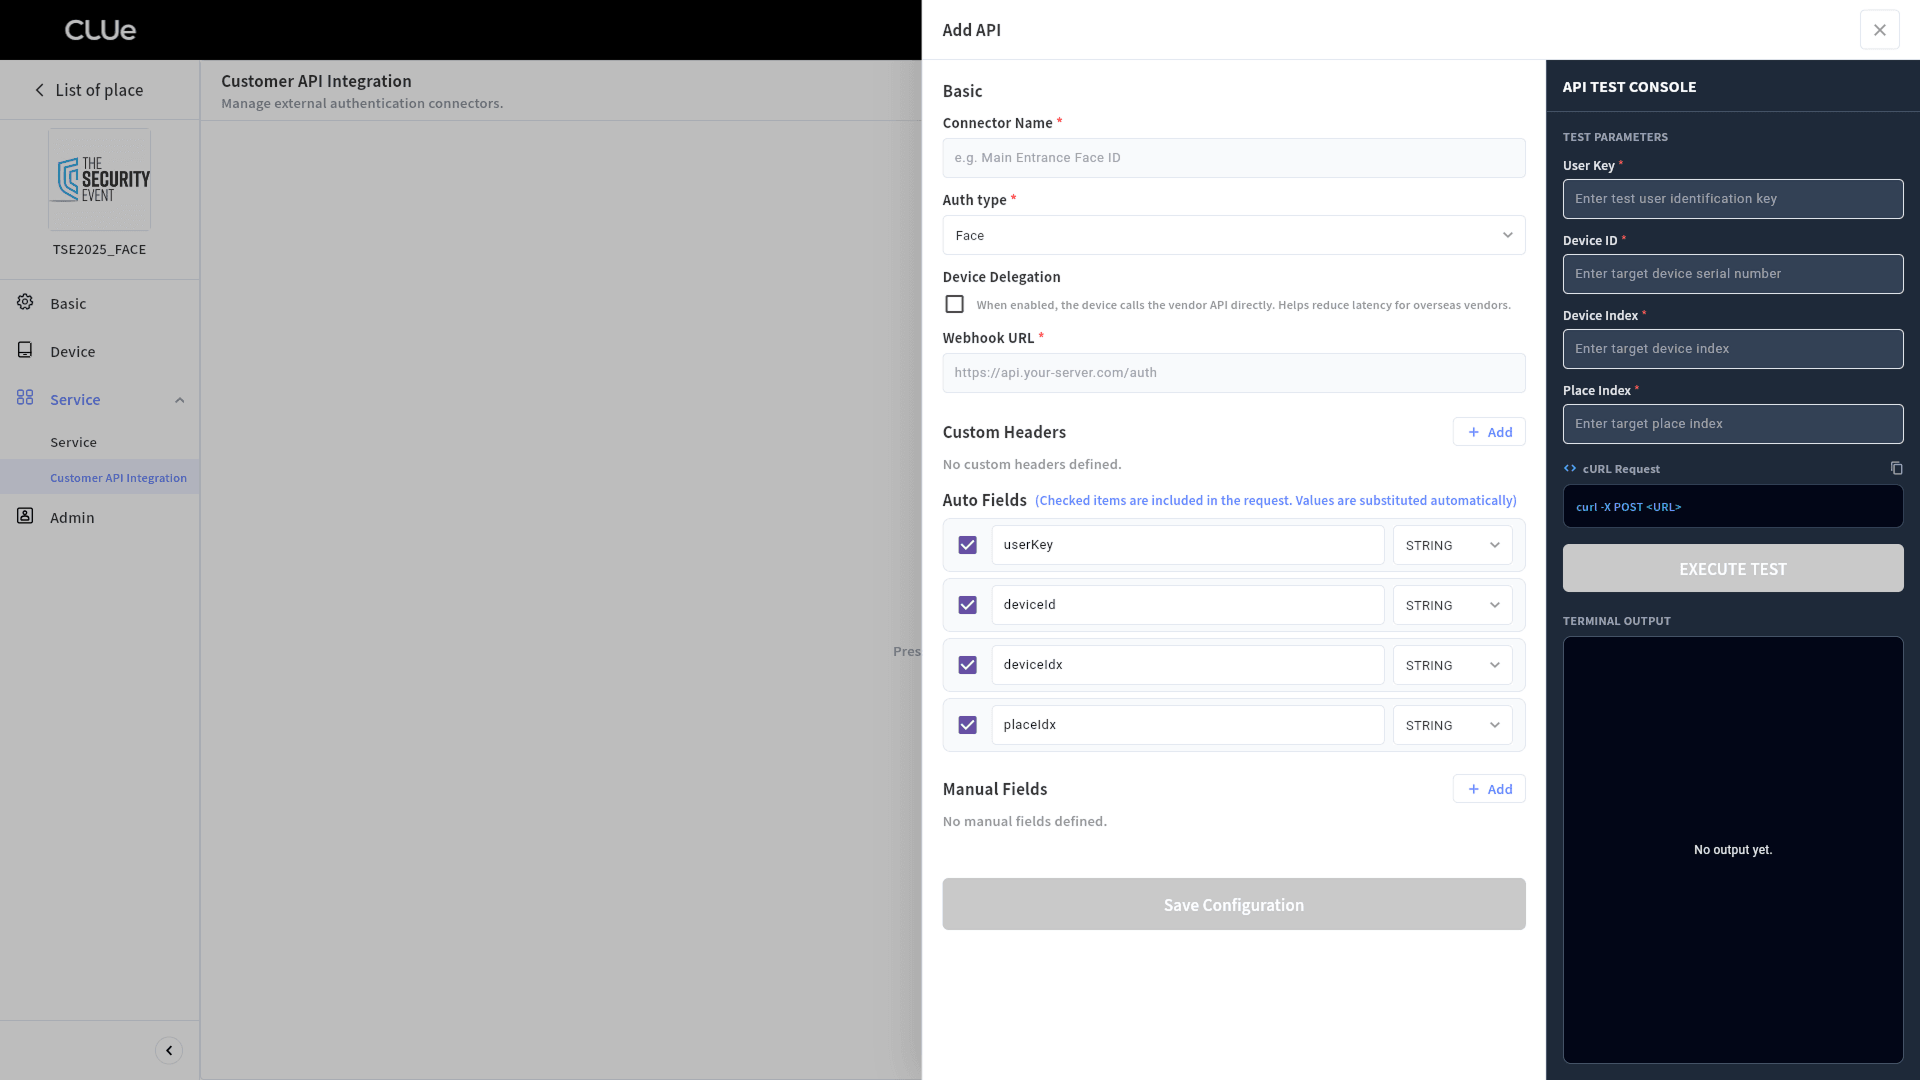
Enter basic information
| Field | Description | Required | Input rule |
|---|---|---|---|
| Connector Name | Enter a name to identify this integration. | Yes | Up to 64 characters. |
| Auth type | Select the credential that will use this API. | Yes | Select one of the six types. |
| Webhook URL | Customer Webhook URL. | Yes | Must start with https:// and can be up to 512 characters. http:// URLs cannot be saved. |
Auth type cannot be changed after it is set once. To use it for a different credential type, register a new API.
Request spec
CLUe sends only HTTP POST requests with Content-Type: application/json to the registered URL. The customer API must accept requests in this format. Endpoints that allow only other methods, such as GET or PUT, are not supported.
Response spec
The customer API must include Content-Type: application/json in the response header and return the response body in JSON format. CLUe cannot parse non-JSON responses, such as HTML error pages, plain text, or XML. Test and live access verification both fail.
{
   "valid": true,
   "message": "Access granted."
}
In the example above, set the judgment criteria Key to $.valid and Value to true (BOOLEAN) to define the success condition, and set Success Message JSONPath to $.message to show the success message. Match the actual key names and structure to the customer API spec.
Registration limit
You can register up to 3 APIs per credential type. In other words, you can register up to 18 APIs per place group across the six types: face, fingerprint, RF card, PIN, CLUe QR, and custom QR. You cannot register more for a credential type that already has 3 APIs. Select the API that each credential actually uses in #credentialApiAssignment.
Add custom headers
Add custom headers if the customer API requires Authentication or Authorization headers.
Example:
Authorizationtoken, API key
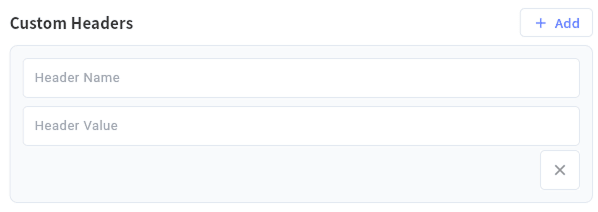
| Field | Description |
|---|---|
| Header Name | Enter the header name, such as Authorization. Duplicate names are not allowed. |
| Header Value | Enter the header value. |
-
You can add up to 10 custom headers.
-
Leave this section blank if the customer API is a public endpoint or does not require separate headers.
-
To insert a row, click the Add button. To delete one, click the button.
Fixed headers cannot be configured
Content-Type and Accept cannot be added as custom headers. CLUe sends Content-Type: application/json and Accept: application/json as fixed values internally, so the administrator does not need to set them separately. If you try to add a header with this name, the system does not save it. The customer API should be designed with these two headers in mind.
Select auto fields
Auto Fields are values that the system fills into the request body automatically. Available auto fields vary by credential type. The location of each field value appears as a {{...}} placeholder, and the system replaces it with actual device or user values at request time.
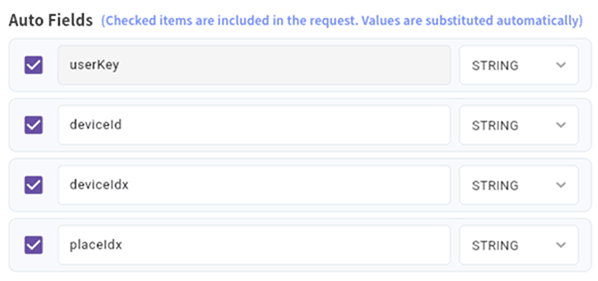
| Default key | Placeholder (value location) | Available for | Actual value |
|---|---|---|---|
deviceId | {{DEVICE_SERIAL}} | All credential types | The serial number of the requested device |
userKey | {{USER_KEY}} | Face / Fingerprint / CLUe QR | The user identifier managed by CLUe |
rfCard | {{CARD_NUMBER}} | RF Card | Presented card number |
uniquePin | {{UNIQUE_PIN}} | User PIN | Entered PIN value |
qrCode | {{QR_CODE}} | Custom QR | QR payload |
Field selection rules
-
Use the checkbox on the left of each field to decide whether to include it in the request.
-
You do not need to select all of them. Select only the values the customer API actually needs for judgment. Reducing unnecessary data makes troubleshooting easier.
-
You can edit the key field name. Change it to match the name required by the customer API, such as
userKey → employeeId. The system fixes the placeholder location value, so you cannot change it. -
The data type for each field, such as
STRING, appears to the right of the field.
-
You cannot add placeholders beyond these five. If the customer API requires additional values, see #manualField to add fixed values, or coordinate with the customer so they derive them from the device serial number or user key.
-
You can include up to 10 fields in the request body, combining auto fields and manual fields. The more auto fields you select, the fewer manual fields you can use.
Add manual field
Add manual fields when the customer API requires fixed values in the request.
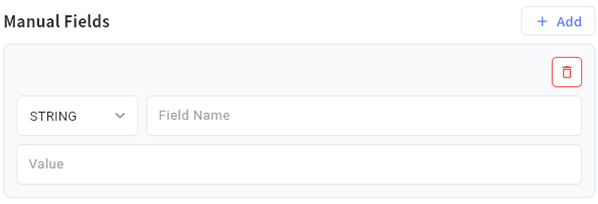
| Field | Description |
|---|---|
| Field Name | Field names must be unique and must differ from auto field names. |
| Field type | Select STRING, NUMBER, or BOOLEAN. |
| Value | Enter the value for this field. The system converts it to the appropriate JSON data type based on the selected type. Example: NUMBER: 123, STRING: "123", BOOLEAN: true/false |
-
You can include up to 10 fields total, combining auto fields and manual fields.
-
If no manual fields are added, the No manual fields defined. message appears.
-
To insert a row, click the Add button. To delete one, click the button.
Run API test
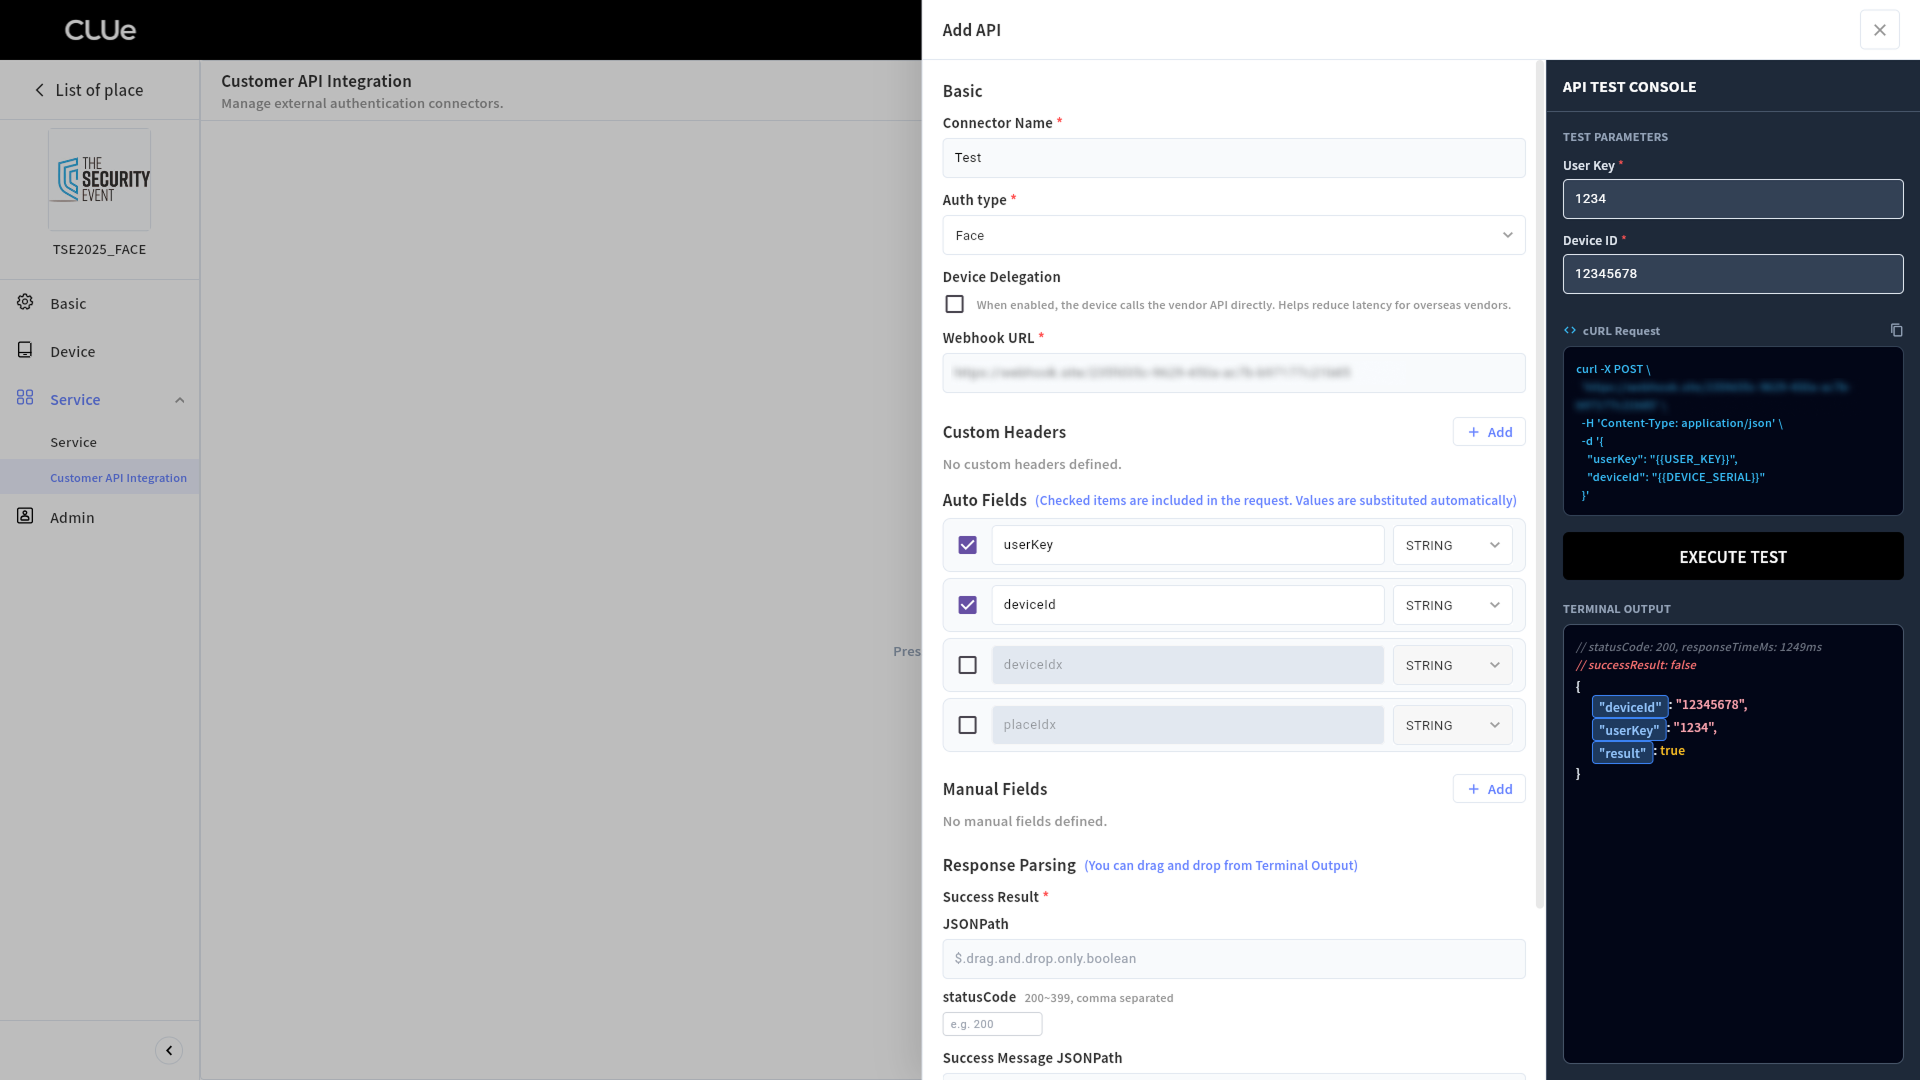
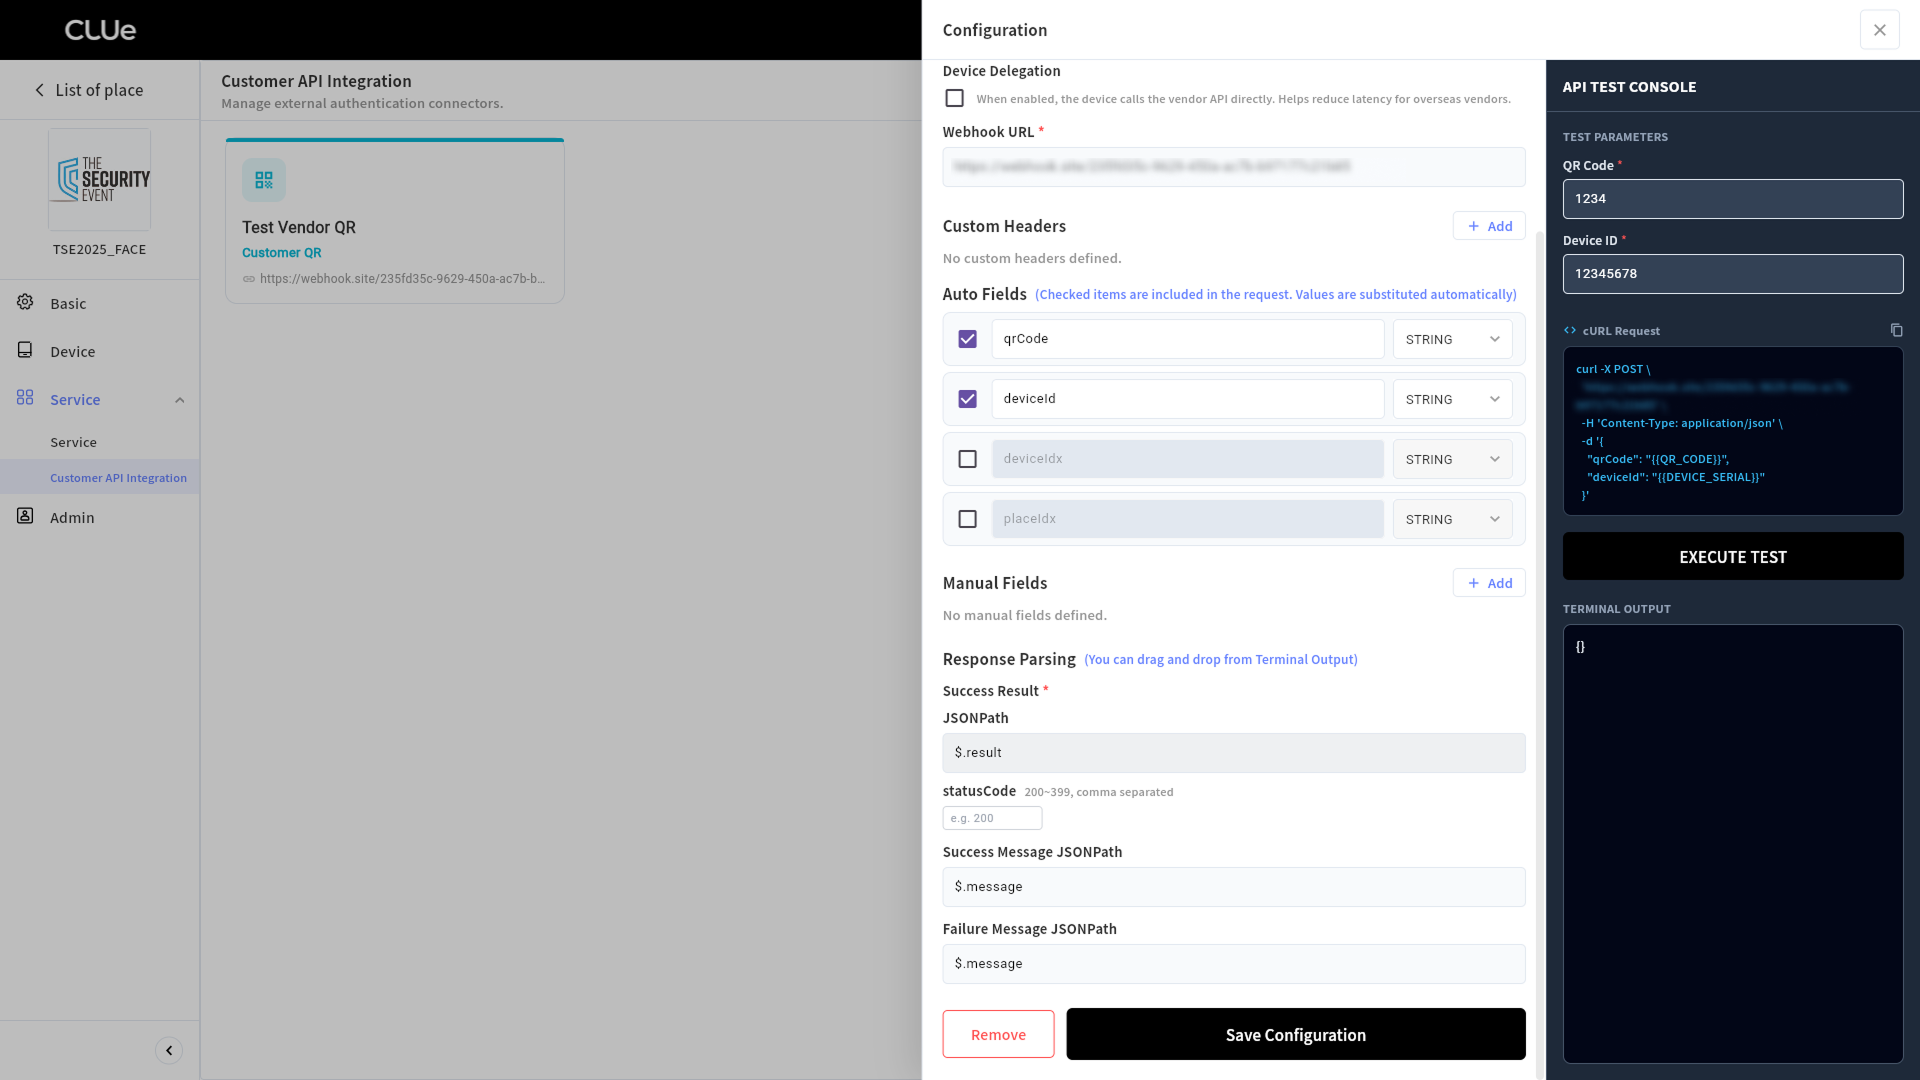
After you finish basic info, custom headers, auto fields, and manual fields, run a test before configuring the judgment criteria. The actual response from the test is required to configure the judgment criteria (#responseParsing).
Use API TEST CONSOLE on the right side of the Add API panel.
Test parameters
The input fields shown in the test console vary by credential type. Device ID (device serial number) is required for all types. Enter the remaining values in the same format the customer manages for that credential type.
| Authentication method | Value to enter | Matching placeholder |
|---|---|---|
| All types | Device ID — 9 to 12 digits, device serial number | {{DEVICE_SERIAL}} |
| Face / Fingerprint / CLUe QR | User Key — 1 to 64 characters, the user identifier managed by CLUe | {{USER_KEY}} |
| RF Card | The card number managed by the customer | {{CARD_NUMBER}} |
| User PIN | The user PIN managed by the customer | {{UNIQUE_PIN}} |
| Custom QR | The QR payload managed by the customer | {{QR_CODE}} |
Values entered in the test console replace the auto-field placeholders and are sent as the actual request body. For testing, enter values that actually exist in the customer database to verify both allow and deny responses. In a live environment, the values recognized by the device are filled in automatically.
Run test
-
Click the EXECUTE TEST button at the bottom of the console.
-
A progress indicator appears while the test runs.
-
When results arrive, the request and response details appear in the TERMINAL OUTPUT console area.
If you close the panel or move to the previous step while it runs, the test stops.
When the response arrives successfully, move to the next step and configure the judgment criteria based on the response. If URL, header, or field settings prevent a response, review the values and test again.
Required before saving
The Save Configuration button activates after at least one successful test. Here, success means receiving an HTTP response of any kind from the customer server, including 4xx and 5xx responses. If a network error prevents a response, you cannot save.
Test failure example — when the response body is not JSON
Even if the customer server returns a response, the test console shows an error and failure log if the body is not JSON or if the response header Content-Type is not application/json. The Save Configuration button does not activate.
Using #responseSpec, check with the customer contact that the API meets both conditions below.
-
The response header includes
Content-Type: application/json -
The response body is valid JSON, not an HTML error page, plain text, or XML
Configure response parsing
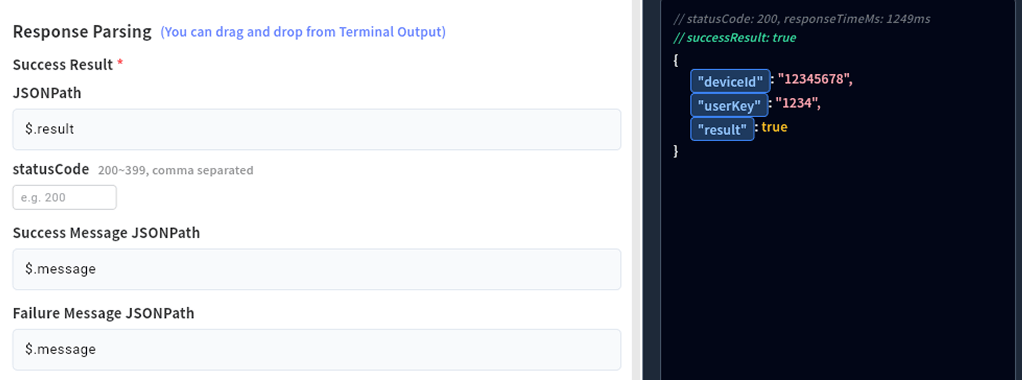
Based on the response you receive, define which response counts as access allowed at this step. Responses that match the configured criteria are allowed. All others are denied.
The judgment mode is determined automatically based on the fields you enter. At least one of statusCode and Success Result JSONPath is required. If you leave both blank, you cannot save.
| # | Mode | Input | Success criteria |
|---|---|---|---|
| 1 | Response code validation | statusCode only | Success occurs when the HTTP status code matches one of the values in the list. |
| 2 | Response body validation | Success Result JSONPath only | Success occurs when the body satisfies the Key = Value condition, regardless of the HTTP response code. If the condition matches, 4xx and 5xx responses are still allowed. |
| 3 | Combined validation | Both | Success occurs when the status code matches and the body condition also matches. If the status code does not match, the system does not evaluate the body. |
statusCode (used in modes 1 and 3)
-
You can specify only integers in the 100 to 399 range. You cannot set
4xxor5xxcodes as success. -
You can specify up to 3 values, and duplicate values are not allowed.
-
If you set multiple values, success applies when any one of them matches, such as
200or201.
Success Result JSONPath (used in modes 2 and 3)
-
Enter the
Key,Value, and data type (BOOLEAN,STRING, orNUMBER) that identify the success response. -
You can set only one success key condition.
-
Responses that do not match this condition are denied.
Success Message JSONPath / Failure Message JSONPath (Optional)
-
Specify the key to extract the string shown on the device for success and failure.
$.messageis commonly used. -
You can save even if you do not specify it. If left blank, the system judges only allow or deny and does not show a message on the device.
-
You can set different keys for success and failure.
-
The value for the specified key must be a string, and it should not be too long for the device screen.
If direct JSONPath input is difficult
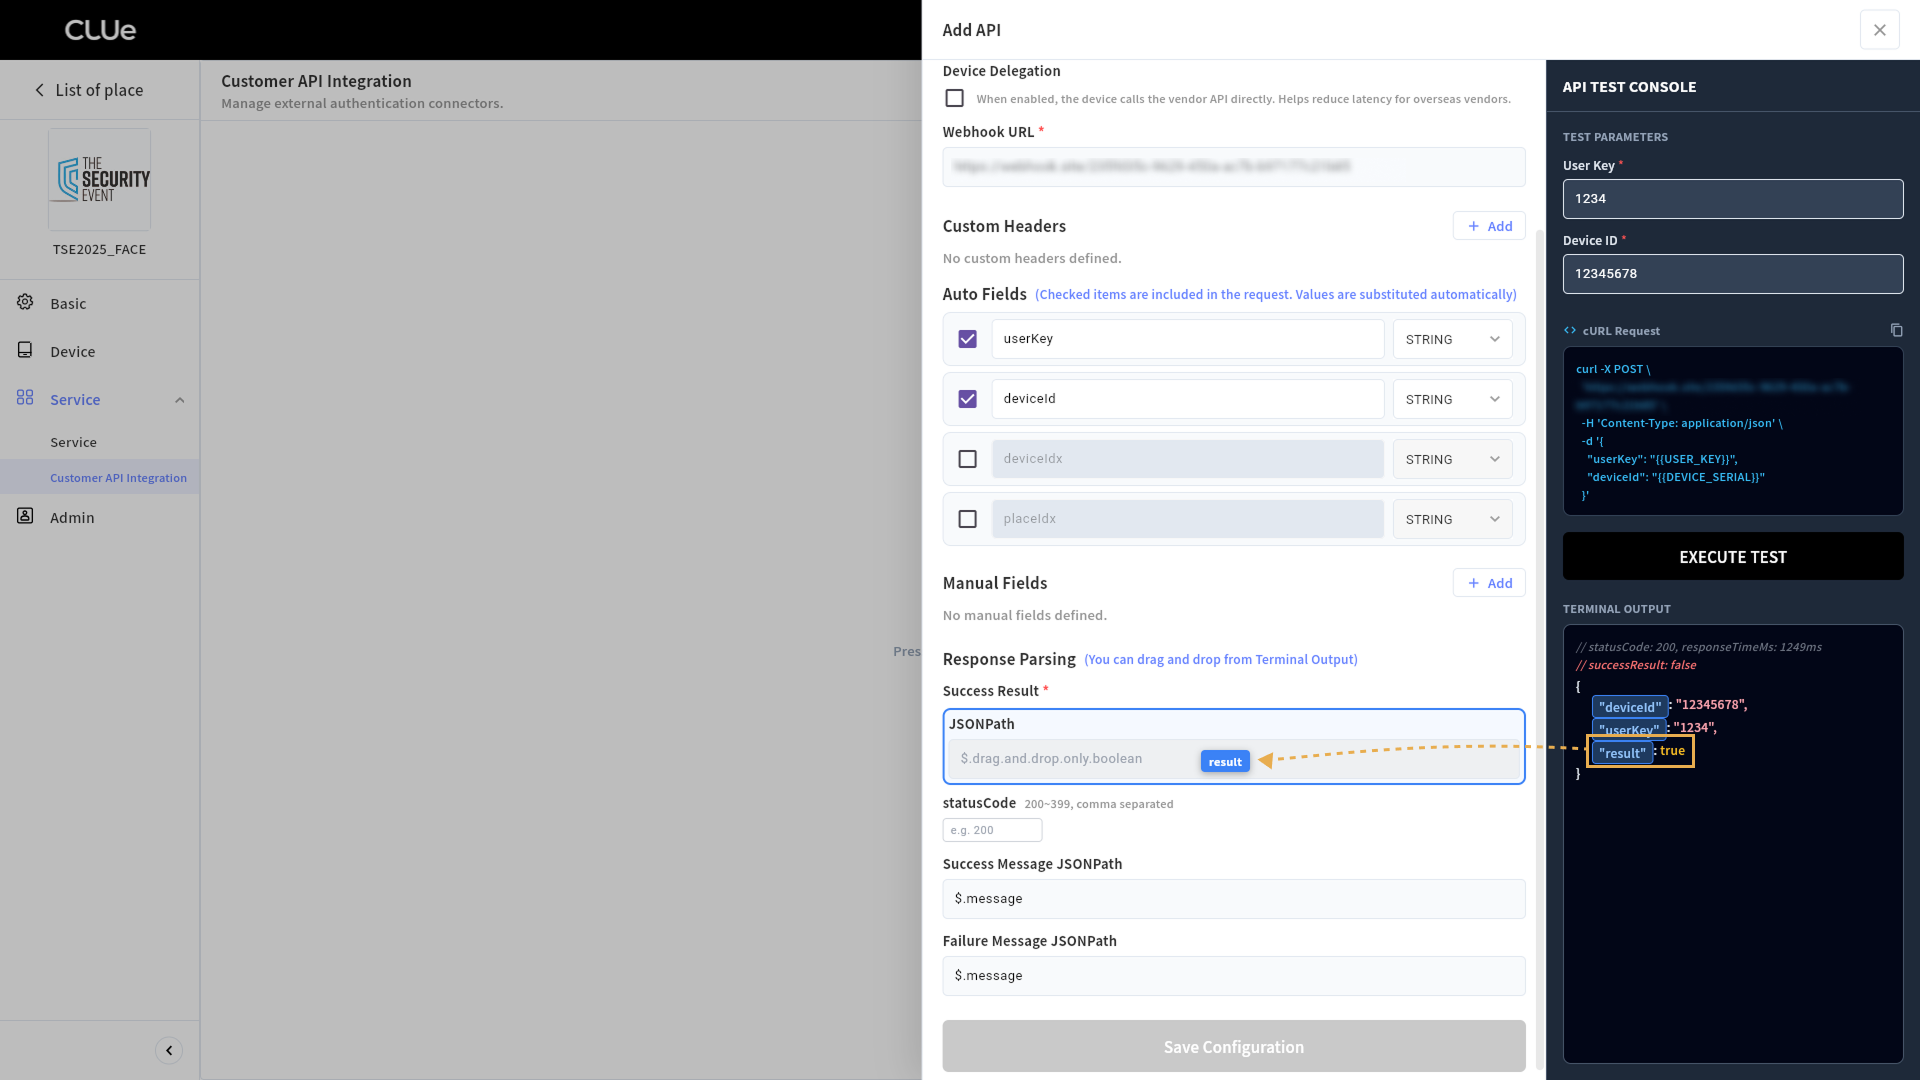
Drag and drop fields from the response area into the Success Result JSONPath, Success Message JSONPath, and Failure Message JSONPath inputs. The JSON path fills in automatically. You do not need to write the JSONPath manually.
Save
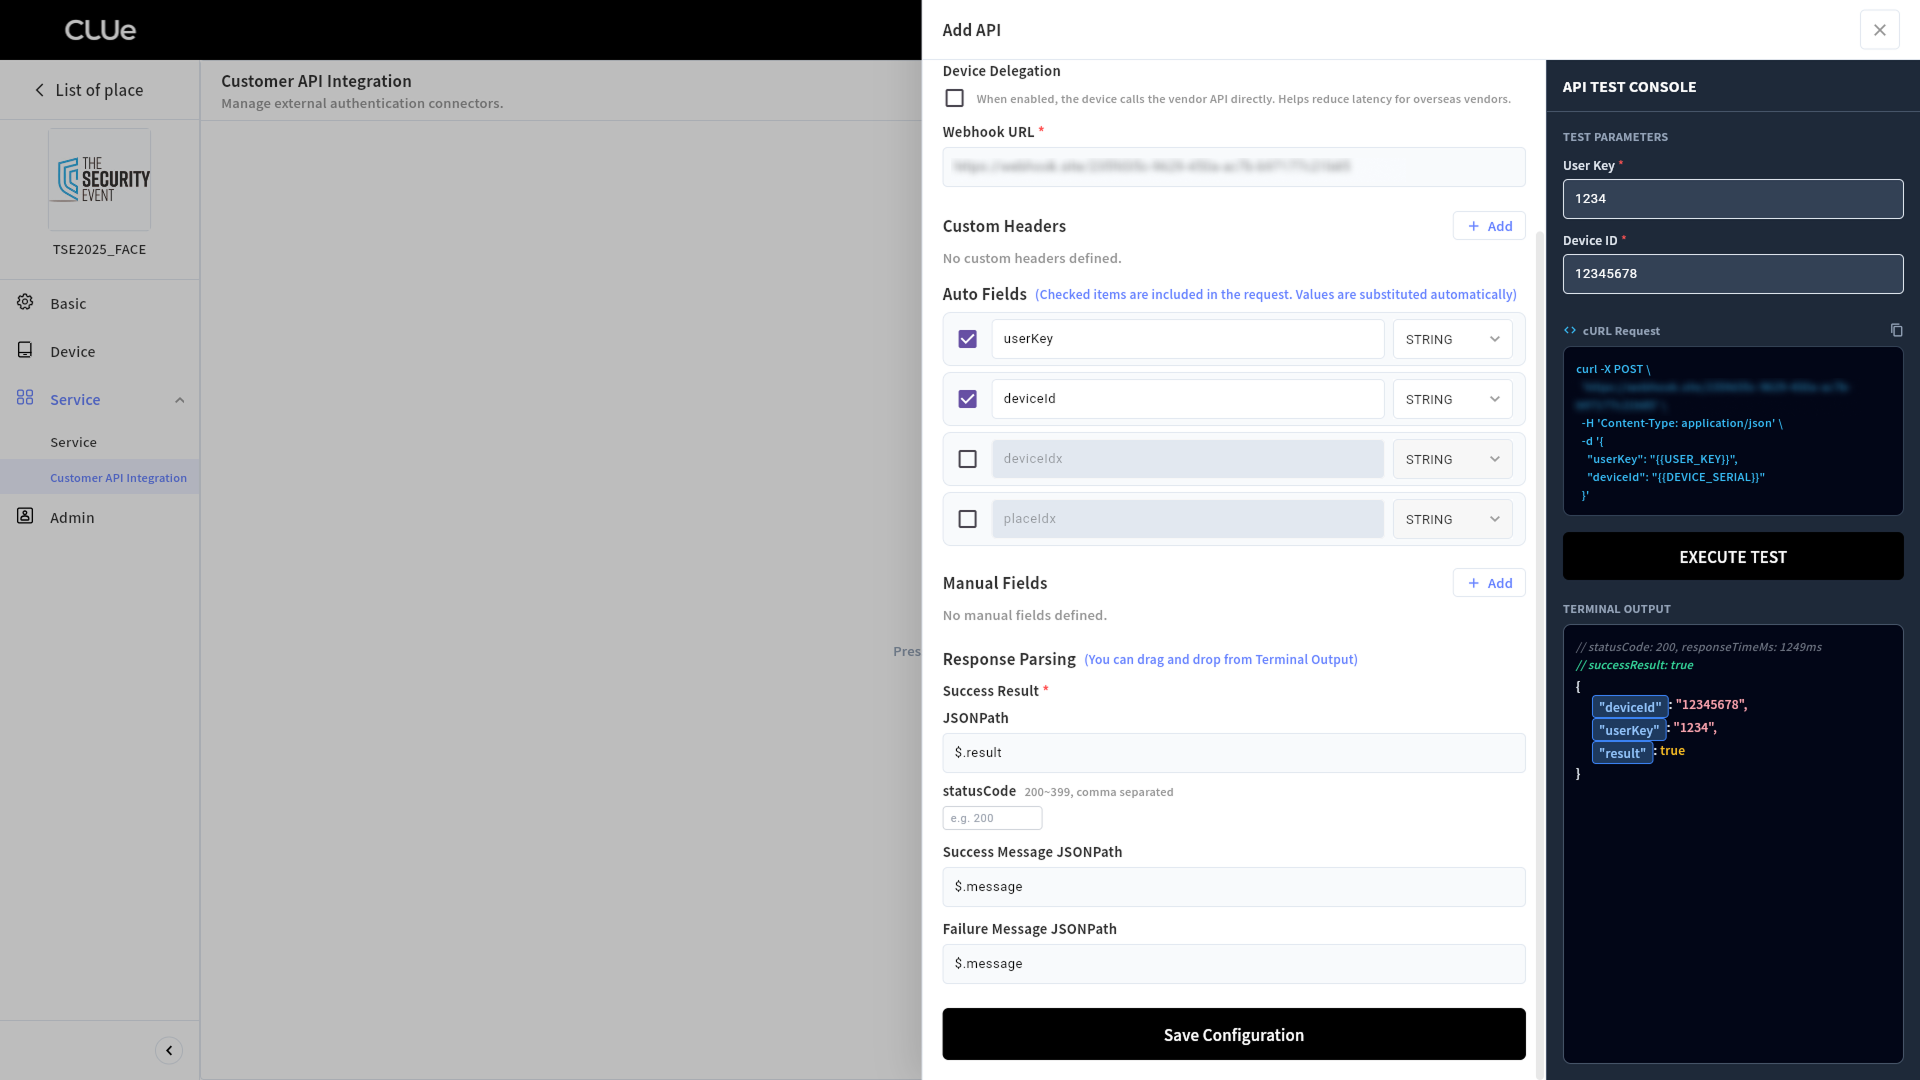
The Save Configuration button at the bottom of the Add API panel activates when all required fields and judgment criteria are entered correctly, and the API test succeeds at least once.
-
If any required field is missing, the URL format is invalid, a manual field value cannot convert to the specified type, judgment criteria are missing, or the test has not succeeded, including network errors, the Save Configuration button remains disabled.
-
To complete the registration, click the Save Configuration button.
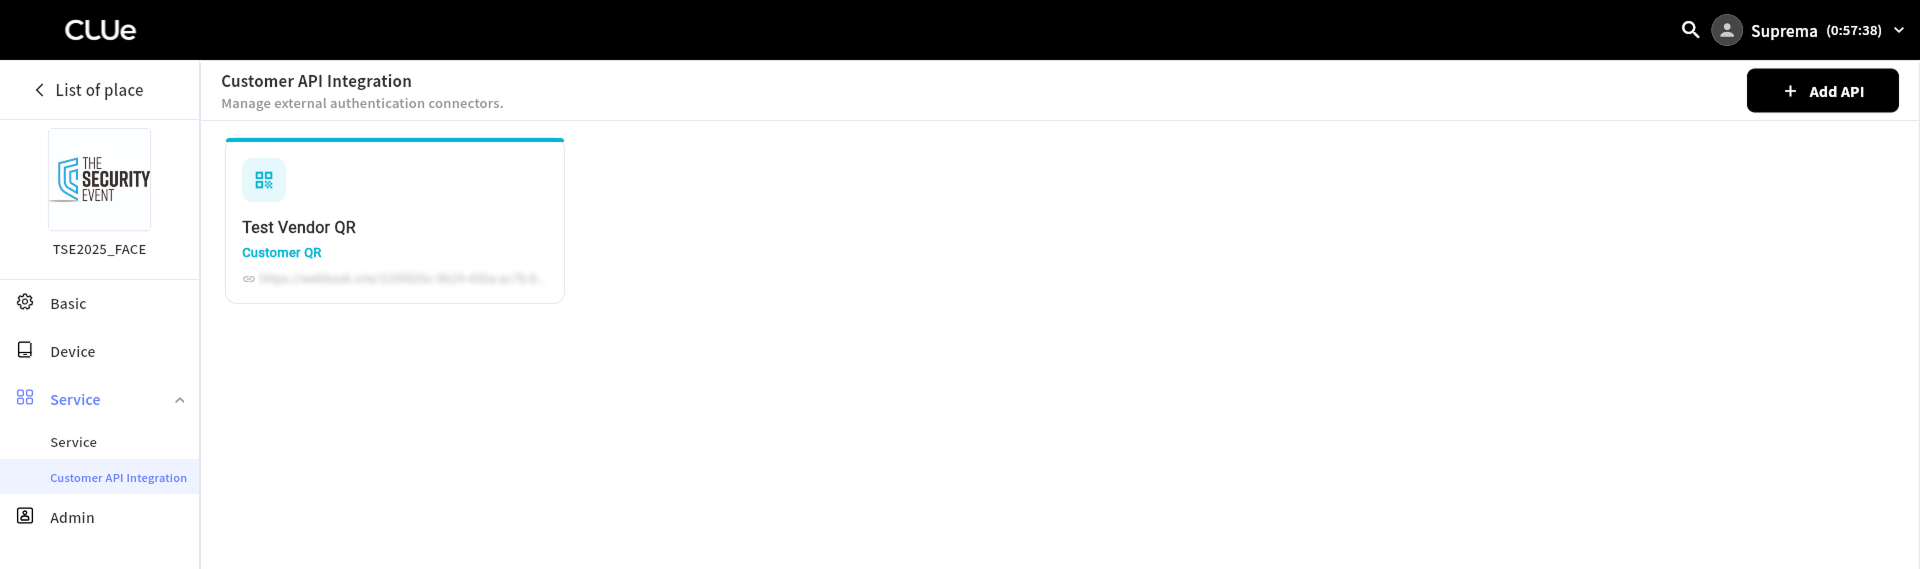
When you save the API, the panel closes and the newly registered API appears in the list as a card. The card shows information such as the name, credential type, and registered URL.
-
To edit an API, click the card. The edit panel opens. You can edit Connector Name, Webhook URL, Auto Fields, Manual Fields, and Response Parsing. Auth type cannot be changed.
-
Remove: Delete the registered API. If this API was connected to a credential, that connection is removed automatically, and the change applies to the device immediately. A disconnected credential then works with device authentication only, without customer verification. If you worry about an operational gap, register and connect a replacement API before deletion.
Step 3 — Assign APIs to each credential
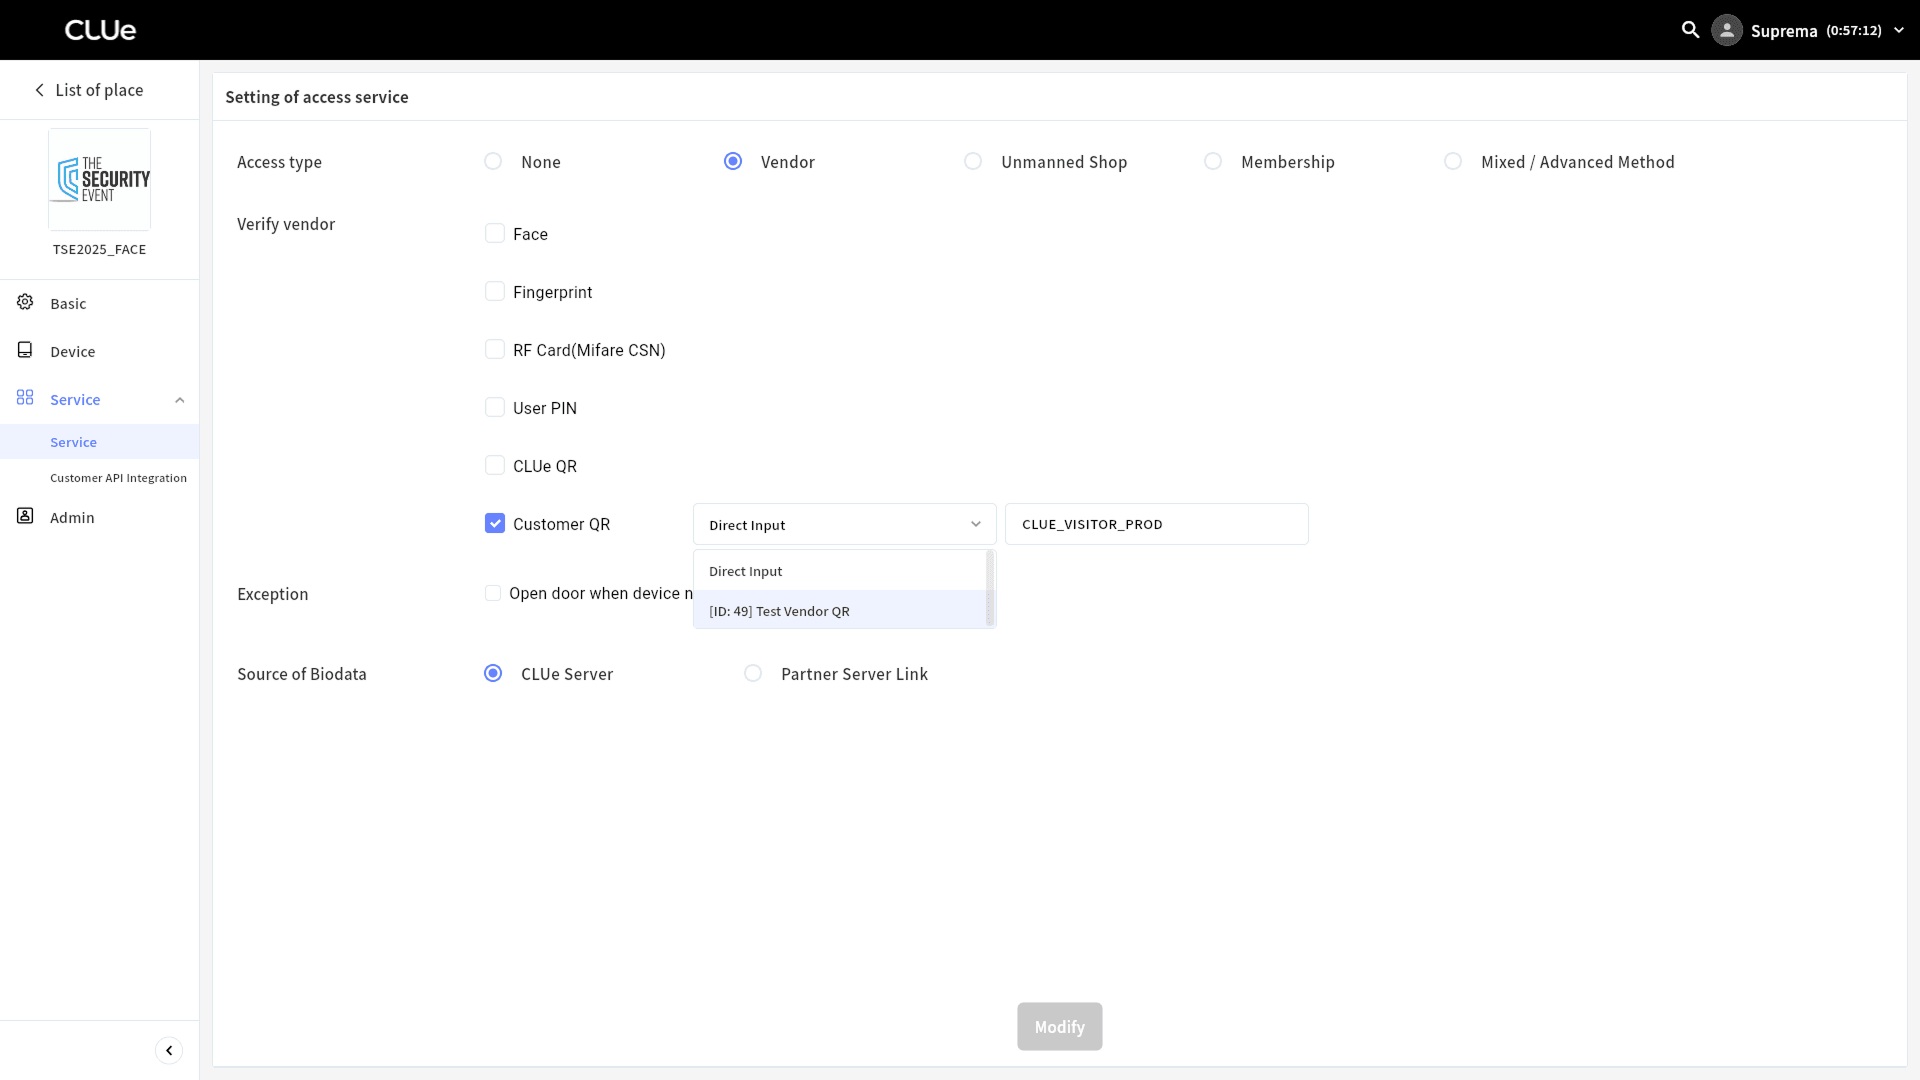
On the left sidebar, click Service → Service. In the Verify vendor section, specify the API for each credential.
-
Click the dropdown next to each credential to show the list of registered APIs. Only APIs that match the selected credential and Auth type appear.
-
For each face, fingerprint, RF card, PIN, CLUe QR, and custom QR credential, select the API to use. You can assign a different API to each credential.
-
A credential without an assigned API works with device authentication only. No verification request is sent to the customer API for that credential. Leave unassigned only the credentials that do not need customer verification.
Save and apply rules
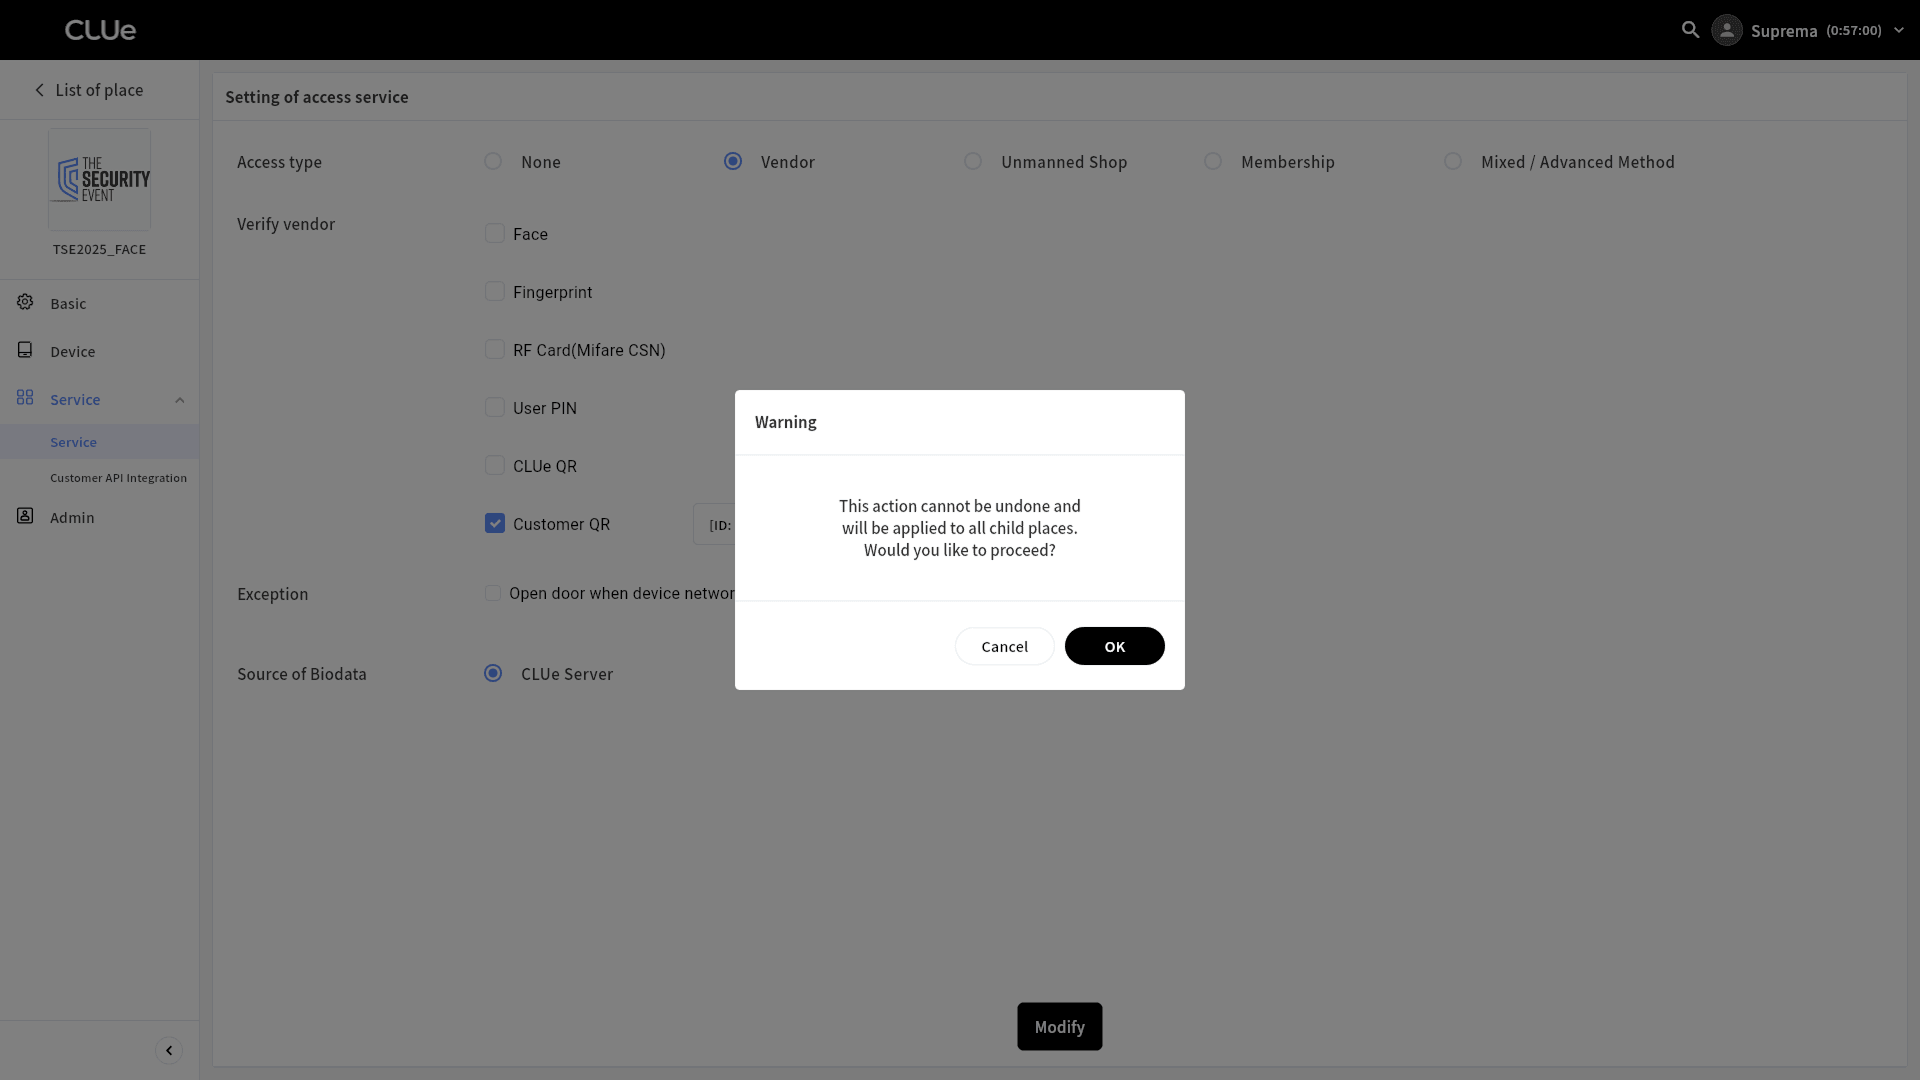
After you assign the API registered to the credential and click the Modify button, a confirmation dialog asks whether to apply the change to sub-places.
-
OK: The same settings apply immediately to all sub-places in the current place group. Existing place-specific overrides are overwritten by the place group values.
-
Cancel: Do not save the changes.
In most cases, place group-level settings are enough to keep all sub-places consistent. If you need a different API for a specific place, see #spaceOverride.
Step 4 — Set a place-specific override (optional)
This section explains how to assign a different API only to a specific place, instead of the settings inherited from the place group. Settings applied only to a specific place do not affect other places or the parent place group.
-
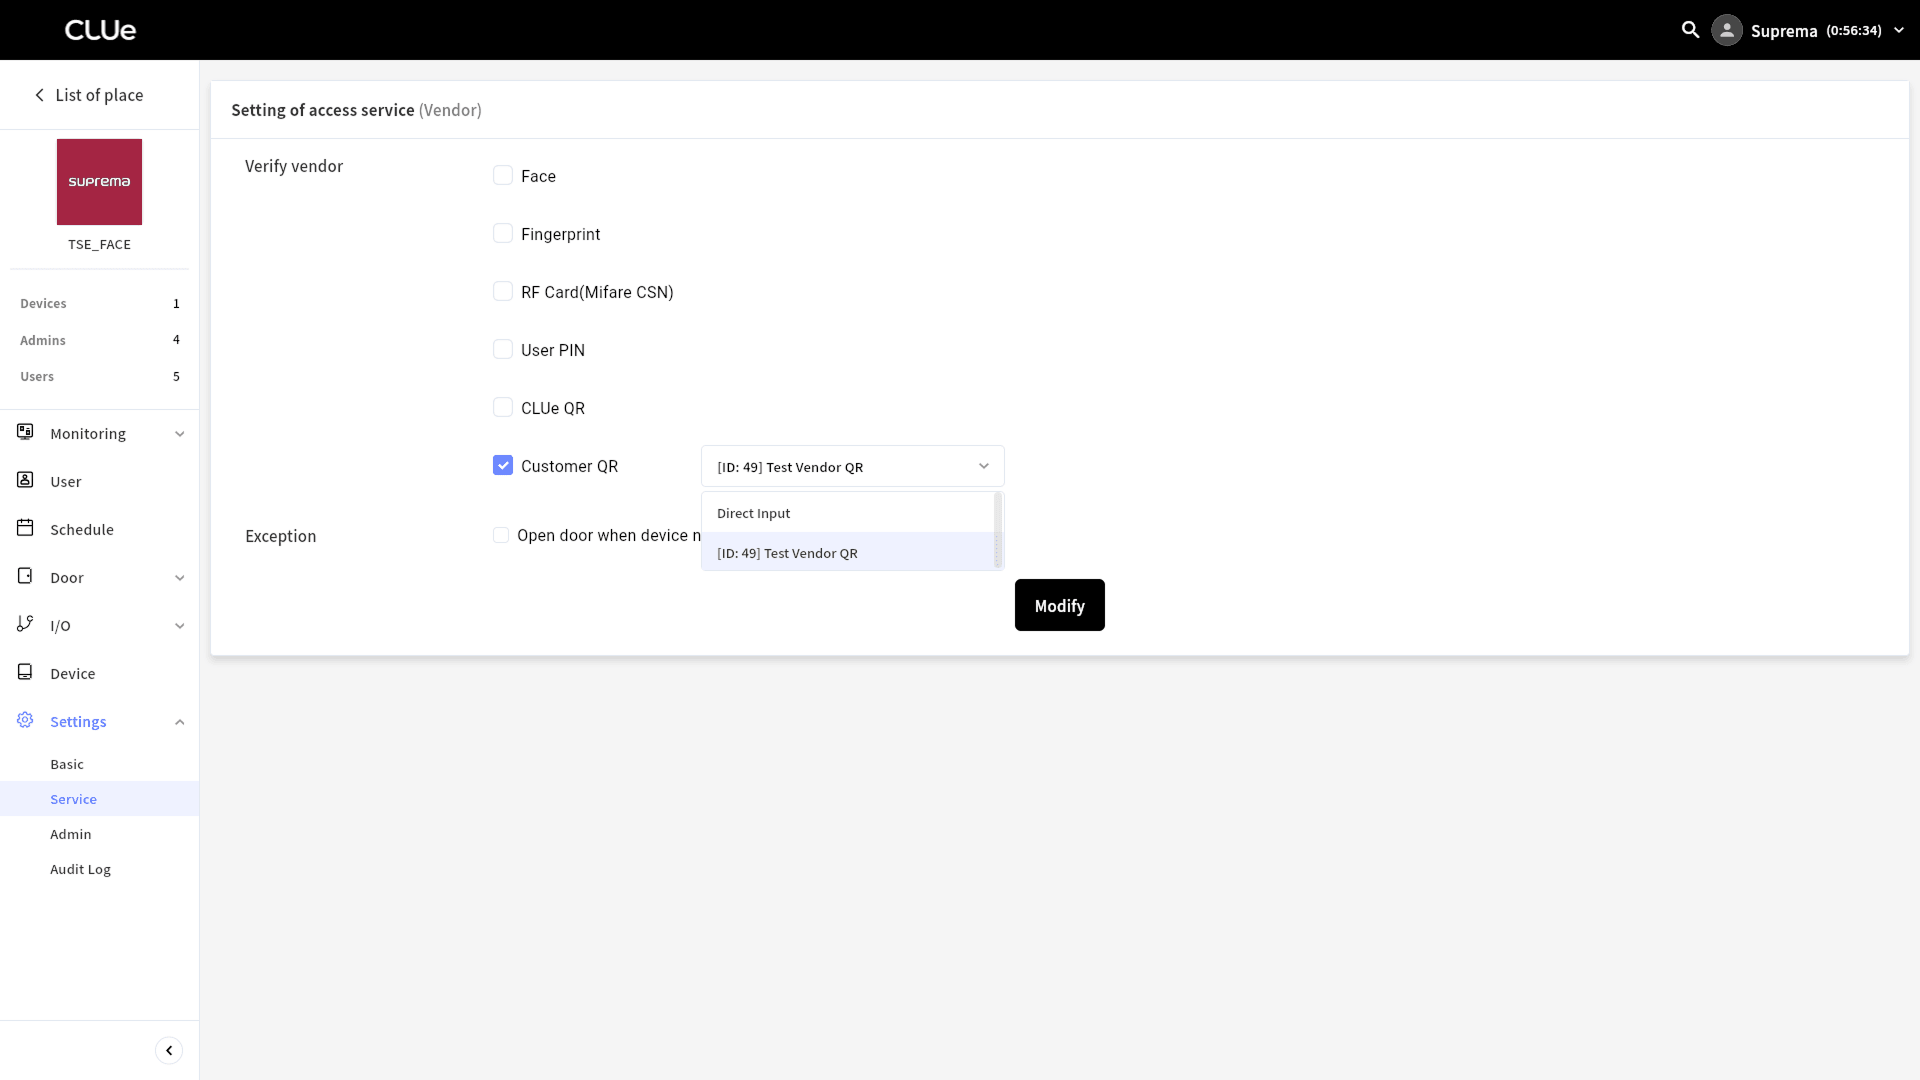
Move to a specific place under the place group.
-
On the left sidebar, click Settings → Service.
-
In each credential dropdown in the Verify vendor section, select the different API to use only for this place.
-
Click the Modify button to save the changes.
The changes save only to the current place. They do not apply to other places.
Only place administrators invited as administrators for that place can access Settings → Service.
If you change the credential-to-API assignment in the parent place group after assigning an API to a specific place and save, the place-specific override is overwritten by the place group values. If you need to keep place-specific settings after a place group change, assign them again in that place’s Settings → Service after updating the place group.
Summary of input rules
| Field | Required | Rules |
|---|---|---|
| Connector Name | Yes | Up to 64 characters |
| Auth type | Yes | Cannot change after saving |
| Webhook URL | Yes | https:// required / up to 512 characters / CLUe sends only HTTP POST/application/json requests to this URL |
| Number of Auth type APIs | - | Up to 3 APIs per credential type can be registered |
| Custom Headers | Optional | Up to 10 Key/Value pairs / duplicate names not allowed (case-insensitive) |
| Auto Fields | Optional | Include only checked fields in the request / key names can be edited / the system fills in the values automatically |
| Manual Fields | Optional | Up to 10 fields total with auto fields / duplicate names not allowed / values convert to JSON data based on the selected type (STRING / NUMBER / BOOLEAN) |
| User Key (Test) | Depends on Auth type | 1 to 64 characters |
| Device ID (Test) | Yes | Only 9 to 12 digits |
| Response Parsing | - | At least one of statusCode or Success Result JSONPath is required. If both are entered, combined validation activates. |
| statusCode | - | Integers in the 100 to 399 range / up to 3 / duplicates not allowed |
| Success Result JSONPath | - | 1 field: Key + Value + data type (BOOLEAN / STRING / NUMBER) |
| Success Message JSONPath / Failure Message JSONPath | Optional | If specified, the key to extract from the response body. The value must be a string, and it must fit the device screen. If not specified, no message appears on the device. |
| Save conditions | - | Can save only after a successful test |
Troubleshooting
Access issues (step-by-step troubleshooting)
See #settingWorkflow to narrow down the issue area.
| Steps | Symptom | Check items |
|---|---|---|
| 1 | A specific credential is not recognized | Make sure the credential is enrolled on the device and active. |
| 2 | Device-server communication failed | Check the network connection and the device enrollment status. |
| 3 | The request does not reach the customer server | Check the registered URL (HTTPS), custom headers, and firewall rules. |
| 4 | The customer responds, but all attempts are denied | Check the judgment criteria, including the judgment mode, success key/value, and HTTP status code. |
| 5 | Allow/deny works correctly, but no message appears | Check Success Message JSONPath/Failure Message JSONPath and the message string in the response body. |
Save Configuration button disabled
If you cannot click the Save Configuration button, check the following in order.
-
Required fields: Make sure none of Connector Name, Auth type, or Webhook URL is blank.
-
Webhook URL: Make sure it starts with
https://and does not exceed the 512-character limit. -
Manual Fields: Make sure the value can convert to the selected type (
STRING/NUMBER/BOOLEAN).Example: when you enter a non-numeric character in
NUMBER -
Response Parsing: Make sure you entered at least one of statusCode or Success Result JSONPath.
-
If you use Success Result JSONPath, make sure you entered the
Key,Value, and data type. -
Success Message JSONPath/Failure Message JSONPath are optional and do not affect saving.
-
-
API test: Make sure at least one test succeeded. You cannot save without a successful test.
Test failure
Test failures fall into three types.
(A) Blocked during input validation
The request itself does not send because the input does not meet the rules.
| Symptom | Check items |
|---|---|
| Webhook URL format error | Make sure Webhook URL starts with https:// and does not exceed 512 characters. |
| Judgment criteria key format error | Make sure Success Result JSONPath, Success Message JSONPath, and Failure Message JSONPath use JSONPath format starting with $., up to 128 characters. |
| No judgment criteria specified | Make sure you entered at least one of statusCode or Success Result JSONPath. |
| Success status code range/count error | Make sure each value is in the 100 to 399 range, three or fewer values are set, and there are no duplicates. |
| Duplicate field key | Make sure the keys in Auto Fields and Manual Fields are unique and do not overlap. |
| Duplicate request header key | Make sure the request header keys are unique and do not overlap, case-insensitive. |
| Restricted header name used | Make sure you did not add Content-Type or Accept as custom headers. The system uses them as fixed values, case-insensitive. |
| Too many fields or headers | Make sure you have no more than 10 Auto Fields and Manual Fields fields, and no more than 10 custom headers. |
| Too many Auth type registrations | Make sure this credential type already has 3 registered APIs. |
| User Key format error | Make sure the User Key in the test console meets the allowed character set (letters, numbers, -, _, @, .) and the 1 to 64 character length. |
| Device ID format error | Make sure the Device ID in the test console is 9 to 12 digits. |
(B) Request sent, but the test failed
The test result shows success = false, and you cannot save in this state.
| Symptom | Check items |
|---|---|
| Connection failure / network error (no response from the customer server) | Check external access to the customer server, HTTPS certificate validity, firewall and port settings, and custom headers, such as expired tokens or typos. |
| Timeout (no response) | Customer server response delay, network status. The test fails if no response arrives within a few seconds. |
| Response received, but the body is not JSON | Check whether the customer returns a JSON response and whether the response Content-Type is set to application/json. This includes HTML error pages and blank text. |
(C) Response received, but the result is not as expected
With success = true, the actual HTTP status code appears in statusCode, and the customer’s raw response appears in TERMINAL OUTPUT. You can save, and you must configure response parsing based on the response at this step.
| Symptom | Check items |
|---|---|
| Status code received, but all access is denied | Modes 1 and 3: Check the list of status codes that count as success. Mode 2: Check the key/value condition in the body. The status code is ignored. |
| Body field condition does not match | Check the Key, Value, and data type (BOOLEAN / STRING / NUMBER) entered in Success Result JSONPath. Check whether the response is "true" (STRING) or true (BOOLEAN). The type must match. |
| Manual Fields shows in an invalid format in the request body | Check again whether the Manual Fields type (STRING / NUMBER / BOOLEAN) matches the actual input value. |
-
The test API shows the response body as is without parsing it, so use the actual response JSON shown in TERMINAL OUTPUT to match the JSONPath, key, and value settings.
-
See #accessTroubleshooting to identify the failure cause on the device side.
Duplicate name issue
The key names in Auto Fields and Manual Fields cannot overlap. Request header keys also cannot overlap. If you changed an Auto Fields key name, make sure it does not conflict with Manual Fields.
No message appears on the device
-
Make sure the response body actually contains the field specified by Success Message JSONPath or Failure Message JSONPath.
-
Make sure the value for that key is a string. Numbers, objects, and arrays do not appear.
-
Make sure the configured Success Message JSONPath / Failure Message JSONPath name matches the actual response key exactly.